The antefact is a new room without light, a big white wardrobe, and the desire to make a IoT device that I can use outside my house. For the IoT "flavour" I use Cayenne.
In this room I want make a hidden light behind the wardrobe. I want use the reflect of light upper the withe ceiling. I have mounted 5 mt of 5050 RGB LED strip up the wardrobe, and I've connected a Raspberry Pi (do you want one?) with Cayenne to Adafruit PC9685, that you can buy here, and after to my simple transistor board.
The Adafruit pca 9685 is a great shield that by the I2C connection give 16 pwm port. YES! It's great!
With this board you can use the servo motors, and also you can use a dimmable LED. But if you want use a long led strip, you must also use a 12V DC power supply. But all the system like Raspberry, PCA9685 and other, works by 5V DC power. For this reason I've made a simple transistor board for use 12 Volt power supply with all the components.
Step 1: Cayenne drag and drop IoT project builderCayenne is a great partner for IoT project. Cayenne supports many platforms, and you can use the dashboard to make your project. You can light a LED, or modify the temperature of your house by using your smartphone.
Cayenne is simple and free! Try NOW Cayenne. Use it for your project. The installation is automatic and very simple. See the docs of Cayenne. Take your Raspberry Pi and install on it Raspbian distro. Connect your Raspberry to your local network and to the internet.
Go to Cayenne and Sign Up. Use your smartphone iOS or Android, install the Cayenne app and find your Raspberry Pi:
Install the Cayenne demon on your Raspberry Pi. If you not find your Raspberry Pi, type in your Raspberry Pi terminal:
wget https://cayenne.mydevices.com/dl/rpi_pa6vva5ic6.sh
sudo bash rpi_pa6vva5ic6.sh -v
After the reboot of your Raspberry, you can see your device online. Then you can add a new widget. The widget is a PCA9685.
Choose extensions, and choose PWM. You can see the photo below.
Now you can choose the name and the device. You must choose the slave. Now try to add the PCA9685 device.
If the installation doesn't work, try to add manually the I2C configuration. Follow this guide to add I2C on your Raspberry Pi. After this you can see the slave address that you must add to Cayenne installation page. Try to write on terminal of Raspberry Pi:
sudo apt-get update
sudo apt-get install i2c-tools
sudo i2cdetect -y 1
Now you can see the address. The address is ever 40. Now try to add the PCA9685 device to your Cayenne Dashboard.
Step 3: Wire the hardwareNow is the hardware time!
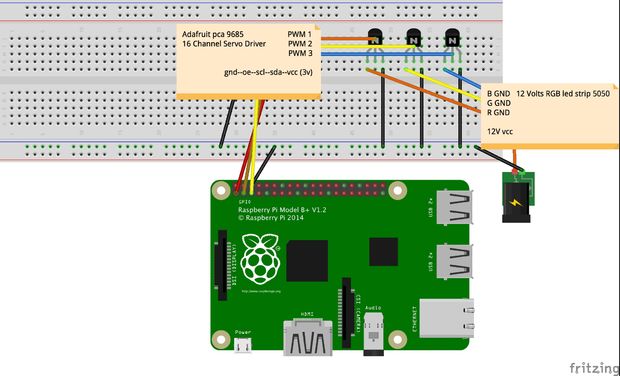
Try to connect the components. I've used Fritzing, but Fritzing don't have yet Adafruit PCA components. For this reason, I've used a note.
Connect the components. You have to make two controls for the 12 Volts connections.
If you connect the cable in wrong way you can burn all. The Raspberry Pi and the Adafruit PCA9685. The 12 VCC+ (anode) only connects to RGB led strip. You have to connect the - (cathode) of 12V battery to your transistor shield or your bradboard. The led strip is connected to 12V battery (+), and the three cathode Red, Green, and Blue, are connected to three transistors.
Now you can test all the project. I have mounted the project in my room. This is the final result! Great! An emotional room that I can command by my smartphone or my iPad from anywhere in the world! This is the power of Internet of Thing. This is the power of Cayenne!


Comments
Please log in or sign up to comment.