
![Raspberry Pi IR Remote with MATRIX Creator [DEPRECATED]](https://prod.hackster-cdn.online/assets/transparent-a0c1e3063bcabc548a5f3fa7328f3c1c97f747e6e764da4c14439567baa79ae1.gif)


![Raspberry Pi IR Remote with MATRIX Creator [DEPRECATED]](https://hackster.imgix.net/uploads/attachments/176016/Screen%20Shot%202016-07-28%20at%206.45.34%20PM.png?auto=compress%2Cformat&w=900&h=675&fit=min)
Hardware components | ||||||
 |
| × | 1 | |||
 |
| × | 1 | |||
| × | 1 | ||||
| × | 1 | ||||
Follow the new guide here.
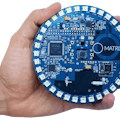
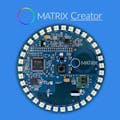
IntroductionThis tutorial will help you build the ultimate universal remote control using a Raspberry Pi and MATRIX Creator, the first IR remote receiver/transmitter add-on for Raspberry Pi.
We are using LIRC (Linux Infrared Remote Control), that is appropriate for this job. It simplifies many of the difficult tasks that we need to accomplish.
Step 1: Parts that you'll need- Raspberry Pi 2 or 3.
- 5V 2.0A Power Supply.
- An IR enabled device supported by LIRC (A properly documented device will make your life easier)
MATRIX Creator has two IR Emitters, one on the top side of the board and another one on the bottom side of it. It allows to control the devices regardless of board position.
Also it has an IR Receiver, TSOP573. It allows you to receive commands from virtual any IR transmitter.
Step 3: Setting up the SoftwareWelcome to the MATRIX Creator! To enjoy your new board you’ll need to set it up. First, you need to have Raspbian installed on your Raspberry Pi. If you don’t have it, you can download it and follow the instructions.
Then you need to install the software that will allow you to program the MATRIX Creator. To do it, you need to configure APT. The following steps should do it:
echo "deb http://packages.matrix.one/matrix-creator/ ./" | sudo tee --append /etc/apt/sources.list
Now update the package list.
sudo apt-get update
Then you can install the required packages.
sudo apt-get install matrix-creator-init cmake g++ git
Now reboot the Raspberry Pi. After rebooting the FPGA and the SAM3 MCU will be programmed for you automatically. That is, after every reboot the FPGA will be programmed for you with the default firmware.
If you wish, you can also learn more about other features of MATRIX Creator on Github Questions? Post them on raspberrypi.stackexchange.com! Use the tag #matrix-creator.
Step 4: Test MATRIX CreatorWhen you install the MATRIX Creator package you are also setting LIRC in your Raspberry PI.
Feel free to test the IR receiver with your TV remote, a LED in MATRIX Creator blinks whenever you press a button in the remote
Step 5: Test LIRC resourcesUsing LIRC software Run the command and press remote buttons at the sensor and you should get some feedback. Its necessary to stop LIRC service in order to release the IR resource.
sudo /etc/init.d/lirc stop
mode2 -d /dev/lirc0
When you do this, run the command and press some buttons in the remote while aiming it at the sensor, you should get some feedback. It should responds something similar to:
pi@user:~$ sudo /etc/init.d/lirc stop
[ ok ] Stopping lirc (via systemctl): lirc.service.
pi@user:~$ mode2 -d /dev/lirc0
space 7583853
pulse 2498
space 524
pulse 1278
space 519
pulse 734
space 461
pulse 1309
space 488
pulse 714
space 481
pulse 1309
space 488
Next we run the following command while in the user directory (e.g.: /home/pi ) directory, this will record the remote control commands.
irrecord -d /dev/lirc0 ~/NAME_OF_CONTROL.conf
Follow the instructions provided. When it asks for key names you must use the predefined names. To get the names I like to open a new window and run the command.
irrecord --list-namespace
When you finish this process, it generates a file like the following:
# Please make this file available to others
# by sending it to
#
# this config file was automatically generated
# using lirc-0.9.0-pre1(default) on Tue Jul 26 21:01:56 2016
#
# contributed by
#
# brand:                       /home/pi/samsung.conf
# model no. of remote control:
# devices being controlled by this remote:
#
begin remote
  name  SAMSUNG
  bits           16
  flags SPACE_ENC|CONST_LENGTH
  eps            30
  aeps          100
  header       4572  4399
  one           638  1597
  zero          638   480
  ptrail        639
  pre_data_bits   16
  pre_data       0xE0E0
  gap          107726
  toggle_bit_mask 0x0
      begin codes
          KEY_POWER                0x40BF
          KEY_1                    0x20DF
          KEY_2                    0xA05F
          KEY_3                    0x609F
          KEY_4                    0x10EF
          KEY_5                    0x906F
          KEY_6                    0x50AF
          KEY_7                    0x30CF
          KEY_8                    0xB04F
          KEY_9                    0x708F
          KEY_0                    0x8877
          KEY_MUTE                 0xF00F
          KEY_CHANNELUP            0x48B7
          KEY_CHANNELDOWN          0x08F7
          KEY_VOLUMEUP             0xE01F
          KEY_VOLUMEDOWN           0xD02F
          KEY_MENU                 0x58A7
          KEY_EXIT                 0xB44B
          KEY_UP                   0x06F9
          KEY_DOWN                 0x8679
          KEY_LEFT                 0xA659
          KEY_RIGHT                0x46B9
      end codes
end remote
Now you need to edit the configuration file /etc/lirc/lircd.confby doing the following: Copy the text above from "begin remote" all the way to "end remote" and open the configuration file by doing:
sudo nano /etc/lirc/lircd.conf
Replace the file content with the text you copied and save your changes. If you want to add any additional remote controls, just add more remote sections so it looks similar to this:
begin remote
  name  SAMSUNG
  bits           16
   …
end remote
begin remote
  name  SONY
  bits           16
   …
end remote
begin remote
  name  Panasonic
  bits           16
   …
end remote
Make sure to change the remote’s name by editing the name line.
Step 8: Send CommandsNow we finally got to the exciting part! sending remote commands to devices with lines such as:
irsend SEND_ONCE device KEYNAME
Device being the name you assigned to it. Enjoy seeing your device react!
Step 9: Test with Matrix Creator - HALNow we are using the Hardware Abstraction Layer of MATRIX Creator. Download the following repository from GitHub:
git clone https://github.com/matrix-io/matrix-creator-hal.g...
Go to the demos directory:
cd matrix-creator-hal/demos/
Compile the demo apps:
mkdir build
cd build
cmake ../
make
Finally run the app:
./ir_demo name_control
This code is a simple test to integrate the Everloop and LIRC software, it only works with KEY_POWER , KEY_VOLUMEUP and KEY_VOLUMEDOWN.


Comments
Please log in or sign up to comment.