


Hardware components | ||||||
 |
| × | 1 | |||
 |
| × | 1 | |||
 |
| × | 1 | |||
Software apps and online services | ||||||
| ||||||
| ||||||
 |
| |||||
 |
| |||||
Before you get started, let's review what you'll need.
- Raspberry Pi 3 (Recommended), Pi 3 Model B+ (Supported), or Pi 4.
- MATRIX Voice ESP32 version - Buy the MATRIX Voice.
- Micro-USB/USB-C power adapter for Raspberry Pi
- Micro-SD Card (Minimum 8 GB)
- A PersonalComputer to SSH into your Raspberry Pi
- Internet connection (Ethernet or WiFi)
The MATRIX Voice ESP32 version has an ESP-WROOM-32. This tiny module allows for standalone applications with WiFi and Bluetooth. We require the Raspberry Pi for the initial setup of the ESP32 MATRIX Voice and to serve as our Mozilla WebThings Gateway afterwards.
This guide goes over how to set up a MATRIX Voice ESP32 as a WebThing so that the Mozilla IoT WebThings Gateway can recognize it and configure it locally or remotely using the Gateway from any device.
The environment we're setting up in this guide will end with our PC serving as the development environment for our apps. The apps will then be sent to the Raspberry Pi which will upload them to the MATRIX Voice for standalone deployment.
1. Get Familiar with PlatformIO Code DeploymentFirst, follow our MATRIX Voice ESP32 PlatformIO guide to learn how to upload & run code on the ESP32.
Now that you're familiar with our ESP32 workflow, clone the repository for this project.
git clone https://github.com/matrix-io/esp32-mozilla-webthingNote: This project does not employ over the air programming due to OTA not working very well with web servers. You can incorporate this by adding OTA code sections from our base code here.Open platformio.ini located in the esp32-mozilla-webthing folder with PlatformIO and change the following values in platformio.ini to enable WiFi connectivity.
WiFi Credentials:
- "YOUR_WIFI_SSID"
- "YOUR_WIFI_PASSWORD"
All the steps to compile & deploy your code can be found in the guide linked in Step 1. Below is some helpful information.
Source Code for WebThing:esp32-mozilla-webthing/src/main.cpp
Once you have flashed the ESP32 MATRIX Voice with the WebThings code, remove it from the Pi and power it directly with a 5V power supply.
If the LEDs flash red, green, and then turn off, that indicates that your MATRIX Voice ESP32 is connected to WiFi.
Use any network scanner to find the IP of your MATRIX Voice ESP32.
Below are some network scanners available for phones:
It should show up as a generic Espressif device. Note down the IP for later use.
If you would like to see whether your code deployment worked, you can navigate to http://YOUR_MATRIX_VOICE_IP to see the WebThing JSON in your browser.
Follow this guide to set up the WebThings Gateway on your Raspberry Pi.
5. Add the ESP32 MATRIX Voice WebThing to the GatewayOnce on the Gateway things page, click on "+" sign on the bottom right corner to add a WebThing.
On the page where it says "Scanning for new devices...", click on "Add by URL..."
Enter the URL: YOUR_MATRIX_VOICE_IP/things/board
Then hit the "Submit" button.
Next, you will find a screen like below. Click "Save".
Then click "Done" below.
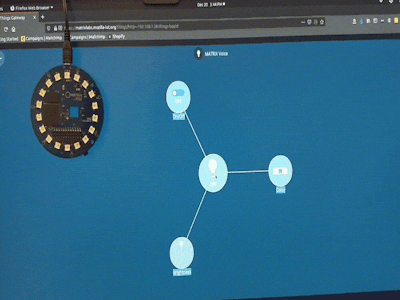
Your MATRIX Voice ESP32 will show up on the Gateway like below.
Click the little icon overlaid on the MATRIX Voice WebThing to see and manipulate its properties.
For more examples on how to add different properties & actions to WebThings, check out the webthing-arduino repo from MozillaIoT here. The comments in this example's code should also allow for easily adding new properties, say for reading sensors attached to any of the exposed GPIOs. Let us know if you have any questions below.
For more information on the Gateway and how to create custom rules for your home, check out this Mozilla guide.
The current implementation in this guide allows for LED color, brightness, toggle, and GPIO control on your standalone MATRIX Voice ESP32. Future guides will touch on incorporating voice activation to your Mozilla IoT Gateway through the MATRIX Voice ESP32 satellite!


Comments
Please log in or sign up to comment.