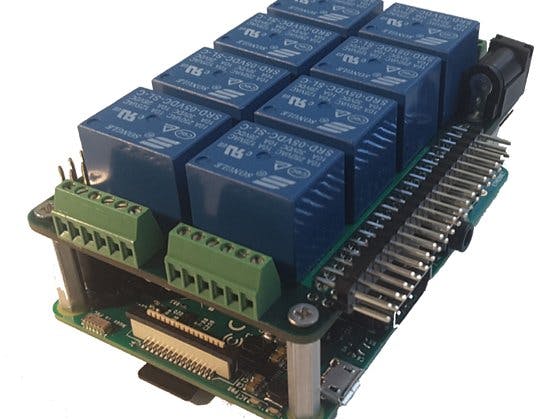
This project is part of a full home automation solution implemented on our residence. The design shown here has 8 stations with no humidity feedback, which is quite sufficient for most residential projects. It can be expanded to up to 64 stations for commercial installations.
If no humidity feedback is required, the cheapest solution is to use the 8-Relay Expansion Card (available soon) This stackable card for the 40-pin Raspberry Pi family packs 8 relays in the same form factor with Raspberry Pi.
Humidity sensors are cheap and can provide a water saving solution in regions where there is a shortage of water, like California. The Mega-IO card (available now) has 8 analog inputs, which could read the humidity from 8 irrigation zones.
Step #1: Design Your Irrigation LayoutWe needed 3 zones to irrigate the front yard, and 5 zones for the back. We used imaged of the actual landscape, and indicated the placement of the irrigation zones in circled numbers.
The BACK and FRONT buttons in the upper left toggle the yard images which show the irrigation zones. The Start Time can be typed. The ON/OFF Master Switch controls the whole system.
The five STATION circles (three for the FRONT) permit turning on or off a station manually.
Run time for each station can be adjusted at 1 minute interval from the UP/DOWN arrows for each zone. Finally, run days can be selected from the check-boxes.
Step 3: Hardware InstallationInstall your Raspberry Pi and Mega-IO card in a location where you can run all the wires from your irrigation valves. You will also need a 5V power supply for Raspberry Pi, and a 24V power supply for your valves. Do not connect the valve wires to the Mega-IO relays until everything is checked and works.
Step 4: LAMP Software InstallationYou need a functional Raspberry Pi with LAMP (Linux, Apache, Mysql and PHP). You also need PERL support, which is standard on RASPBIAN. Ample instructions for installing all are available everywhere.
Step 5: Sprinkler Software InstallationThe Sprinkler software consists of the following files:
- /var/www/html/sprinklers/irrigation.html - browser interface
- /var/www/html/sprinklers/images/ - supporting images directory
- /var/www.html/sprinklers/css/ - supporting css directory
- /var/www.html/sprinklers/js/ - supporting js directory
- /var/www/html/sprinklers/getAny.cgi - called by browser to read database
- /var/www/html/sprinklers/setAny.cgi - called by browser to write database
- /home/pi/perl/io2db.pl - PERL program called by cron
- /home/pi/perl/log_file_sprinkler - log file for all sprinkler activity
- /etc/cron.d/CronJob1 - setup cron to run at 1 minute interval
- /home/pi/CronJobs/CronTask1 - cron script calling io2db.pl
CLICK HERE TO DOWNLOAD THE TAR ARCHIVE
Step 6: Create the Sprinkler DatabaseThe sprinkler database has two tables: timer_action and sprinkler. All the instructions for creating and initializing the database are listed in the mysql.txt file
If you followed the instructions correctly, you can load the main page into your browser and play with the settings. CLICK HERE FOR A DEMO.
If you installed the MEGA-IO software, you should be able to click on a station # and see the corresponding relay turning on and off.
CHALLENGE #1Install humidity sensors in all your irrigation zones. Use the analog inputs of the Mega-IO card to check the soil humidity. Change the browser interface to stop watering if a preset humidity level is reached.
CLICK HERE FOR AN INTERACTIVE DEMO
CHALLENGE #2Use your favorite web service to find out the weather in your zip-code area. Add a RAIN-DELAY selection to the GUI. Stop the irrigation on AUTO, if the chance of rain is high (you decide what means high, or select it from SETTINGS). Stop the irrigation manually for selected number of days.
CHALLENGE #3Expand the number of stations. Up to four Mega-IO cards can be used for a 32 station irrigation controller, or op to 8 8-Relays cards for up to 64 stations.


Comments
Please log in or sign up to comment.