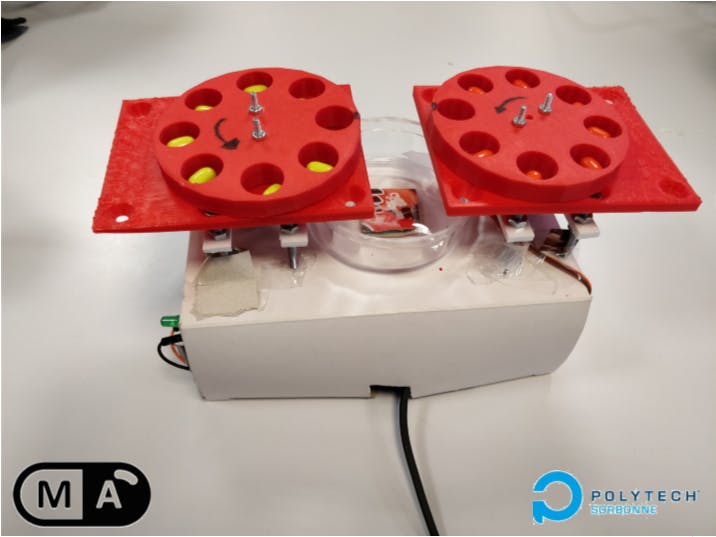
Nowadays when people have severe disease, they use pill dispenser to gather all their tablets into one place. Having all these drugs to handle can become very inconvenient. Plus, people around them barely know what they actually take, or what they need. Often, this lack of attention can become very dangerous for a patient. Here we present a cheap solution to keep track of your medication: a connected pill dispenser.
The systemWe printed 2 wheels, one for each kind of drugs. These can rotate thanks to our 2 servos :
After a determined number of rotations, we get the number of pills to take in the pot.
The rotation is controlled by the ESP8266 placed inside the box. It also controls the hall effect sensor. There is a magnet where you see a red spot under the pot. On the other side of the box, you have the hall effect sensor that tell you if the pot is there, so if the patient took his pills.
The entire system's communication is done through MQTT protocol, which is based on publisher/subscriber clients and a central broker redirecting information to right topics. A client can publish on a particular topic and clients who subscribed to that topic will receive the published message. For more details check out this link.
In this project we have 3 major communications :
The android application sends the prescription to the cloudant database, the Node-Red application retrieves that data and publishes information to the ESP8266.
Getting startedArduino IDE
First of all you need to make sure that your IDE's target board is the ESP8266. To do so, go under File > Preferences and paste the following url :
http://arduino.esp8266.com/stable/package_esp8266com_index.json
and hit OK. Now, by going to Tools > Boards > Boards Manager you can install nodeMCU 1.0 (ESP-12E Module) if it was not already there, or simply select it as your new target board.
Then, you can select libraries needed for this project, under Sketch > Include Library > Manage Libraries :
- esp8266webser
- esp8266wifi
- esp8266webser
- esp8266httpclient
- arduinojson
Finally download pubsubclient library from the following GitHub. Include this library by going under Sketch > Include Library > Add .zip Library.
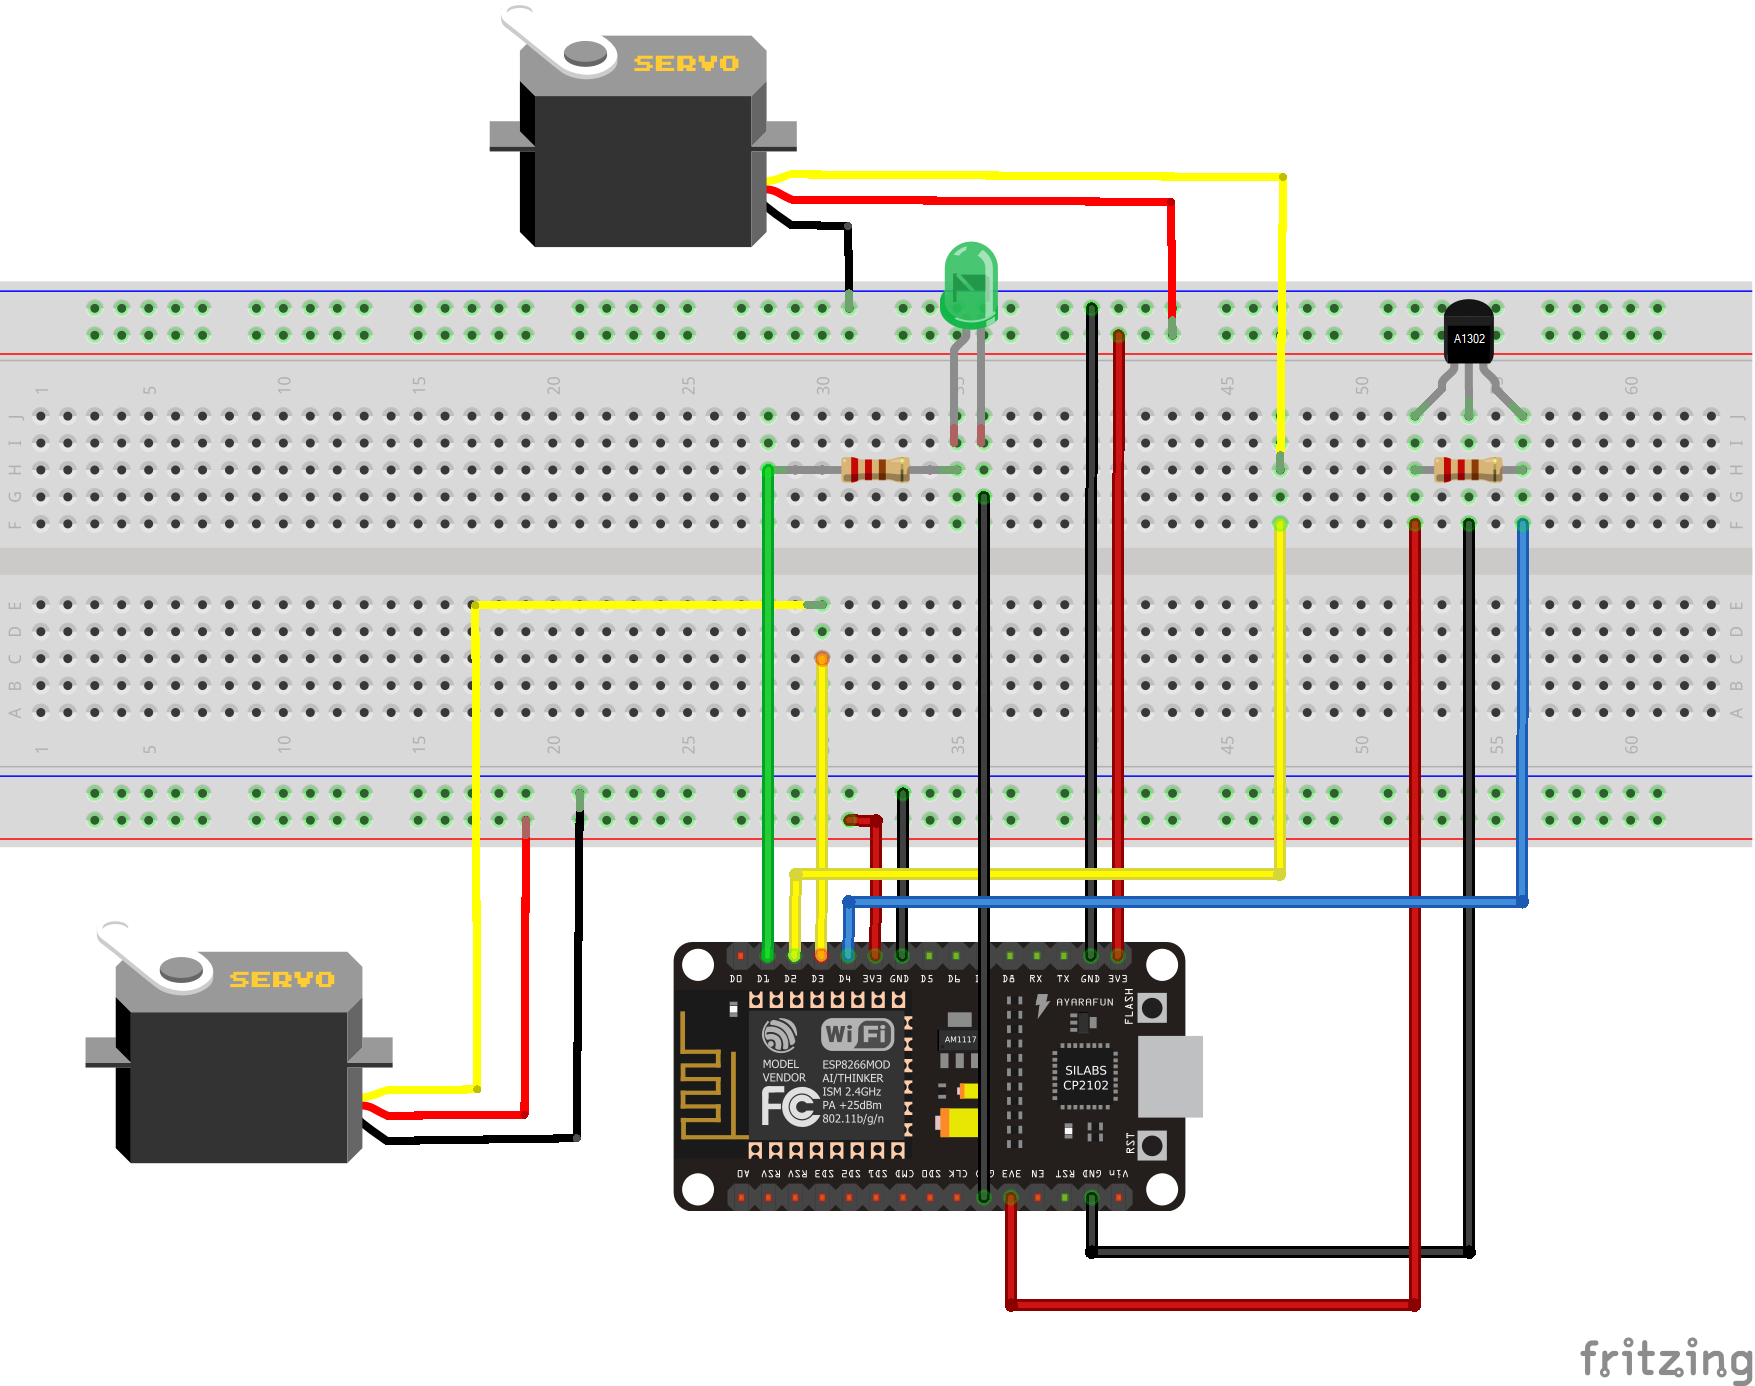
Note : You can download the program under the code section, and wire the LED, the 2 servos and the hall effect sensor just like the schematic shows it. Put your own information where it is indicated.
Bluemix
You will need a Bluemix account, follow the link below to register :
https://console.bluemix.net/registration/
Select Catalog, and search Node-Red. You will be asked to give your Node-Red application a name and you have to choose a cloudantNoSQLDB application.
You can navigate to your new database under your bluemix dashboard / Services, hit the Lauch button.
Before applying any changes to the Node-Red application, set up the database :
Choose the name of your database. The "Actions" column gives you access to "set permissions for" your database. Generate an API key, and save the password associated to that key. Give that key all the permissions it can have : read, write, admin, replication. Save your database id which looks like this :
584400a7-df99-4eec-a847-5ef9d85bf82b-bluemix
It is in the url of your database.
Note : Do not forget to save the generated password from Bluemix ! You cannot have access to it again. All these information will be needed for the android application.
Follow this tutorial to connect your ESP8266 to your Node-Red application.
Node-Red applicationLet's move on to the Node-Red application. As you saw in the system schematic, we need 3 communication canals covered by our application.
1. From the android application to Node-Red :
Topic Update : whenever there is a change in the database, the application publishes a message to that topic.
In Node-Red topics are represented by ibmiot nodes.
The first ibmiot node is an input. Set the input type to device event with a device id : androidapp. The event will be our topic Update, with a string format. This is linked to a cloudant node that allows us to access data from the database. Put the name of your database and select "search by all elements".
The first function node takes the number of pills from the database to initialize an array of 2 drugs.
/* FIRST NODE FUNCTION */
var myStringArray = msg.payload;
var arrayLength = myStringArray.length;
var drugs = {"Morning":{"drug1":0,"drug2":0},
   "Afternoon":{"drug1":0,"drug2":0},
   "Noon":{"drug1":0,"drug2":0}
};
var cpt = 0;
for (var i = 0; i < arrayLength; i++) {
   var result = (myStringArray[i]);
   if (result.index !== 0){
       if(cpt === 0){
           drugs.Morning.drug1 = result.numberPillMorning;
           drugs.Afternoon.drug1 = result.numberPillAfternoon;
           drugs.Noon.drug1 = result.numberPillNoon;
           cpt = 1;
       }
       else{
          drugs.Morning.drug2 = result.numberPillMorning;
          drugs.Afternoon.drug2 = result.numberPillAfternoon;
          drugs.Noon.drug2 = result.numberPillNoon;
       }
   }
}
msg.payload = medocs;
return msg;
/* END FIRST NODE FUNCTION */
The second function node creates a string with all information from the array :
/* SECOND NODE FUNCTION */
var string = msg.payload.Morning.drug1 + ";"
string += msg.payload.Afternoon.drug1 + ";"
string += msg.payload.Noon.drug1 + ";"
string += msg.payload.Morning.drug2 + ";"
string += msg.payloadAfternoon.drug2 + ";"
string += msg.payload.Noon.drug2 + ";"
var msg = {'payload':string};
return msg;
/* END SECOND NODE FUNCTION */
That string will be sent to the ESP8266 via the ibmiot output node, which is a command type node with string format. This node is related to the TakeDrugs topic explained in the next section.
2. From Node-Red to the ESP8266 :
Topic TakeDrugs : the ESP8266 is the subscriber and the Node-Red application is the publisher. When the patient takes his drugs the Node-Red application publishes a message to notify the ESP8266 that he has to turn on the servos controlling the wheels containing drugs.
On the right, you can see an inject node. This node tells at what time the patient has to take his drugs on mornings, afternoons and noons.
Put JSON format in this node and add the following code :
{"Morning": { "hour": "XX:XX" },"Afternoon": { "hour": "XX:XX"}, "Noon": { "hour":"XX:XX"}}
Replace xx:xx by your desired hour.
Add 3 functions nodes with the following code :
var string ="on_override"+msg.payload.YYYY.hour
var msg = {'payload':string};
return msg;
Replace YYYY by Morning, afternoon, or noon depending on which function it will be.
Nodes after are Big Timer.
Finally, add a switch node : set it for string == OutputON. That node is connected to the ibmiot output node.
By doing this you have 2 options to send the command to the ESP8266, the time you set or the injet node OutputON (which is SortieOn on the schematic).
At the end of this section your Node-Red flow should look like this :
3. From the ESP8266 to Node-Red : The ESP82266 publishes to 3 different topics :
- Topic DrugNotTaken : the Node-Red application will start a timer that is going to send a reminder once the timer is expired. The LED blinks whenever there is a reminder.
- Topic StopTimer : if the reminder works and the patient takes his drugs, we stop the Node-Red timer.
Here the ibmiot output node has the same settings as the previous one. Both input ibmiot nodes are event type, support JSON format, and are related to DrugNotTaken and StopTimer topics.
- Topic ContactFamily : If we have no positive response after 4 reminders, we send an email to the family members.
The ibmiot input node is also event type for the ContactFamily topic and supports JSON format. Create documents in your database containing the email of the familly members and for all of them set the _id to Contact.
The first function node gets the email :
msg.payload="Contact"; return msg;
The second function node will turn it into a string :
var msg2; msg2 ={"to":msg.payload.to,"complete":true}; return msg2;
The last node allows you to enter the text of your email :
msg.payload="My text"; msg.topic ="My Topic"; return msg;
You will find the project files in this GitHub. This application allows you to create a new prescription, which are going to be uploaded automatically to your database. Change the settings.xml file with your own database name, API key/password and bluemix id.
And do not forget to hit the publish button, to notify database change to the Node-Red application.
Here you go, this connected pill dispenser can be improved in many ways, have fun !


Comments
Please log in or sign up to comment.