


Hardware components | ||||||
 |
| × | 1 | |||
 |
| × | 1 | |||
Software apps and online services | ||||||
 |
| |||||
| ||||||
| ||||||
This is a simple project utilizing Google Assistant and the app IFTTT, along with the Bolt WiFi Module. It consists of 4 basic steps.
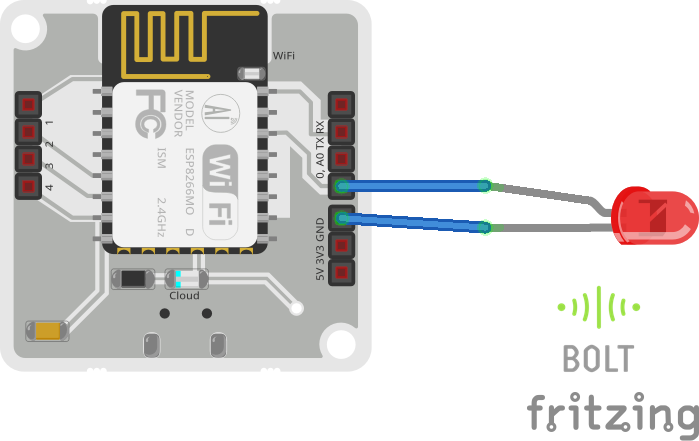
Step 1: Hardware Setup- Take your LED and identify the positive and negative ends. The longer leg is positive, while the shorter leg is negative.
- Once you have identified the ends, insert the the longer end of the LED into any of the GPIO Pins of your Bolt WiFi Module, i.e Pin 0, 1, 2, 3 or 4 (This example will be done by using Pin 0, as it is closest to the GND pin, if you wish to utilize the other GPIO pins be careful and use a wire connector soas to not break the LED).
- Insert the the shorter end into the GND.
- Make sure your connections are tight and only then switch power on your Bolt WiFi Module. Not ensuring to do so can lead to damaging your circuit components.
- Login into your Bolt Cloud account.
- Click on the API tab and click on Enable to generate an API key if you have not done so already.
- Now, copy your API key by clicking on the copy button and save it for later.
- Click on the Device tab and doing the same, copy your Device ID using the copy button.
LED stands for Light Emitting Diode, which means it gives out light as an output when connected in a circuit. So now we will write a digitalWrite command to send to the WiFi module from the internet to switch on or off the LED. Click here to read more about the digitalWrite command.
The syntax of the command is: https://cloud.boltiot.com/remote/API_KEY/digitalWrite?pin=PIN_NUMBER&state=HIGH/LOW&deviceName=DEVICE_ID
Here we are utilizing the GPIO Command digitalWrite where Parameters are as follows:
1. API_KEY= The API Key you have copied from the Bolt Cloud Dashboard.
2. PIN_NUMBER= The Pin to which you have connected the LED i.e 0, 1, 2, 3, 4.
3. HIGH/LOW= HIGH will turn on the LED while LOW will turn it off. We will be utilizing both these commands.
4. Device_ID= The ID of your Bolt WiFi module which you have copied along with the API key from the dashboard.
An example is: https://cloud.boltiot.com/remote/f1f918e9-d9c2-4e5b-aed0-b7cb743f74cf/digitalWrite?pin=0&state=HIGH&deviceName=BOLT13845850
Where the Parameters are highlighted in Bold.
Step 4: IFTTT integration using Google Assistant and Webhooks- Login to IFTTT and create an applet. Ensure your IFTTT account is the same account on your mobile where you'll be using Google Assistant.
- Click on '+This' and choose the Google Assistant service, and allow IFTTT to access your Google Account.
- Choose the Trigger 'Say a simple phrase'. Type in the phrase which will trigger the action and type in similiar phrases too. Eg: "Turn on the lights"; "Switch on the lights", etc.
- Click on '+That' and select Webhooks.
- Enter the API URL from the previous step which contains your own Parameters. Choose your Method as GET and Content type as Application/JSON.
- Click on 'Create Action' and 'Finish'.
- Now repeat the same process for turning off the LED.
Note: Make sure to say the phrase properly because the command is case sensitive. If you're having trouble with the Assistant not recognizing your phrase, try typing it.
Now you can use your assistant by saying 'Ok Google' and saying your phrase.
Congratulations, you've successfully connected your Google Assistant to your Bolt WiFi Module!


Comments
Please log in or sign up to comment.