


Hardware components | ||||||
| × | 1 | ||||
Software apps and online services | ||||||
 |
| |||||
Every journey into embedded systems and robotics starts with a simple yet essential project - blinking an LED. This guide will help you get acquainted with the Mercury Development Board, an advanced yet beginner-friendly microcontroller that takes you beyond traditional Arduino boards.
If you're new to the Mercury Board, this project will introduce you to:
✅ Basic coding with the Arduino IDE
✅ Interfacing an LED with digital pins
✅ Understanding how to upload and run your first program
By the end of this tutorial, you'll have successfully programmed your first LED to blink, marking the beginning of your journey into embedded systems and robotics.
Let's Get Started- Setting up the environment - if you haven't added the Mercury Board on your Arduino®, this is a good time to do so. Refer to this tutorial for setup: https://www.hackster.io/roboticsailabinfo/getting-started-with-mercury-arduino-setup-705f4d
- Plug the USB Cable to Mercury Board and connect it you your laptop.
- Refer to the code below
- To initiate upload process, press and hold FLASH button when "Connecting..." is visible on Arduino Terminal.
Crash Course: Understanding GPIO Control in the Arduino® Environment
For those new to the Arduino® coding environment, let's break down the basics of controlling an LED using digital GPIO (General-Purpose Input/Output) pins.
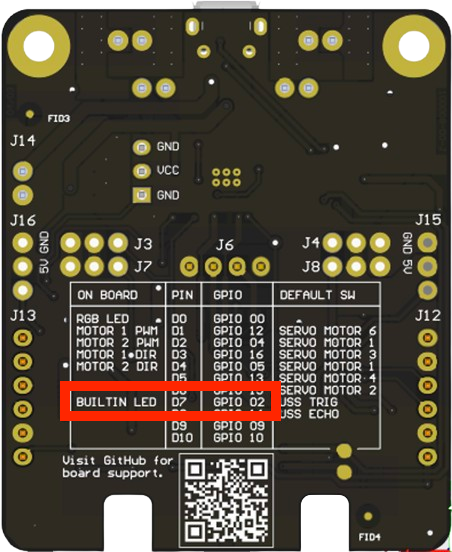
On the Mercury Board, the "BUILTIN LED" is connected to pin D7 or GPIO 02
How LED Control works
- To turn-ON the LED, we set the GPIO pin 2 to HIGH, applying 3.3V to the LED, which powers it up.
- To turn-OFF the LED, we set the GPIO pin 2 to LOW, cutting off power and turning if OFF.
By alternating between HIGH and LOW states with a programmed time delay, we create the blinking effect - a fundamental concept in embedded systems used for debugging and signaling.
Quick Video TutorialWe hope you enjoy all future projects that will be uploaded here. Cheers!!!


Comments
Please log in or sign up to comment.