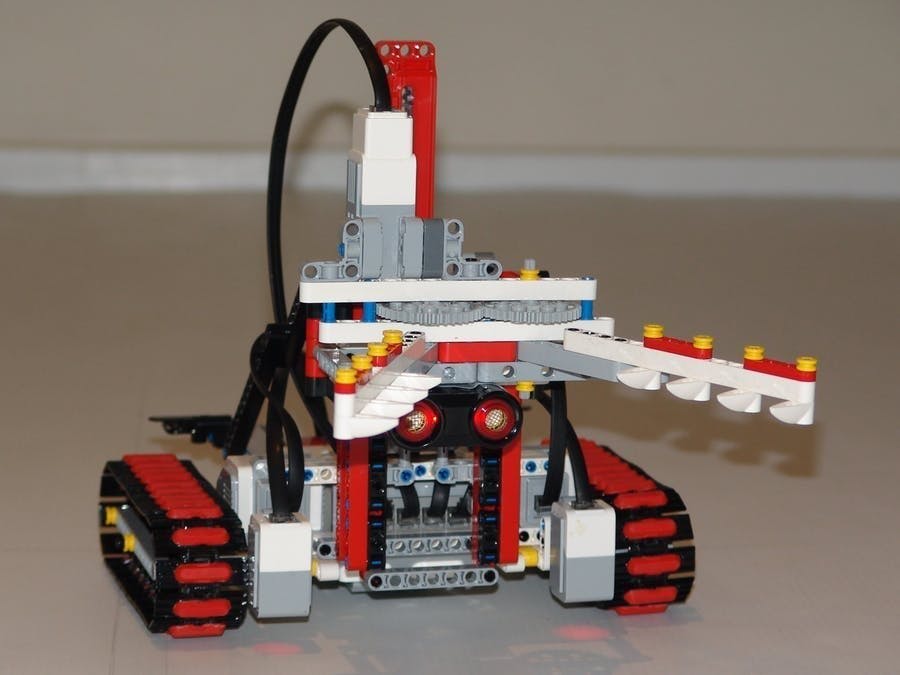
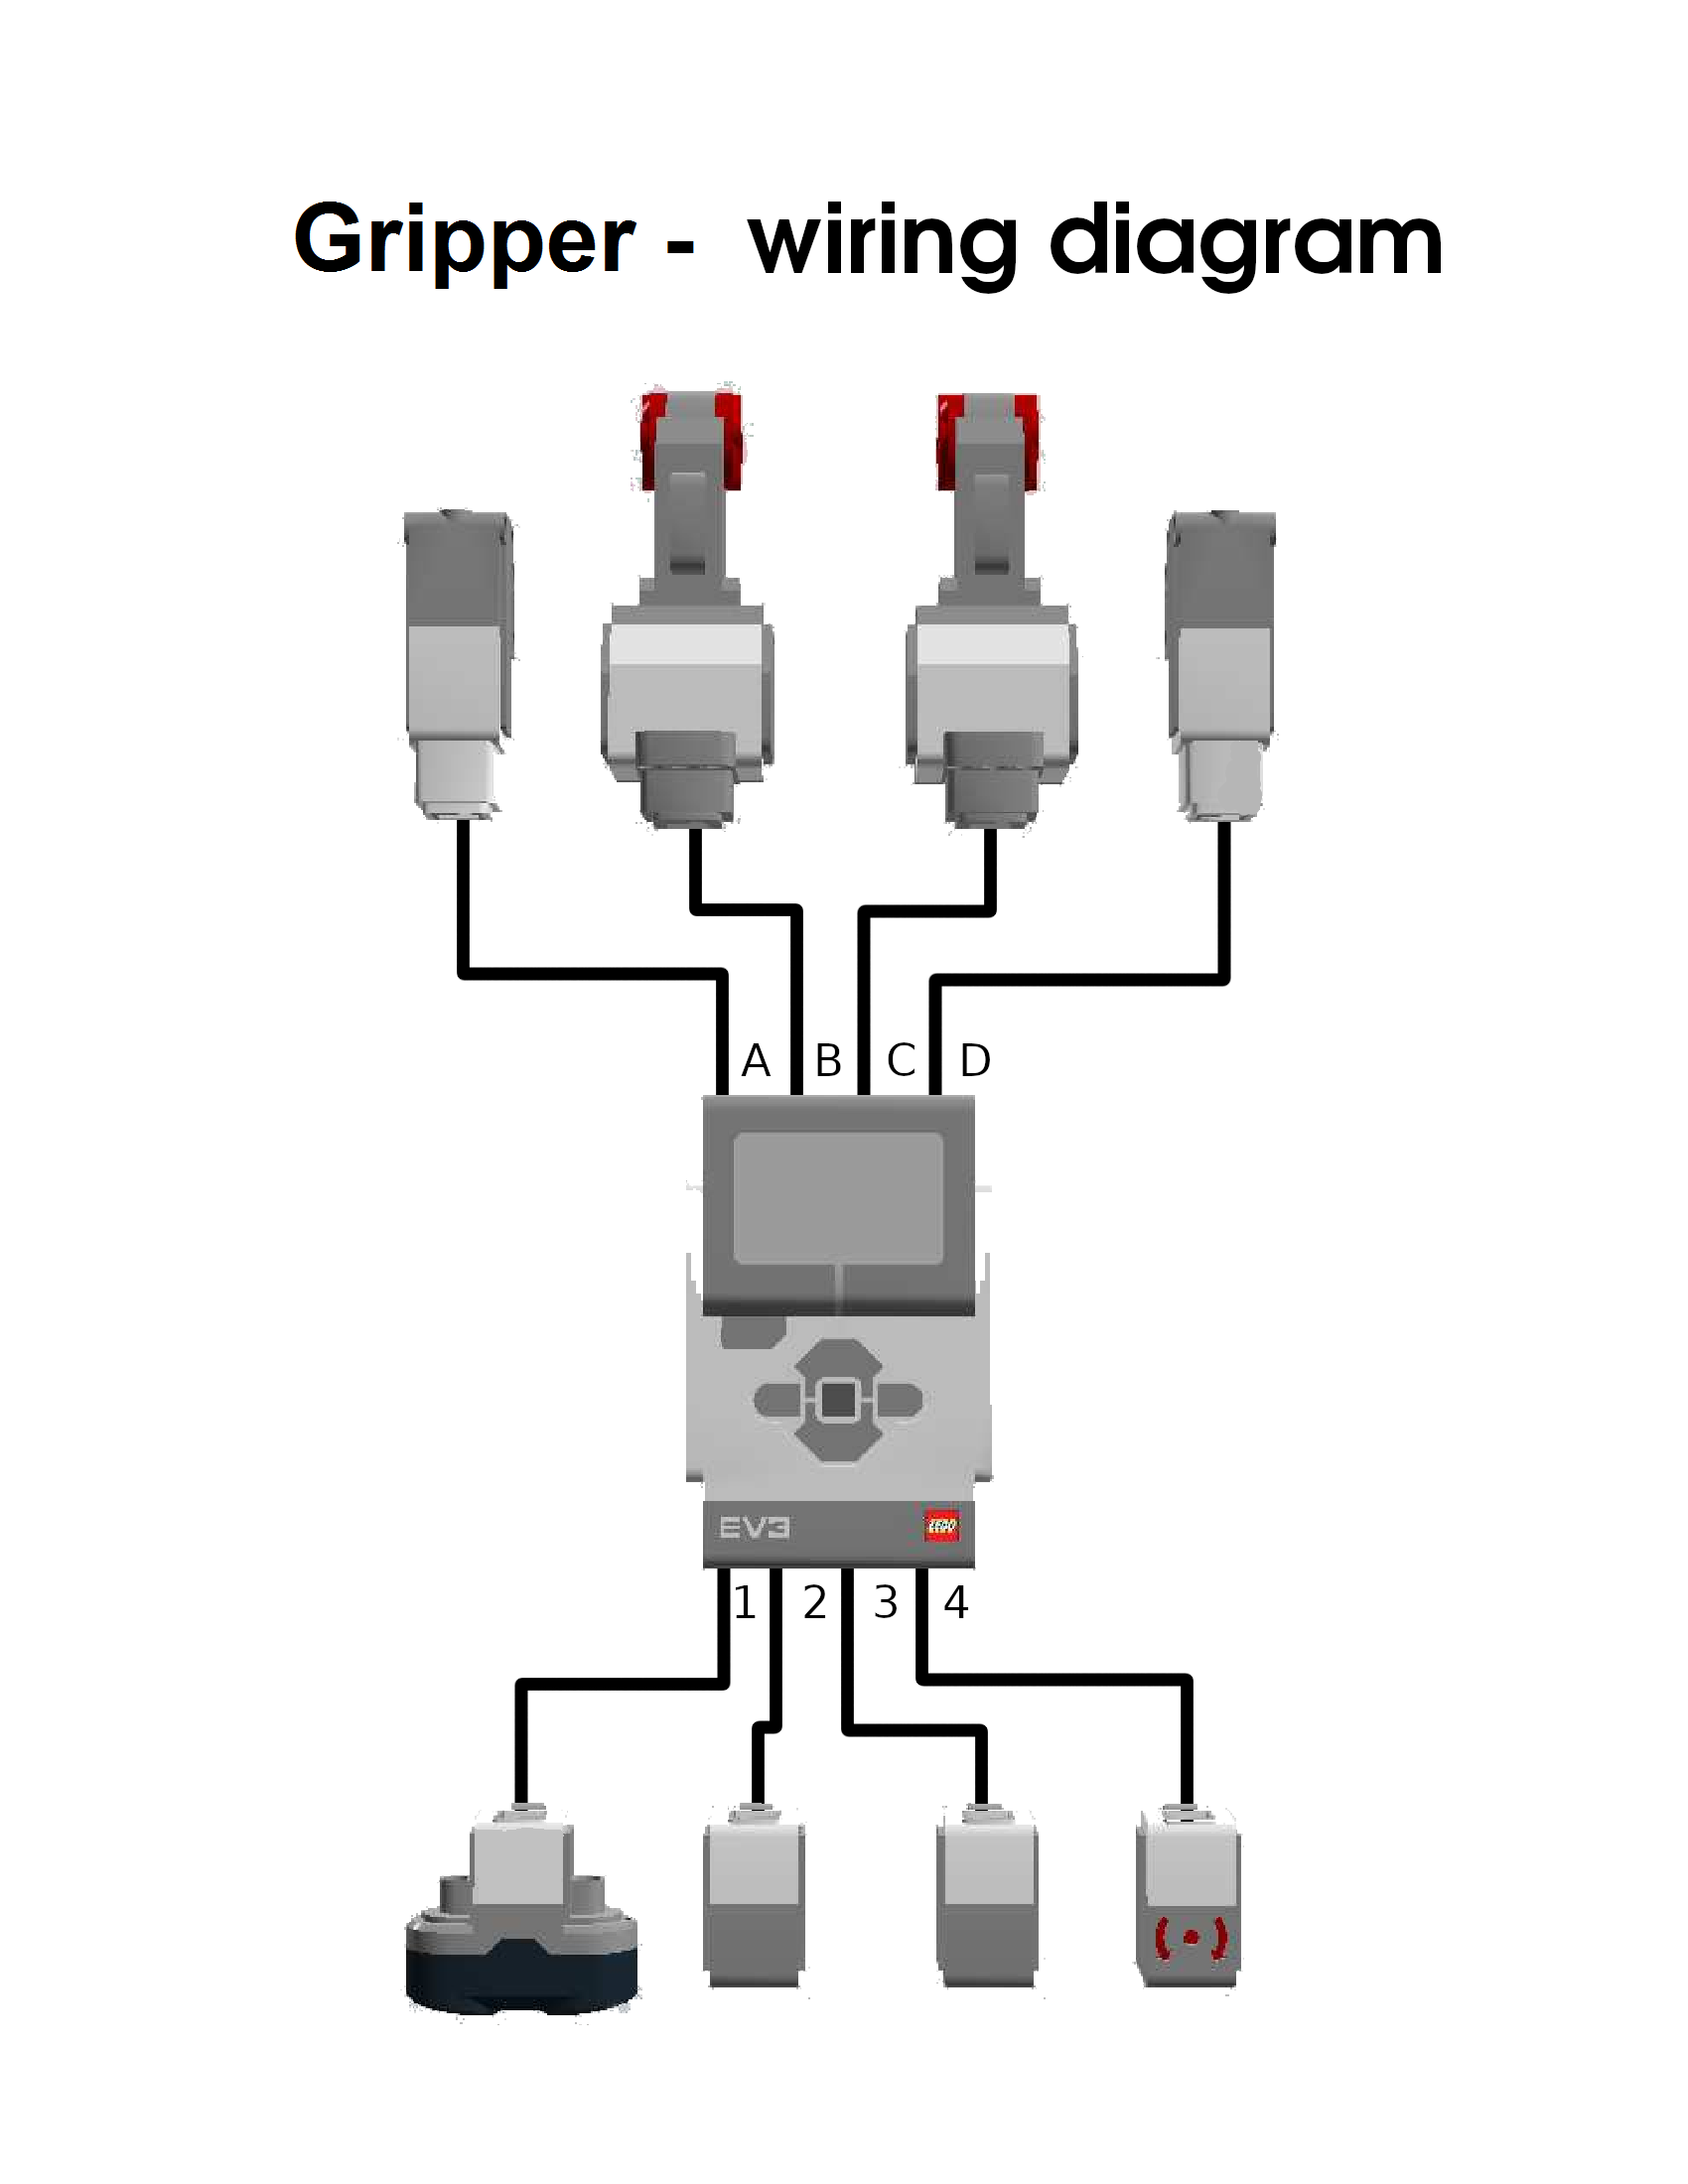
This project is a submission for a LEGO MINDSTORMS Voice Challenge. Here I tried to apply an Alexa-powered voice control to solve "navigate", "take" and "deliver" robotic problems and finally take back home three ladybugs. For demonstration I used a 2015 FIRST LEGO League map that we have in our robotics club. Navigate, take and deliver tasks are very common for robotic competitions such as Skills Ontario, FIRST LEGO League or Zone01.
PrerequisitesFor anyone, who is going to reproduce this project, I would suggest starting with looking at LEGO MINDSTORMS Voice Challenge page including Setup, Mission 1, Mission 2, Mission 3 and Mission 4. This will provide an overview of using Alexa-powered voice control to operate a LEGO MINDSTORMS EV3 robot as well as detail instructions of setting up development environment, creating a skill and working examples of the code. This project utilizes and extends approaches demonstrated in Mission 4.
VideoBuildingBill of materials, building Instructions and wiring diagram are included in the Attachments. The design requires extra LEGO parts in addition to LEGO Education EV3 Core Set - 45544, extra Color Sensor and extra Medium Servo Motor. These parts can be found in the bill of materials and purchased on LEGO marketplaces such as Brick Owl, Brick Link or Brick Scout.
Due to limitations of LEGO Digital Designer software, which was used to generate building instructions, the building instructions don't include installation of gear rack, gear rack housing and caterpillar tracks. These components can be installed at the end of building as shown on the cover image and video.
Walk-ThroughThis project adds a number of new features, comparing to the mentioned above Mission 4. You could see them on the video.
The robot can follow a line when "Follow line" command is issued. Line following is needed because robot cannot go straight for a long distance without extra control. It is even visible on the video when robot goes backward for 14 inches, it deviates from the line at the end.
The design includes two Color Sensors on front left and front right sides of the robot for advanced navigation functions. The robot needs to know, which of these sensors should be used for line following. A sensor name (left or right) needs to be provided to complete this command. For example "Follow line using right sensor". The following code snippet shows implementation of line following function:
def _follow_line_thread(self, sensor, speed: int):
    """
    Follows line using reflected_light_intensity value of colour sensor.
    """
    print("Follow line: Sensor = {}, speed = {}".format(sensor, speed))
    if sensor in Direction.LEFT.value:
        self.colour2.mode = self.colour2.MODE_COL_REFLECT
        reflected_light_intensity = self.colour2.reflected_light_intensity
    elif sensor in Direction.RIGHT.value:
        self.colour3.mode = self.colour3.MODE_COL_REFLECT
        reflected_light_intensity = self.colour3.reflected_light_intensity
    else:
        return

    self.moving = True
    while self.moving:
        prev_reflected_light_intensity = reflected_light_intensity
        if sensor in Direction.LEFT.value:
            reflected_light_intensity = self.colour2.reflected_light_intensity
            # Follow line on the left side
            d = - 0.5 * (reflected_light_intensity - 50.) - (reflected_light_intensity - prev_reflected_light_intensity)
        elif sensor in Direction.RIGHT.value:
            reflected_light_intensity = self.colour3.reflected_light_intensity
            # Follow line on the right side
            d =   0.5 * (reflected_light_intensity - 50.) + (reflected_light_intensity - prev_reflected_light_intensity)
        self.drive.on(SpeedPercent(max(min(-speed + d, 100.), -100.)), SpeedPercent(max(min(-speed - d, 100.), -100.)))

    self.drive.off(brake = False) # This thread operates motors and needs to stop them
    if sensor in Direction.LEFT.value:
        self.colour2.mode = self.colour2.MODE_COL_COLOR
    elif sensor in Direction.RIGHT.value:
        self.colour3.mode = self.colour3.MODE_COL_COLOR
At the beginning sensor mode is changed to "reflected light intensity". When it happens sensor light becomes red. You may notice this on the video. Initial value of reflected_light_intensity property is recorded for further calculations. In the while loop reflected_light_intensity property of the appropriate color sensor is used to calculate speed for each motor.
Prior to the while loop "self.moving" property is set to "True" and a while loop is executed while this property remains "True". It can be changed to "False" when robot reaches its destination: when it detects an obstacle or drives for a certain distance. These options correspond to the following voice commands:- "Follow line using right sensor until obstacle" and- "Follow line using right sensor for 14 inches"respectively. Both options of the "Follow line" command were demonstrated on the video. Another option to terminate line following is issuing a "Stop" command. It stops any moving action of the robot including moving forward (when it is used with or without line following) or moving backward as well.
"Follow line" command is a part of MoveIntent and handled by MoveIntentHandler the same as other move types (forward and backward) because they have common attributes:- Condition ("until obstacle"). Move backward command cannot be used with this option because ultrasonic sensor is located on the front side of the robot only.- Distance ("for 14 inches"). It can be used for all three move types: "follow line", "forward" and "backward".- Sensor (left or right) attribute is unique for the "Follow line" command.
Without Condition or Distance attributes, "follow line", "forward" and "backward" move commands drive robot infinitely.
Here is an implementation of the _move function:
def _move(self, move, distance: float, condition, sensor, speed: int):
    """
    Handles move commands from the directive.
    :param move: the move direction
    :param distance: distance in inches
    :param condition: stop condition
    :param sensor: sensor port number that is used for line following
    :param speed: the speed percentage as an integer
    """
    print("Move command: ({}, {}, {}, {}, {})".format(move, distance, condition, sensor, speed))
    if move in Move.FORWARD.value:
        self.drive.on(SpeedPercent(-speed), SpeedPercent(-speed))
        if distance > 0.:
            threading.Thread(target = self._wait_until_rotation_changed_thread, args=[distance], daemon = True).start()
        elif condition in Condition.OBSTACLE.value:
            threading.Thread(target = self._search_thread, args=[5], daemon = True).start()

    if move in Move.FOLLOW_LINE.value:
        threading.Thread(target = self._follow_line_thread, args=[sensor, speed], daemon = True).start()
        if distance > 0.:
            threading.Thread(target = self._wait_until_rotation_changed_thread, args=[distance], daemon = True).start()
        elif condition in Condition.OBSTACLE.value:
            threading.Thread(target = self._search_thread, args=[5], daemon = True).start()

    elif move in Move.BACKWARD.value:
        self.drive.on(SpeedPercent(speed), SpeedPercent(speed))
        if distance > 0.:
            threading.Thread(target = self._wait_until_rotation_changed_thread, args=[distance], daemon = True).start()

    elif move in Move.STOP.value:
        self.drive.off(brake = False)

    elif move in Move.BRAKE.value:
        self.drive.off(brake = True)

    else:
        print("Unknown move: {}".format(move))
When ultrasonic sensor detects an obstacle withing given distance, which is 5 inches, an "Obstacle detected" event is sent back to the skill and the "self.moving" property is set to False:
def _search_thread(self, targetDistance: float):
    """
    Monitors the distance between the robot and an obstacle.
    If the minimum distance is breached, sends a custom event to trigger action on the Alexa skill.
    :param targetDistance: target distance in inches
    """
    count = 0
    self.moving = True
    while self.moving and count < 3:
        distance = self.ultrasonic.distance_inches
        if distance < targetDistance:
            count += 1
            print("Distance: {}".format(distance))
        else:
            count = 0
    if self.moving: # search has not been cancelled yet
        self.drive.off(brake = False)
        self.moving = False
        self._send_event(EventName.DETECTED, {'distance': distance})
        print("Distance is less than {} inches. Sending event to skill.".format(targetDistance))
    else:
        print("Turn cancelled")
Then _follow_line_thread function resets color sensor back to color mode and exits.
Driving with or without line following for a specific distance is implemented in similar way:
def _wait_until_rotation_changed_thread(self, distance: float):
    """
    Monitors rotation change of the robot.
    If the required rotation change is reached, sends a custom event to trigger action on the Alexa skill.
    """
    positionB = self.motorB.position
    positionC = self.motorC.position
    keep_moving = True
    self.moving = True
    position = distance * 360. / 4.5 # motor position in degrees
    if position < 240.:
        adjustedPosition = position / 6.
    else:
        adjustedPosition = position - 200.

    while self.moving and keep_moving:
        keep_moving = abs(self.motorB.position - positionB + self.motorC.position - positionC) / 2. < adjustedPosition

    if self.moving: # self.moving has not been cancelled yet
        self.drive.off(brake = False)
        self.moving = False
        time.sleep(1)
        print("Move completed: Required Rotation = {}, Measured Rotation: Motor B = {}, Motor C = {}".format(position, self.motorB.position - positionB,  self.motorC.position - positionC))
    else:
        print("Move cancelled: Required Rotation = {}, Measured Rotation: Motor B = {}, Motor C = {}".format(position, self.motorB.position - positionB,  self.motorC.position - positionC))
It also sets "self.moving" property to False when target distance is reached.
The turns are also implemented differently than in Mission 4 project. In this project we need the robot to turn on the same spot. This can be achieved by turning motors in different directions. We also need to turn the robot for a specific angle. For example: "Turn right for 90 degrees". The turn command is implemented in the TurnIntent and handled by TurnIntentHandler. The command has two attributes:- Direction (left or right) and- Angle.
In fact "turn" keyword is not mandatory. It would be sufficient to say "Right 90 degrees" or even "Right 90".
As discussed in the Sumobot project the best way to implement controlled turns is using Gyro Sensor. However, it is not reliable when it works with ev3dev and Bluetooth is enabled. I used on_for_rotations function to implement turns in this project with rotation calculated as angle * 0.0125:
if direction in Direction.RIGHT.value:
    self.drive.on_for_rotations(SpeedPercent(-speed), SpeedPercent(speed), angle * 0.0125, brake = False)

elif direction in Direction.LEFT.value:
    self.drive.on_for_rotations(SpeedPercent(speed), SpeedPercent(-speed), angle * 0.0125, brake = False)
else:
    print("Unknown direction: {}".format(direction))
This provides reasonable accuracy. If the turn isn't very accurate, another command to turn for a small (1 - 10 degrees) angle can be issued to correct it.
There are another three commands implemented in this project:- "Grab toy",- "Drop toy" and- "Good job"They are implemented in the CommandIntent and handled by CommandIntentHandler. These commands don't have any attributes and perform simple actions as shown here:
if command in Command.GRAB.value:
    self.lift.on_for_seconds ( 50,  1, brake = True)
    self.gripp.on_for_seconds(-50,  1, brake = True)

elif command in Command.DROP.value:
    self.lift.on_for_seconds (-50, .5, brake = False)
    self.gripp.on_for_seconds( 50,  1, brake = False)

elif command in Command.GOOD_JOB.value:
    threading.Thread(target = self._victory_dance_thread, daemon = True).start()
Here lift and grip are the objects corresponding to two medium motors installed on the robot:
self.lift = MediumMotor(OUTPUT_A)
self.gripp = MediumMotor(OUTPUT_D)
When ladybug toy is being drooped, the arms are programmed to lower approximately half way (for 0.5 second) in order to remain just above walls of the box, which is a ladybug's home. This allows to gently place ladybug into the box. When robot goes to pick up next ladybug, the arms need to be lowered at least to that position (half way) because ultrasonic sensor is attached to the same platform as arms. If the platform was moved to the top position (which is used to grab the toy), it would be too high for the sensor to detect a base, where ladybug sits. It also needs to be noted that the toy is invisible for ultrasonic sensor. This is the reason that I placed ladybugs on the wooden cubes to make it possible for ultrasonic sensor to detect them.
"Good job" command makes the robot reply "Thank you", applause and perform a victory dance, while Alexa skill plays appropriate background sounds and music. The dance can be interrupted by "stop" command.
Comments- Alexa gadget (Python) and Alexa skill (Node JS) full code packages can be found in the "Code" category of the Attachments.
- The project was completed before the updates were posted. However, I managed to execute Python code directly from the EV3 Device Browser in Visual Studio Code, and from the EV3 Brick interface without entering root password each time. In order to do that I performed the following:
First, I ran the command "sudo visudo" on the robot, which opened the sudo configuration file. Then, below all the other lines, I added the line:
robot ALL=(ALL) NOPASSWD: ALLwhich allows the robot to run commands as root without prompting for the root password.
Then I created a simple shell script:
#!/bin/bash
python3 gripper.py
and granted it executable permission. This script could be executed from EV3 Device Browser in Visual Studio Code or from the EV3 Brick interface to run Python code.


_dyynx0bnuf_8u4Xi07d4z.png?auto=compress%2Cformat&w=48&h=48&fit=fill&bg=ffffff)


Comments
Please log in or sign up to comment.