Introduction
HC-SR04 Ultrasonic Sensor
About Ultrasonic Distance Sensors
Sound consists of oscillating waves through a medium (such as air) with the pitch being determined by the closeness of those waves to each other, defined as the frequency. Only some of the sound spectrum (the range of sound wave frequencies) is audible to the human ear, defined as the “Acoustic” range. Very low frequency sound below Acoustic is defined as “Infrasound”, with high frequency sounds above, called “Ultrasound”.
Ultrasonic sensors are designed to sense object proximity or range using ultrasound reflection, similar to radar, to calculate the time it takes to reflect ultrasound waves between the sensor and a solid object. Ultrasound is mainly used because it’s inaudible to the human ear and is relatively accurate within short distances. You could of course use Acoustic sound for this purpose, but you would have a noisy robot, beeping every few seconds....
A basic ultrasonic sensor consists of one or more ultrasonic transmitters (basically speakers), a receiver, and a control circuit. The transmitters emit a high frequency ultrasonic sound, which bounce off any nearby solid objects. Some of that ultrasonic noise is reflected and detected by the receiver on the sensor. That return signal is then processed by the control circuit to calculate the time difference between the signal being transmitted and received. This time can subsequently be used, along with some clever math, to calculate the distance between the sensor and the reflecting object.
The HC-SR04 Ultrasonic sensor we’ll be using in this tutorial for the Raspberry Pi has four pins: ground (GND), Echo Pulse Output (ECHO), Trigger Pulse Input (TRIG), and 5V Supply (Vcc). We power the module using Vcc, ground it using GND, and use our Raspberry Pi to send an input signal to TRIG, which triggers the sensor to send an ultrasonic pulse. The pulse waves bounce off any nearby objects and some are reflected back to the sensor. The sensor detects these return waves and measures the time between the trigger and returned pulse, and then sends a 5V signal on the ECHO pin.
ECHO will be “low” (0V) until the sensor is triggered when it receives the echo pulse. Once a return pulse has been located ECHO is set “high” (5V) for the duration of that pulse. Pulse duration is the full time between the sensor outputting an ultrasonic pulse, and the return pulse being detected by the sensor receiver. Our Python script must therefore measure the pulse duration and then calculate distance from this.
IMPORTANT. The sensor output signal (ECHO) on the HC-SR04 is rated at 5V. However, the input pin on the Raspberry Pi GPIO is rated at 3.3V. Sending a 5V signal into that unprotected 3.3V input port could damage your GPIO pins, which is something we want to avoid! We’ll need to use a small voltage divider circuit, consisting of two resistors, to lower the sensor output voltage to something our Raspberry Pi can handle.
Voltage Dividers
A voltage divider consists of two resistors (R1 and R2) in series connected to an input voltage (Vin), which needs to be reduced to our output voltage (Vout). In our circuit, Vin will be ECHO, which needs to be decreased from 5V to our Vout of 3.3V.
The following circuit and simple equation can be applied to many applications where a voltage needs to be reduced. If you don’t want to learn the techy bit, just grab 1 x 1kΩ and 1 x 2kΩ resistor.
Without getting too deep into the math side, we only actually need to calculate one resistor value, as it’s the dividing ratio that’s important. We know our input voltage (5V), and our required output voltage (3.3V), and we can use any combination of resistors to achieve the reduction. I happen to have a bunch of extra 1kΩ resistors, so I decided to use one of these in the circuit as R1.
Plugging our values in, this would be the following:
So, we’ll use a 1kΩ for R1 and a 2kΩ resistor as R2!
Assemble the Circuit
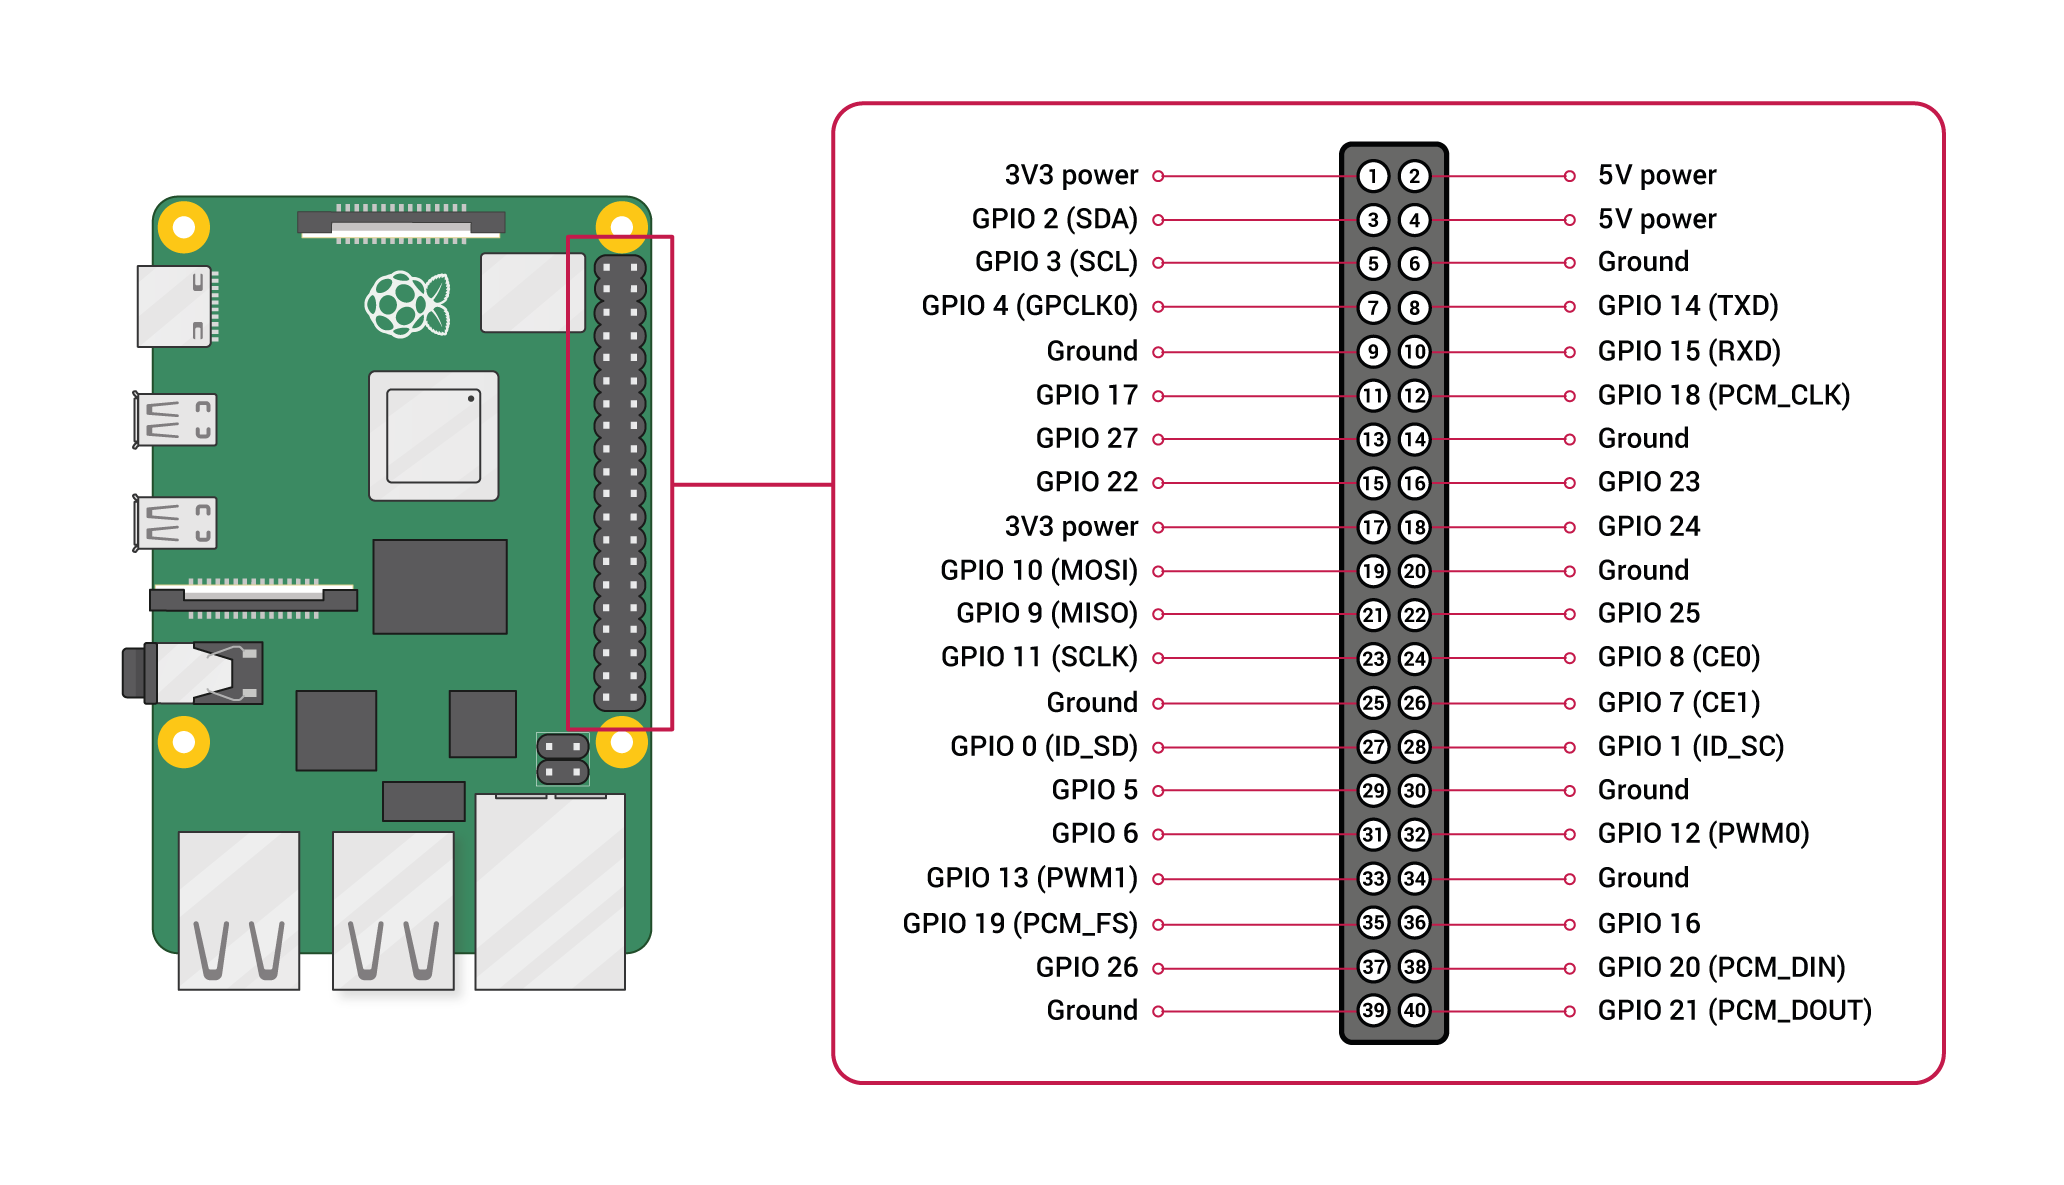
We’ll be using four pins on the Raspberry Pi for this part of the project:
GPIO 5V [Pin 4] for Vcc (5V Power)
- GPIO 5V [Pin 4] for Vcc (5V Power)
GPIO GND [Pin 6] for GND (0V Ground)
- GPIO GND [Pin 6] for GND (0V Ground)
GPIO 3 [Pin 5] for TRIG (GPIO Output)
- GPIO 3 [Pin 5] for TRIG (GPIO Output)
GPIO 2 [Pin 3] for ECHO (GPIO Input)
- GPIO 2 [Pin 3] for ECHO (GPIO Input)
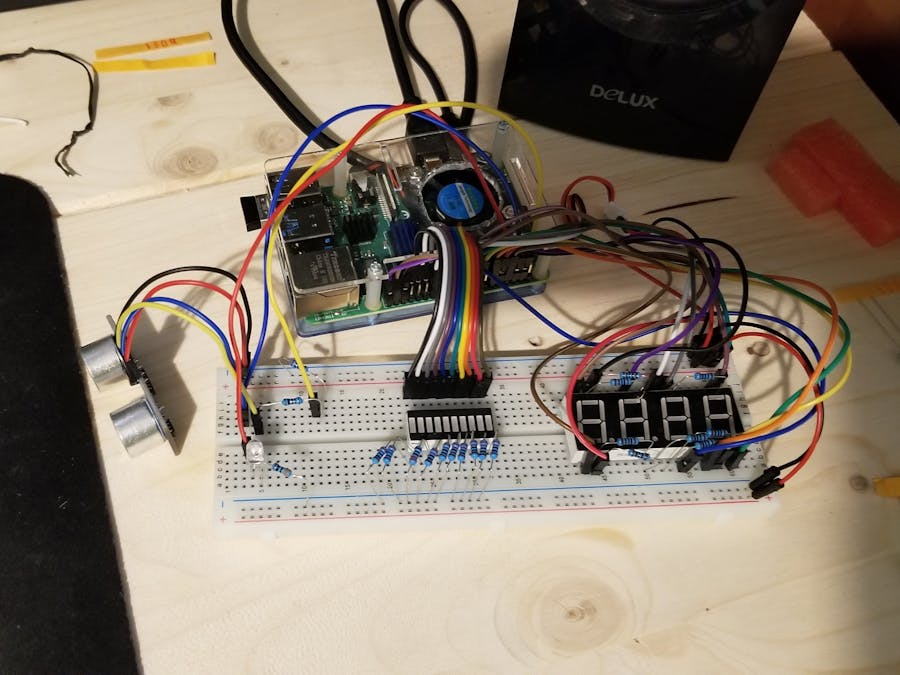
1. Plug four of your male to female jumper wires into the pins on the HC-SR04 as follows: Red; Vcc, Blue; TRIG, Yellow; ECHO and Black; GND.
2. Plug Vcc into the positive rail of your breadboard, and plug GND into your negative rail.
3. Plug GPIO 5V [Pin 4] into the positive rail, and GPIO GND [Pin 6] into the negative rail.
4. Plug TRIG into a blank rail, and plug that rail into GPIO 2 [Pin 3]. (You can plug TRIG directly into GPIO 2 if you want). I personally just like to do everything on a breadboard!
5. Plug ECHO into a blank rail, link another blank rail using R1 (1kΩ resistor)
6. Link your R1 rail with the GND rail using R2 (2kΩ resistor). Leave a space between the two resistors.
7. Add GPIO 3 [Pin 5] to the rail with your R1 (1kΩ resistor). This GPIO pin needs to sit between R1 and R2.
LED bar
The Bar Graph Display
This display is a really great idea. There are so many projects that you might want a row of LEDs to show readings for – temperature, sound, humidity, unread emails, hours until the next event etc. Whilst wiring up a line of LEDs is perfectly fine, these little displays give your project that cool ‘retro space movie control panel’ look to them.
They use exactly the same number of pins as 10 LEDs, so there aren’t any savings in terms of connections, however they do use a little less room on the breadboard as LEDs need space for their large heads.
Wiring
Wiring one of these displays is the same as wiring 10 individual LEDs. One side has one row of 10 positive (anode) connections (usually the longer leg on your LED), and the other side is the negative ground connections (cathode). Each anode pin is attached to a GPIO pin, and each cathode pin is connected to a resistor and then to the Pi’s ground pin.
These displays have the same length legs, but you can tell which side has the cathode/ground connections as one of the display’s edges will have a slight chamfer. Check your data sheet as well of course!
Simply put, all we need to do is add ten resistors (I found that 150Ω resistors are enough to have the LEDs be bright, but still be safe in regards to the amperage that is drawn from the Raspberry Pi pins).
4-digit 7-segment Display
This display can be used to display the number of centimeters measured by the sensor.
How Does It Work?
If you connect pin 12 to GND, the first digit will activate (9 = second, 8 = third, 6 = fourth).
Bringing each of the other 8 pins HIGH activates a specific segment on all currently active digits.
So if we had 12, 9, 8 & 6 all connected to GND, and 7 & 4 HIGH, all four digits would display the number 1.
But How Can We Use That?
The way that you get each digit displaying something different is to switch them on and off again, in turn, faster than the eye can observe. Using the same circuitry to control more than one ‘thing’ is called multiplexing. We need some Python code to handle this for us, and we’ll do it using 12 of the Pi’s GPIO pins (4 to switch the digits and 8 to switch the segments).
We also need some current-limiting resistors. 330 Ohm works, but is a bit dim. I’ve opted for 100 Ohm, which gives the LEDs a little protection. In reality, we’re switching fast, so each segment should only be ON for a short time. But if you connect these segments directly to a 3V3 source off-Pi without current-limiting resistors, you will damage or kill the leds in the segments (yes of course I tried it).
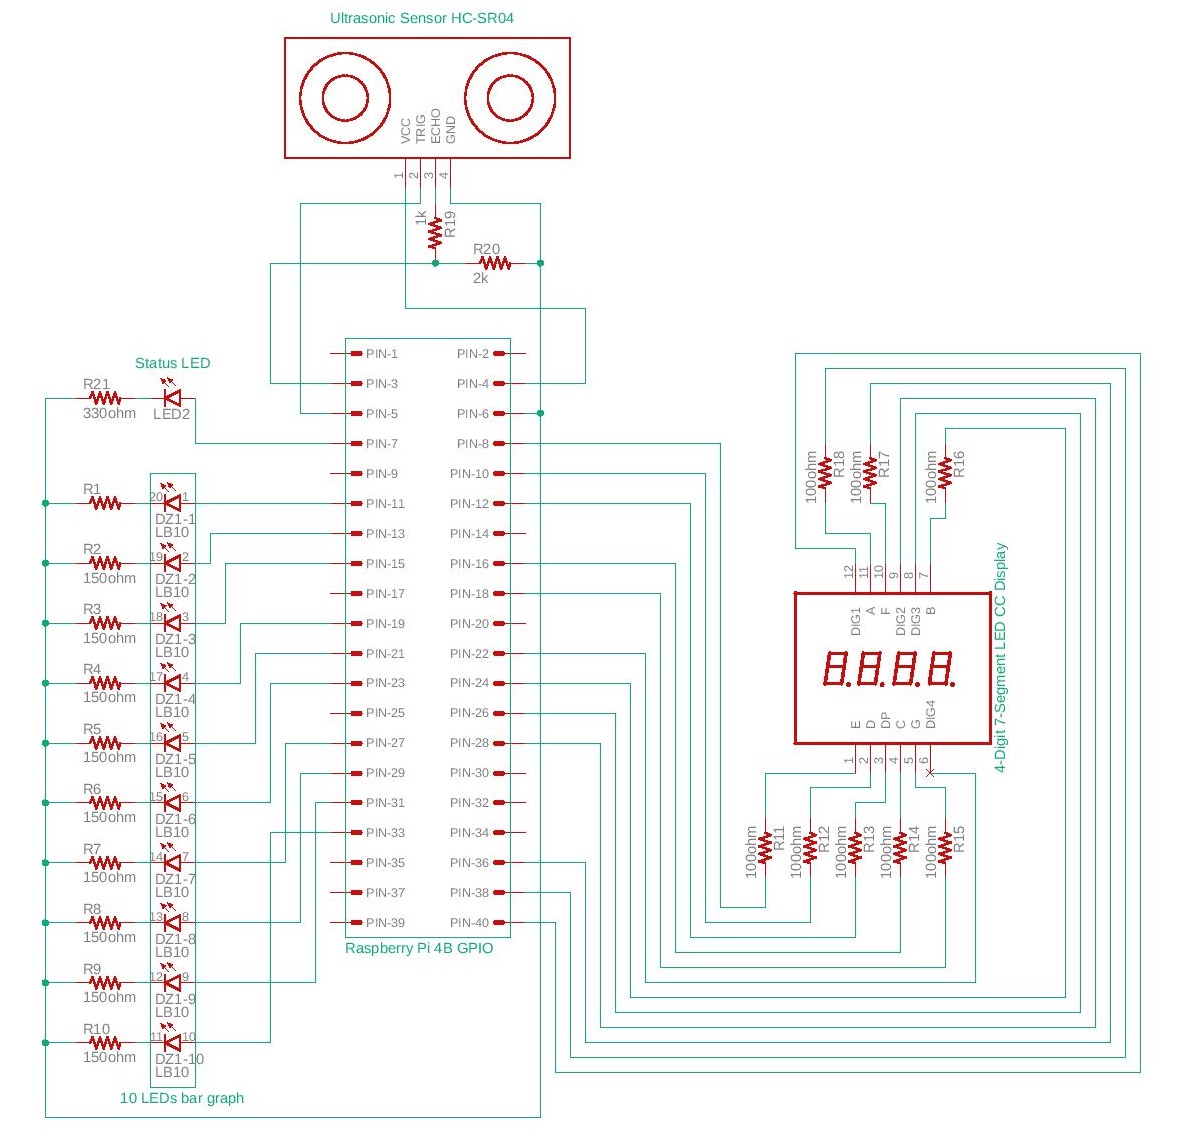
Full Pinout for all the components:
HC-SR04 Ultrasonic Sensor
GPIO 2 [Pin 3] - ECHO
GPIO 3 [Pin 5] - TRIG
GPIO 5V [Pin 4] - Vcc
GPIO GND [Pin 6] - GND
LED bar
GPIO 17 [Pin 11] - LED1
GPIO 27 [Pin 13] - LED2
GPIO 22 [Pin 15] - LED3
GPIO 10 [Pin 19] - LED4
GPIO 9 [Pin 21] - LED5
GPIO 11 [Pin 23] - LED6
GPIO 0 [Pin 27] - LED7
GPIO 5 [Pin 29] - LED8
GPIO 6 [Pin 31] - LED9
GPIO 13 [Pin 33] - LED10
LED display
GPIO 14 [Pin 8] - Pin 1
GPIO 15 [Pin 10] - Pin 2
GPIO 18 [Pin 12] - Pin 3
GPIO 23 [Pin 16] - Pin 4
GPIO 24 [Pin 18] - Pin 5
GPIO 25 [Pin 22] - Pin 6
GPIO 8 [Pin 24] - Pin 7
GPIO 7 [Pin 26] - Pin 8
GPIO 1 [Pin 28] - Pin 9
GPIO 16 [Pin 36] - Pin 10
GPIO 20 [Pin 38] - Pin 11
GPIO 21 [Pin 40] - Pin 12
Status LED
GPIO 4 [Pin 7]
The functionality can be observed in this Youtube video.


Comments
Please log in or sign up to comment.