


Hardware components | ||||||
 |
| × | 1 | |||
Software apps and online services | ||||||
| ||||||
| ||||||
 |
| |||||
| ||||||
| ||||||
One day at some office store I have observed plenty of TV screens laying aground. Light bulb on my head glowed💡. Right away I had this idea of turning them in to a cool displaying device. Then I developed the TVRaiser framework to make my life a bit easier.
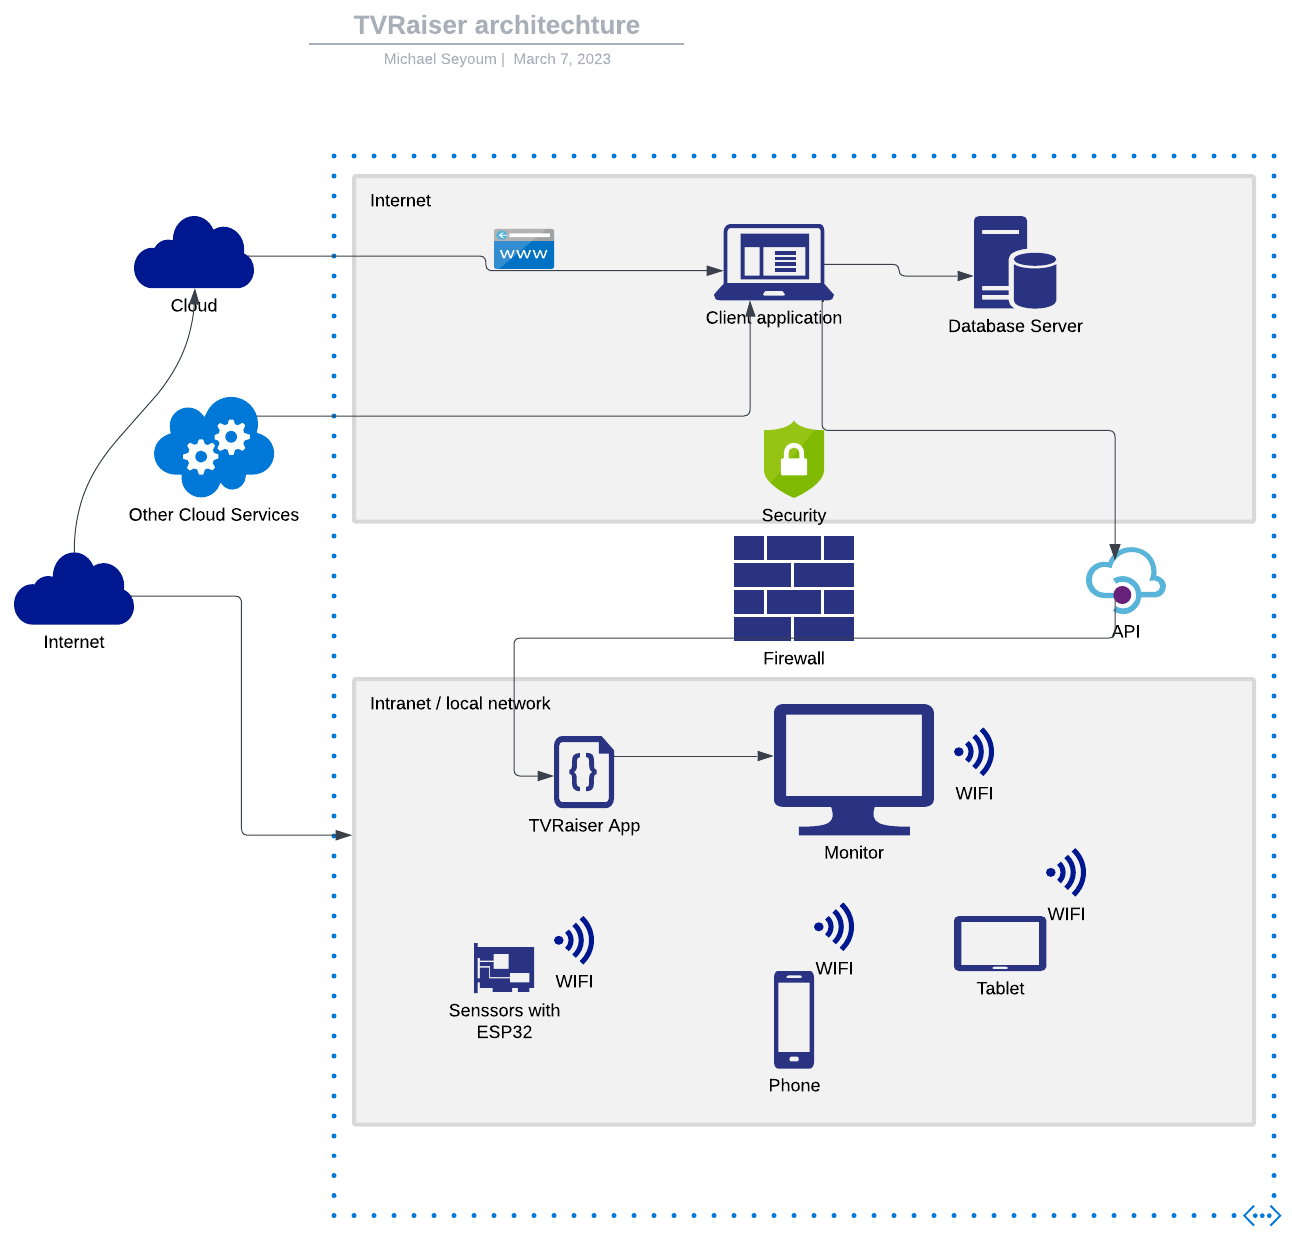
BackgroundThe TVRaiser is an open source platform that aims to re-purpose idle TV screens by displaying useful information from other smart devices in your home or office. With TVRaiser, you can check the status of your coffee machine, view the contents of your fridge, and more, all from the comfort of your TV screen. TVRaiser is a system architecture that let's you integrate home automation devices, micro-controllers , sensors and back end office app to display status , notifications and information as a widget or card in a modern smart TV screen or the old models with WiFi and web browser support.
PurposeThe main purpose of this project is to demonstrate an ESP32 micro-controller to push notifications (coffee brew status) in a web server and The data is pulled through the TV app and gets displayed as a widget card to show status. So this is just as a proof of concept to show the glimpse of what this platform can do together with any hardware device that is capable of connecting to any local network.
How does it work?TVRaiser app has two ways to be developed:
Option1: For Smart TVs like (SAMSUNG) use native Tizen app to deploy.
Opton2: For old TVs and those support built-in browser here is the step:
Installation
- Clone the repository to your local machine.
- Install the required dependencies by running npm install.
- Other alternative is to run a local web-server using Python: Python-x -m http.server 8000 This will run as web app.
- Connect your TV on the same network as you computer and fire-up TVs web-browser then hit the URL : http://local-network-ip:8000
Boom....
Now on the back end side there is hit the URL where you deployed the TVRaiser with port number 8000. If you go to the url and hit this on the computer browser you get a pure JSON data that looks like this:
All this JSON is push out to the server using an ESP32 micro-controller connected via wifi network. So imagine anything connected to an ESP32 is accessible through the JSON by formatting it using the ESP32 firmware described code:
Here you can Set your local network's WiFi SSID and password and do some initialization of variables the server URL in this example: http://IP_address:8000/sensor.php. Sensor.php is part of the TVRaiser backend app.
#include  "esp_http_client.h"
#include  <WiFi.h>
include <ArduinoJson.h>

const char *ssid = "wifi_SSID";
const char *password = "WIFI_password";

const char *post_url = "http://SERVER_NAME/sensor.php";
const char *post_data = "temp=160&level=100%";

bool internet_connected = false;
const int buttonPin = 32;
const int ledPin = 14;
int buttonState = 0;
Here we set some pins initialized and WiFi connected.
void setup()
{
  Serial.begin(115200);
  pinMode(buttonPin, INPUT_PULLUP);
  pinMode(ledPin, OUTPUT);

  if (init_wifi())
  {
    internet_connected = true;
    Serial.println("Internet connected");
  }
}

bool init_wifi()
{
  int connAttempts = 0;
  Serial.println("\r\nConnecting to: " + String(ssid));
  WiFi.begin(ssid, password);
  while (WiFi.status() != WL_CONNECTED)
  {
    delay(500);
    Serial.print(".");
    if (connAttempts > 10)
      return false;
    connAttempts++;
  }
  return true;
}
Here we handle http post and response. Any error is handled in this routine function so no worries.
esp_err_t _http_event_handler(esp_http_client_event_t *evt)
{
  switch (evt->event_id)
  {
  case HTTP_EVENT_ERROR:
    Serial.println("HTTP_EVENT_ERROR");
    break;
  case HTTP_EVENT_ON_CONNECTED:
    Serial.println("HTTP_EVENT_ON_CONNECTED");
    break;
  case HTTP_EVENT_HEADER_SENT:
    Serial.println("HTTP_EVENT_HEADER_SENT");
    break;
  case HTTP_EVENT_ON_HEADER:
    Serial.println();
    Serial.printf("HTTP_EVENT_ON_HEADER, key=%s, value=%s", evt->header_key, evt->header_value);
    break;
  case HTTP_EVENT_ON_DATA:
    Serial.println();
    Serial.printf("HTTP_EVENT_ON_DATA, len=%d", evt->data_len);
    if (!esp_http_client_is_chunked_response(evt->client))
    {

      // printf("%.*s", evt->data_len, (char*)evt->data);
    }
    break;
  case HTTP_EVENT_ON_FINISH:
    Serial.println("");
    Serial.println("HTTP_EVENT_ON_FINISH");
    break;
  case HTTP_EVENT_DISCONNECTED:
    Serial.println("HTTP_EVENT_DISCONNECTED");
    break;
  }
  return ESP_OK;
}

static esp_err_t post_something()
{
  esp_err_t res = ESP_OK;

  esp_http_client_handle_t http_client;

  esp_http_client_config_t config_client = {0};
  config_client.url = post_url;
  config_client.event_handler = _http_event_handler;
  config_client.method = HTTP_METHOD_POST;

  http_client = esp_http_client_init(&config_client);

  esp_http_client_set_post_field(http_client, post_data, strlen(post_data));

  // sending a jpg file we will do this in the future
  // esp_http_client_set_header(http_client, "Content-Type", "image/jpg");
 esp_http_client_set_header(http_client, "Content-Type", "text/html; charset=utf-8");

  esp_err_t err = esp_http_client_perform(http_client);
  if (err == ESP_OK)
  {
    Serial.print("esp_http_client_get_status_code: ");
    Serial.println(esp_http_client_get_status_code(http_client));
  }

  esp_http_client_cleanup(http_client);
}
Here in the loop we take some actions by calling the Post_something(). This is the main function that pushes sensor data, and anything that you customize is taken care of. For status indication we light up the onboard LED of the ESP32 after it does the actual data posting to the server.
void loop()
{

  buttonState = digitalRead(buttonPin);
  if (buttonState == LOW)
  {
    // Switch onboard the led
    digitalWrite(ledPin, HIGH);
    post_something();
  }
  else
  {
    // Switch off the onboard led
    digitalWrite(ledPin, LOW);
  }
}Connect your ESP32 pin 32 to a push button (the push button is a simulation of anything. it can be any type of sensor. Thermal, light, magnetic etc...). Then upload the code that you have modified above to the ESP32 using your favorite IDE. Then your are good to go!
Every time the button is press it sends a JSON data to the server and the TVRiser app pulls this data to show a meaningful info about a sensor in the room or office in you TV screen. Simple, right?!. Setting back the status from the TV user interface to the device back is also simple like this:
const char *serverUrl = "http://your-server-url/api/led-status";
// Variable to store the LED status from the server
bool serverLedStatus = false ;

// Function to fetch JSON data from the server
void fetchJsonData()
{
    if (WiFi.status() == WL_CONNECTED)
        {
           HTTPClient http;
           http.begin(serverUrl); // Specify the server URL
           int httpResponseCode = http.GET(); // Make the GET request
           if (httpResponseCode == HTTP_CODE_OK)
                {
                String payload = http.getString();
                Serial.println("Response: " + payload);
                // Parse the JSON response
                StaticJsonDocument<200> doc;
                DeserializationError error = deserializeJson(doc, payload);
        if (!error)
                {
                // Extract the "led_status" value
        if (doc.containsKey("led_status"))
                {
                serverLedStatus = doc["led_status"];
                }
        }
        else
            {
            Serial.println("Failed to parse JSON");
        }
    }
        else
            {
                Serial.print("Error in HTTP request: ");
                Serial.println(httpResponseCode);
            }
            http.end(); // Free resources
        }
        else
    {
        Serial.println("WiFi not connected");
        }
    }

// Function to control the LED
void controlLed()
    {
        digitalWrite(LED_PIN, serverLedStatus ? HIGH : LOW);
    }
This code simply fetches the raw JSON data and parse each object and asign it to the appropriate key vale pair you want. In this case the LED status value is set to HIGH or LOW from the JSON that is parsed.
I hope this inspires someone. Bye Bye 2024! and see you next year!


Comments