Think of factories, how do they make their products? and super fast? Problem solved, They use Machines to do their work. Most use a Robotic arm because they can grip objects so well and move them fast. Today I will show you how you can make your own robotic arm in just a few hours with the right materials.
Household Materials
- Popsicle sticks
- Hot glue/Hot glue gun
- Tin can lid
- Bottle cap
The electrical components needed for this project are above ⬆️
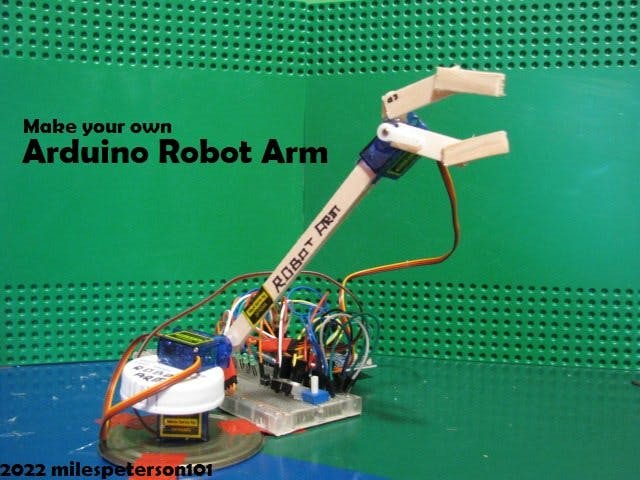
Ok now we are ready to start the project. Start by getting one servo and gluing it to a tin can lid (Any will work) Make sure the bottom side of the servo is glued to the top of the tin can lid.
As for the top I used a bottle cap. and then glued another servo sideways to the bottle cap.
If you look I used a popsicle stick connected to the servo then at the end of the popsicle stick I made a grabber for the robot arm.
As you can see I used another servo and more popsicles sticks. One side of the grabber moves while the other is stationary. I wanted to make both sides move, but it was complicated. If you have a 3d printer you can probably make a mechanism that makes both sides move with only one servo. Your choice.
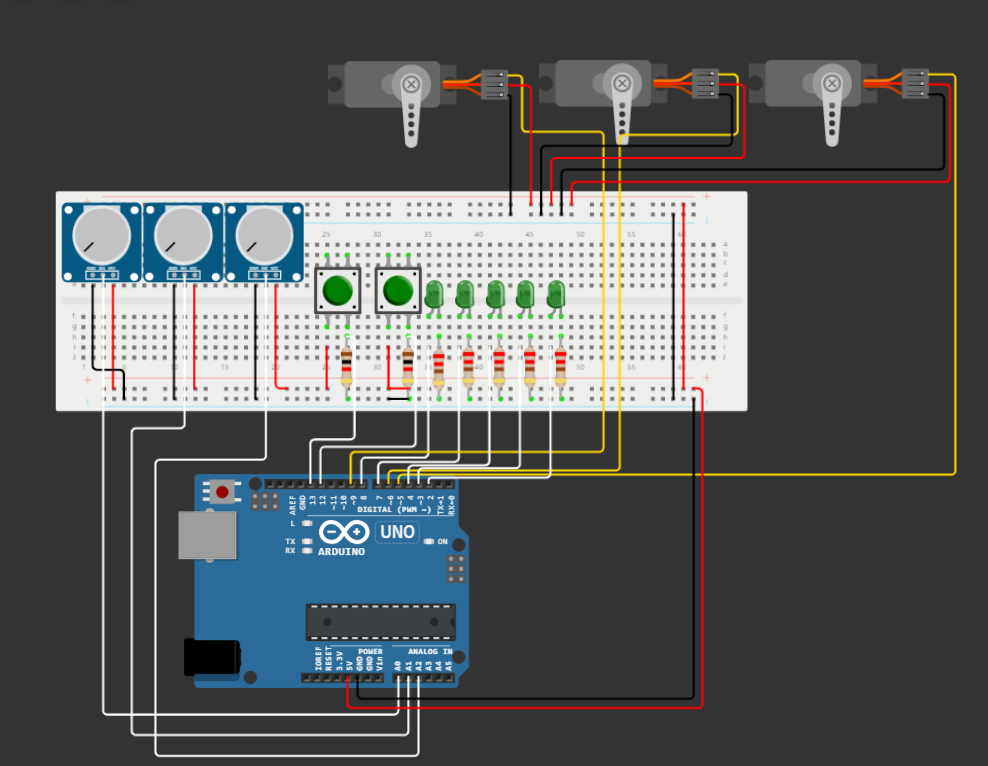
When you have finished building the robot arm, you can now wire the electronics. Start by wiring according to the schematic. Make sure there are no obvious mistakes, and then test the circuit. Now make sure the values of the potentiometers are all the way on so that way the robot arm doesn't move because it will adjust according to the values of the potentiometers. and it might break the arm if it moves fast enough.
Now I will show you how to use this properly. there are 2 buttons, 5 LED's and 3 servos. To make a position, press the right button then a green LED will light up. That is Pos 1, you will see a serial print saying:
"Pos 1 Saved"
Lets make the arm move, Do so by turning one of the potentiometers then the arm should move. Press the button again and then the 2nd LED will light up, also giving us a serial print:
"Pos 2 Saved"
Do this step again 5 times until all the LED's are on, and the serial prints should say:
"Pos 1 Saved"
"Pos 2 Saved"
"Pos 3 Saved"
"Pos 4 Saved"
"Pos 5 Saved"
There are only 5 positions. But its enough to program the robot arm to grab an object! Now, press the left button. and wait about 1 second. then the robot arm should move to each position. the reason it loops is because that part of the code is in the void loop, so it will repeat over and over forever!
VoidLoop()
when a position plays the serial monitor will tell you the position of each servo. So a servo moves 90 degrees it should look like this:
potentimeter Angles: 90
Now that you know how to program and use the robot arm lets try to make it pick up an object! Start by placing an object on your table, make sure the object has a good grip, is small enough to grab, and not too heavy. Something like a LEGO brick or a block. For me I used a LEGO brick because it was light weight, small, and has a good grip. See the video below.
Let's see what you come up with! Try new designs! Other Ideas! It all comes to you! Thank you very much for viewing my project! Go ahead and view my profile for more Projects like this! I really hope this helps you, or at least you knew something new today. Enjoy!


_ztBMuBhMHo.jpg?auto=compress%2Cformat&w=48&h=48&fit=fill&bg=ffffff)


Comments
Please log in or sign up to comment.