This project uses an optical sensor to detect when printer filament runs out. It can be set to sound an audible alarm, or simply flash a light when the sensor detects a problem. This device will give you enough time to pause the print and change the filament spool before the spool is used up.
I decided to use an ATtiny chip instead of Arduino for this project because I only needed a few IO pins and I wanted to solder everything right into the board.
Materials:
- Perfboard: https://amzn.to/2XcNKTv
- ATtiny85: https://amzn.to/2XziJbu
- Active Buzzer: https://amzn.to/2X7kzB8
- Button: https://amzn.to/2Yb6oHL
- 220 Ohm Resistor: https://amzn.to/2X74POs
- Led (green, yellow, and red): https://amzn.to/2YcCId7
- Optical Broken Module*: https://amzn.to/2X3rjQq
- Jumper Wires: https://amzn.to/2FydWgc
As an Amazon Associate I may earn from qualifying purchases.
*The Optical module is available in this sensor kit, shown in the second from the top left. you could also use a button or other sensor to do the same function.
Step 1: CodeIf you've used an ATtiny before, this step is no different from the way you're used to doing it. Otherwise, there are a few different ways you can program a chip like this one:
- Using an Arduino board to program
- Using a dedicated AVR programmer like this one: https://amzn.to/2NeTp6J
Both methods use the Arduino IDE, and the code itself is identical to what you would use on full Arduino board.
#define speaker 4
#define red 0
#define yellow 1
#define sensor 2
#define button 3

int buttonState;
int Mode = 0;
int i = 1000;

void setup() {
 pinMode(speaker, OUTPUT);
 pinMode(red, OUTPUT);
 pinMode(yellow, OUTPUT);
 pinMode(button, OUTPUT);
 pinMode(sensor, INPUT);
 digitalWrite(button, HIGH);
 buttonState = digitalRead(button);
}

void loop() {
 //switch modes:
 int val = digitalRead(button);
 delay(10);
 int val2 = digitalRead(button);

 if (val == val2) {
   if (val != buttonState) {
     if (val == LOW) {
       if (Mode == 0) {
         Mode = 1;
       } else {
         if (Mode == 1) {
           Mode = 0;
         }
       }
     }
   }
   buttonState = val;
 }

 if (Mode == 0) { // buzzer off
   digitalWrite(yellow, LOW);
 }

 if (Mode == 1) {//buzzer on
   digitalWrite(yellow, HIGH);
 }

 //========================
 int filament = digitalRead(sensor);
 if (filament == 1) { //filament is good
   digitalWrite(red, LOW);
   i = 0;
 }

 else {
   if (Mode == 0) { // buzzer off
     digitalWrite(speaker, LOW);
     digitalWrite(red, HIGH);
     delay(250);
     digitalWrite(red, LOW);
     delay(250);
   }

   if (Mode == 1) {//buzzer on
     digitalWrite(red, HIGH);
     if (i <= 10) {
       digitalWrite(speaker, HIGH);
       delay(500);
       digitalWrite(speaker, LOW);
       delay(500);
       i++;
     }
     else {
       digitalWrite(speaker, LOW);
     }
   }
 }
I included a list of all the materials and tools needed above. Just click on the link to be taken to the Amazon page. You can use a regular breadboard for this project, but I am using perfboard for a more permanent solution. Perfboard is very similar to a breadboard, except there are no pre-made connections; you have to solder each part in and connect them in the back using wires and solder. Here is a full tutorial on using a perfbord.
- I hacked a USB cord for a 5v power supply
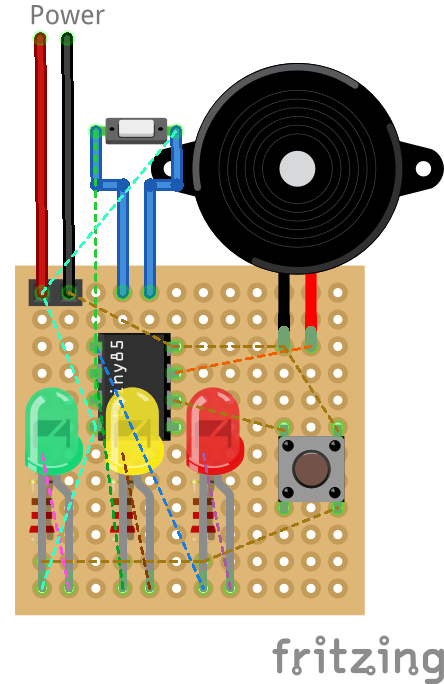
- Place components into the board one at a time soldering them into place, noting the polarity (such as the led anodes and the placement of the dot on the ATtiny)
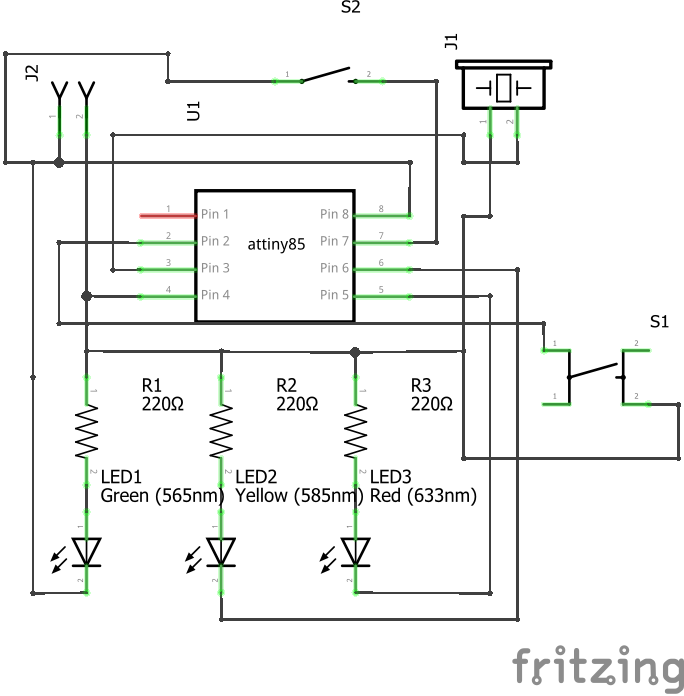
- Solder wires on the back to connect each component according to the schematic
- My sensor actually has 3 pins: GND, VCC, and Signal. My modeling software didn't have a good stand in for this part, so I used a simple switch to represent the connection. In reality, the sensor is connected to ground, 5v, and pin 7 of the chip, respectively.
You can find the 3D file for this step below.
I created a small piece that is designed to hold 1.75mm filament in place for the sensor I used. It is a bit of a tight fit, but using a heat gun or blow drier to soften the plastic a bit will make it easier.
Step 4: InstallationPlace the device somewhere out of the way of your printer's movement, but close enough so that you can slide the sensor module onto the filament feed. Also, make sure to place it far enough away from the extruder to give yourself time to pause the print and change the filament.
Binder clips: https://amzn.to/2Ja1m7P
How to UseFirst, insert a piece of 1.75mm filament. Once plugged in, the device will automatically turn on and the green led will be lit to let you know the device is powered. It will immediately begin sensing the filament on silent mode. You can press the button to switch to an audible alarm, and the yellow led will light to let you know the alarm is active. Press the button again to switch back to silent mode.
- Silent mode: yellow led off, the red led flashes when filament is absent
- Alarm mode: yellow led on, the buzzer beeps once filament is missing


_3u05Tpwasz.png?auto=compress%2Cformat&w=40&h=40&fit=fillmax&bg=fff&dpr=2)
Comments
Please log in or sign up to comment.