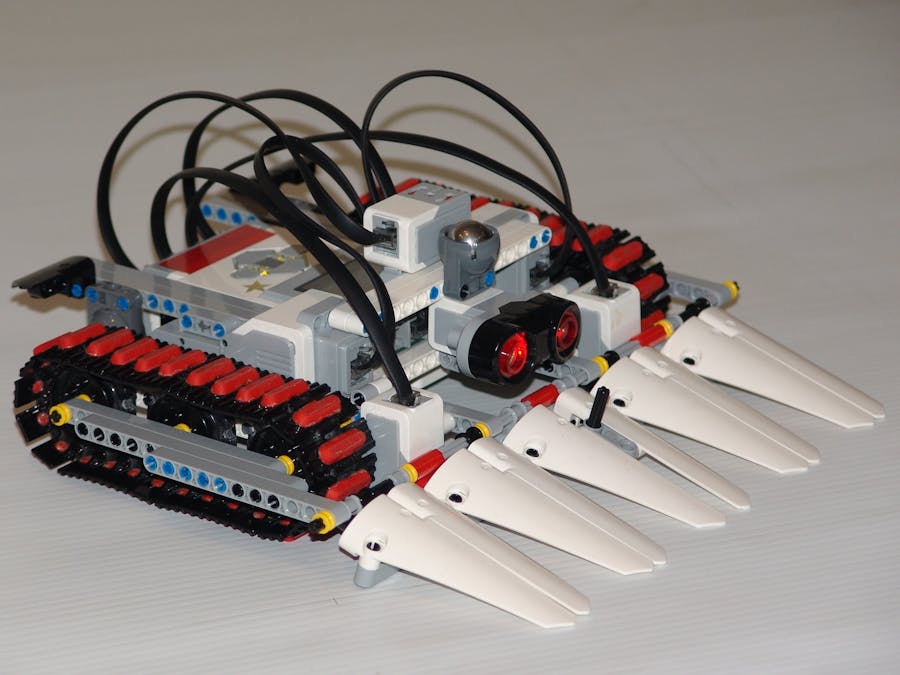
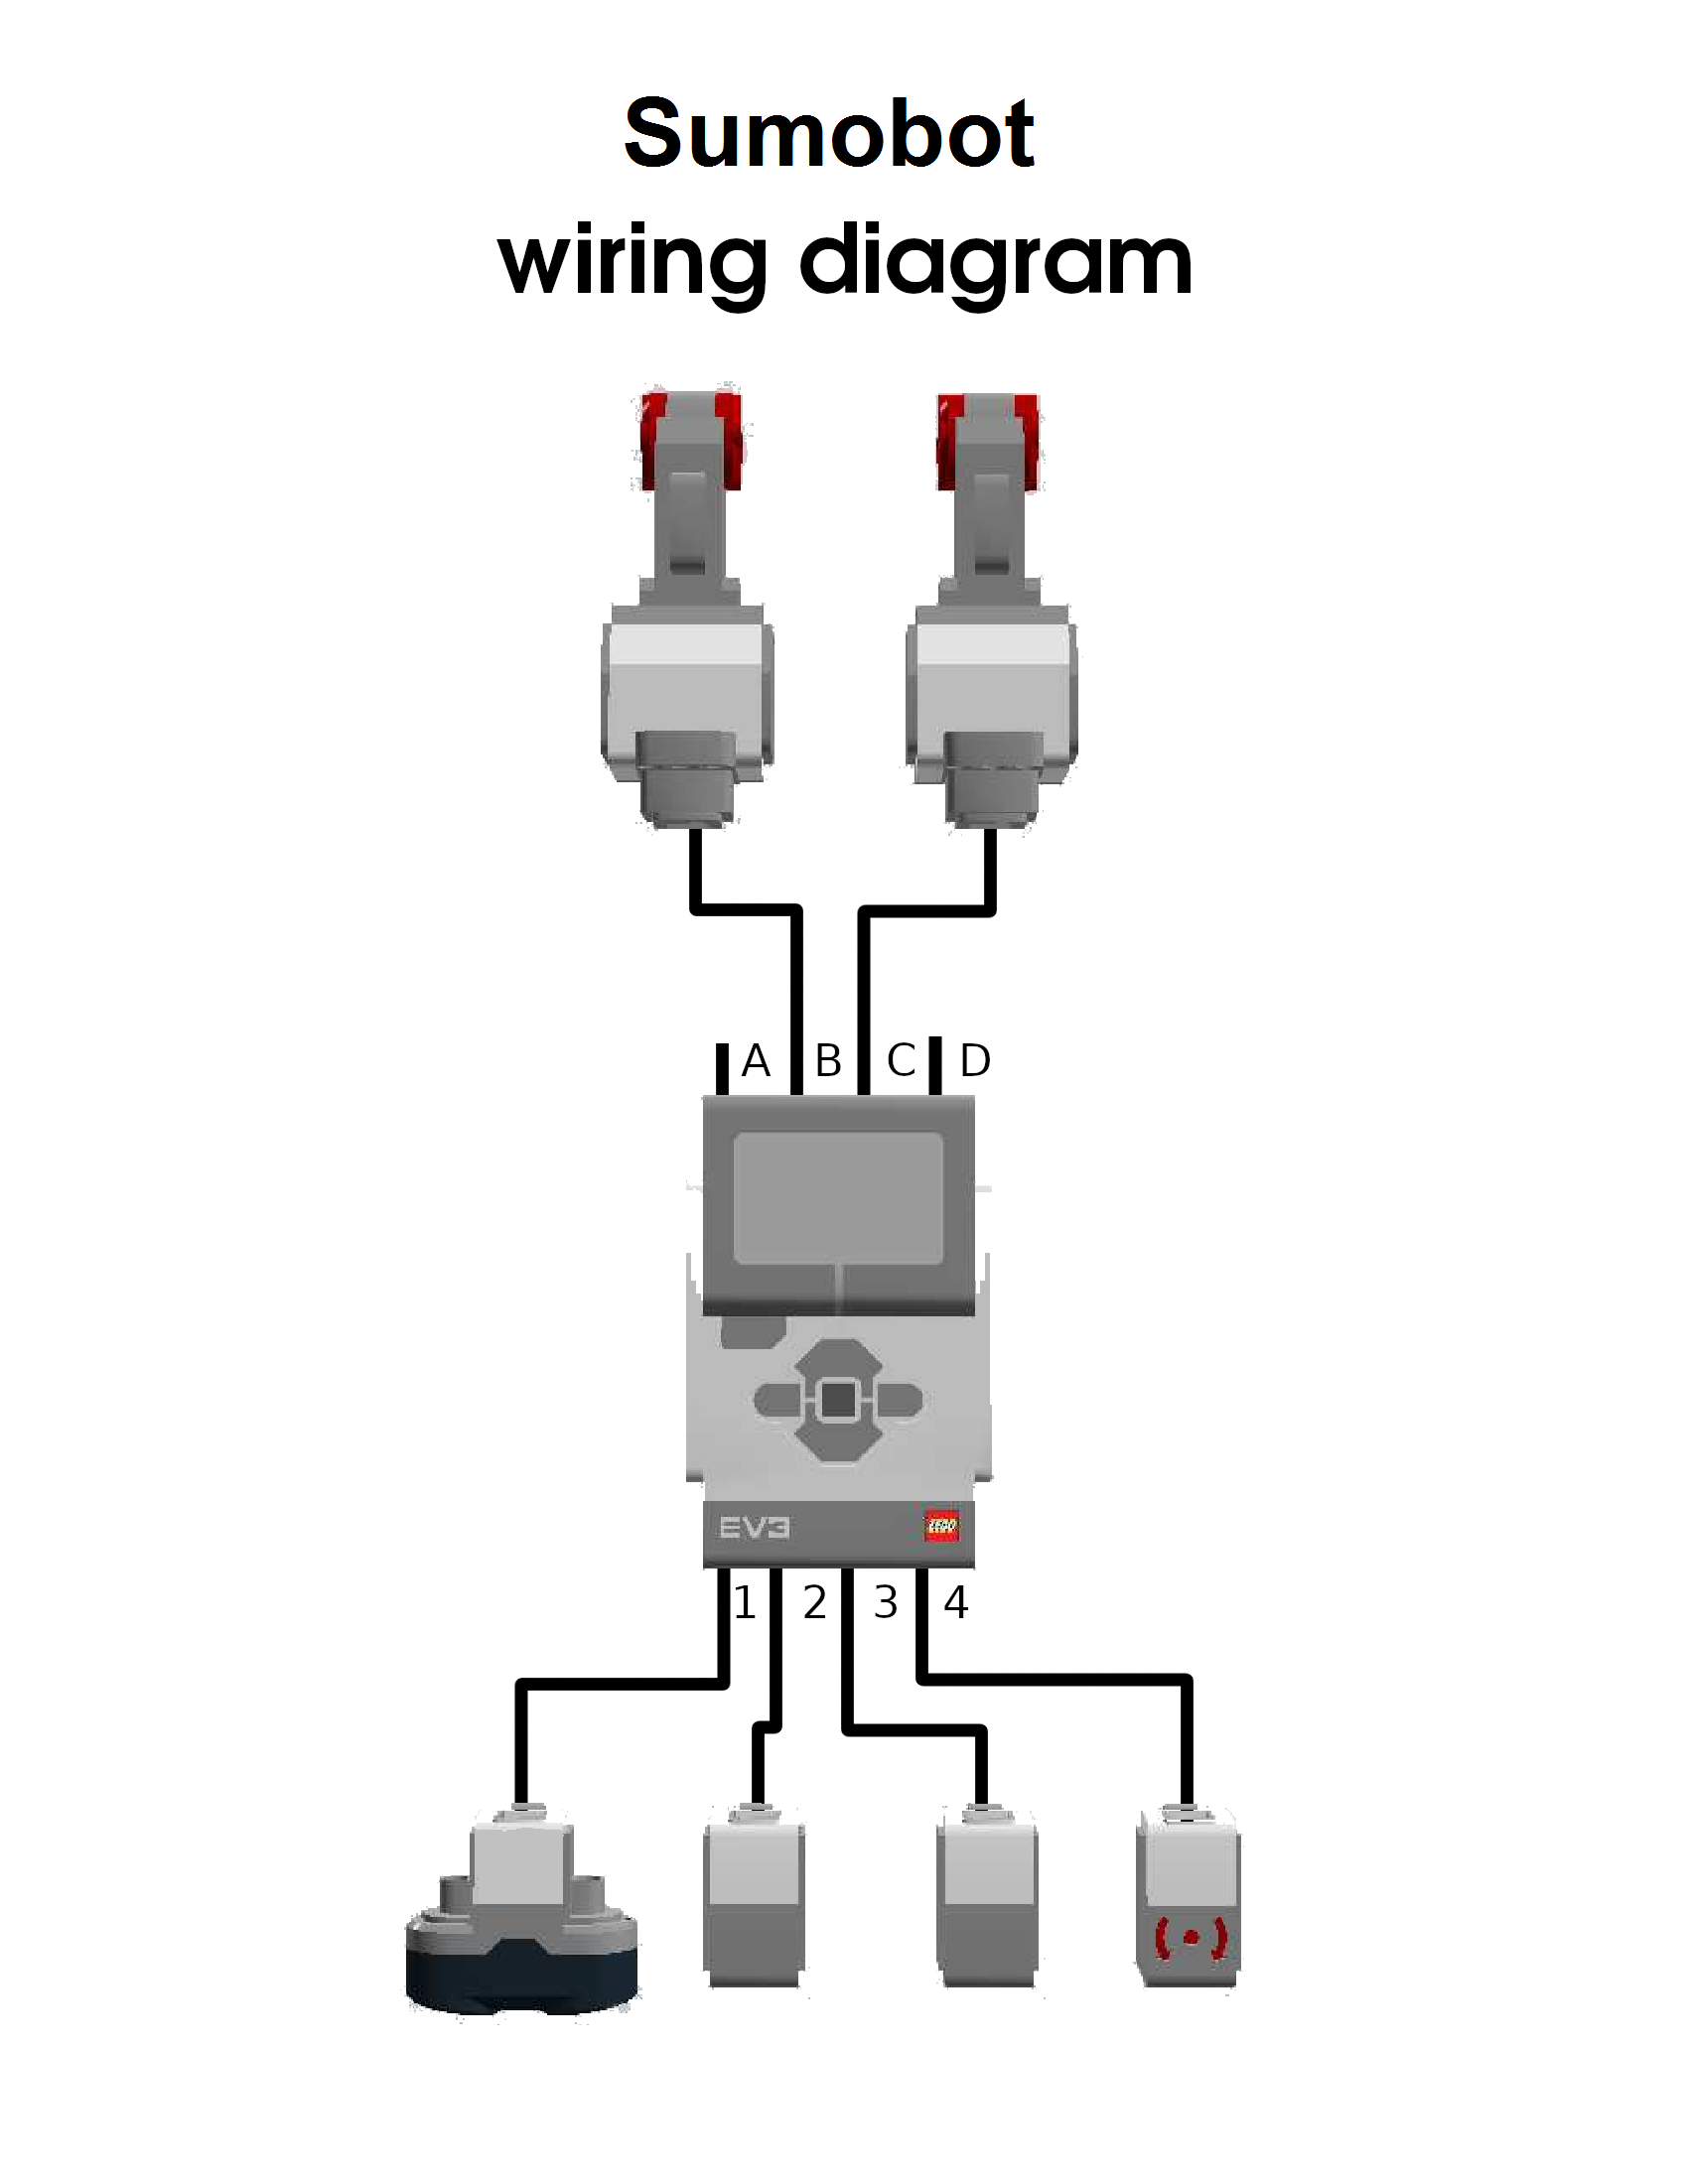
This project is prepared for a LEGO MINDSTORMS Voice Challenge. The goal of the project was making a fun experiment to create an Alexa-powered voice-controlled robot that can play against an autonomous robot in a popular Sumo challenge. The ring size, detail challenge requirement and actual competition videos can be found on the IEEE Ottawa Robotics Competition web page.
Rules of the challenge are simple:- Wait for three seconds in the middle of the ring- Go to the white line on the edge- Turn around- Then attack and push opponent out of the ring
It is highly recommended for the reader to review information provided in the LEGO MINDSTORMS Voice Challenge page including:
- Setup:Get your EV3 development environment setup.
- Mission 1:Get your EV3 Brick connected to a compatible Echo device, and reacting to the wake word.
- Mission 2: Build EV3RSTORM's legs, and react to music played from your Echo device.
- Mission 3: Add arms and a cannon to EV3RSTORM, and react to voice commands using an Alexa skill you create.
- Mission 4: Give EV3RSTORM eyes (IR Sensor), and make your Alexa skill react anytime an intruder is detected.
This project utilizes Mission 3 and Mission 4 code. Steps to create Alexa skill, upload and execute Python code on the robot are exactly the same as shown in Mission 3 and Mission 4 either.
Building the robotBill of materials (BOM) and building instructions are attached in the Attachments section. Please note, this design requires extra LEGO parts in addition to LEGO Education EV3 Core Set - 45544 and extra Color Sensor mentioned in the hardware components. These parts are not available from LEGO online store, but they can be simply identified by part number from BOM and ordered from Bricklink.
The Building instructions don't include caterpillar tracks, which should be attached at the end of building process.
Demonstration and Walk-ThroughDemo and walk-through has been split on three parts:- Turns and moves,- Gyro sensor troubleshooting and- Sumo challenge.
Turns and movesThis video demonstrates basic functionality of the robot implemented using move and turn commands. Stop and brake are included into move Intent. In Missions 3 & 4 stop command would terminate the session. This is the reason that brake command was used to stop the robot instead. It doesn't seem very intuitive. Indeed you would probably ask "stop here" instead of "brake here", if you would like someone, who is driving, to stop. It was handled in the MoveIntentHandler of this project:
const MoveIntentHandler = {
    canHandle(handlerInput) {
        return Alexa.getRequestType(handlerInput.requestEnvelope) === 'IntentRequest'
            && (Alexa.getIntentName(handlerInput.requestEnvelope) === 'MoveIntent'
                || Alexa.getIntentName(handlerInput.requestEnvelope) === 'AMAZON.StopIntent');
    },
    handle: function (handlerInput) {
        // Get data from session attribute
        const attributesManager = handlerInput.attributesManager;
        var move, speed;
        if (Alexa.getIntentName(handlerInput.requestEnvelope) === 'AMAZON.StopIntent') {
            move = "stop";
            speed = "0";
        }
        else {
            const request = handlerInput.requestEnvelope;
            move = Alexa.getSlotValue(request, 'Move');
            speed = attributesManager.getSessionAttributes().speed || "65";
        }
Turn and move commands are implemented as separate intents because they use different parameters. The turn command allows using a specific angle value. If angle value is provided, the robot turns for that angle. Otherwise it turns until it detects an obstacle or an opponent in case of Sumo challenge. If this happens, the robot sends an "Opponent Detected" event to Alexa skill. This logic is new comparing to mentioned above Mission 3 and Mission 4 projects. It is implemented in the _turn function of the gadget (Python) code:
def _turn(self, direction, angle: int, speed: int):
    """
    Handles turn commands from the directive.
    Right and left turns can under or over turn depending on the surface type.
    :param direction: the turn direction
    :param angle: the angle in degrees
    :param speed: the speed percentage as an integer
    """
    print("Turn command: ({}, {}, {})".format(direction, angle, speed))
    if angle is 0: # If angle = 0, search for opponent, otherwise turn for the angle.
        if direction in Direction.RIGHT.value:
            self.drive.on(SpeedPercent(-speed), SpeedPercent(speed))
        elif direction in Direction.LEFT.value:
            self.drive.on(SpeedPercent(speed), SpeedPercent(-speed))
        else:
            print("Unknown direction: {}".format(direction))
            return
        threading.Thread(target = self._search_thread, daemon = True).start()
    else:
        if direction in Direction.RIGHT.value:
            if (self.useGyro):
                self.drive.on(SpeedPercent(-speed), SpeedPercent(speed))
            else:
                self.drive.on_for_rotations(SpeedPercent(-speed), SpeedPercent(speed), angle * 0.014, brake = False)
        elif direction in Direction.LEFT.value:
            if (self.useGyro):
                self.drive.on(SpeedPercent(speed), SpeedPercent(-speed))
            else:
                self.drive.on_for_rotations(SpeedPercent(speed), SpeedPercent(-speed), angle * 0.014, brake = False)
        else:
            print("Unknown direction: {}".format(direction))
            return
        if (self.useGyro):
            threading.Thread(target = self._wait_until_angle_changed_by_thread, args=[angle], daemon = True).start()
Here, depending of turn direction we use positive or negative speed in the motors. In this design motors are inverted, which means positive speed corresponds to moving backward and negative speed corresponds to going forward respectively. Then if gyro sensor is not used (self.useGyro = False) we simply calculate required number of motor rotations using the following formula: angle * 0.014 and then run motors for rotations using self.drive.on_for_rotations function. This way is more accurate then turning for seconds (self.drive.on_for_seconds) in Mission 3 and Mission 4 projects. It is also independent of motor speed. However, the most accurate way is implementing turns using Gyro Sensor. In our robotics club I normally teach students to use this way to solve navigation problems. However, we normally use original LEGO firmware instead of ev3dev.
If gyro sensor is used (self.useGyro = True) we start motors turning infinitely (self.drive.on) and then call a _wait_until_angle_changed function in a separate thread:
def _wait_until_angle_changed_by_thread(self, angle: int):
    """
    Monitors angle change of the robot.
    If the required angle change is reached, sends a custom event to trigger action on the Alexa skill.
    """
    angle0 = self.gyro.angle
    keep_turning = True
    self.wait_until_angle_changed = True
    while self.wait_until_angle_changed and keep_turning:
        keep_turning = abs(self.gyro.angle - angle0) < angle

    if self.wait_until_angle_changed: # self.wait_until_angle_changed has not been cancelled yet
        self.drive.off(brake = False)
        print("Turn completed: Required Angle = {}, Measured Angle = {}".format(angle, abs(self.gyro.angle - angle0)))
    else:
        print("Turn cancelled: Required Angle = {}, Measured Angle = {}".format(angle, abs(self.gyro.angle - angle0)))
In this function the robot waits (while keeps turning) until it reaches required angle (keep_turning = False) or the action is terminated outside of the thread (self.wait_until_angle_changed = False).
You may notice that each move or turn of the robot in these code snippets ends without brake (brake = False). It applies to stop command as well. It was demonstrated in the video when motor was easily turned after stop command was issued. It was done to extend life time of the motor gears. Only brake command causes a brake to be applied.
When robot moves either forward or backward, this move is infinite until stop/brake command is issued or until robot detects white line using two color sensors when it moves forward. It is needed to prevent failing from the ring. If the robot detects white line, it sends "White line" event to Alexa and performs a short rollback. It was not implemented when it moves backward because color sensors are located on the front side of the robot and robot falls from the ring before it detects white line. If LEGO MINDSTORMS EV3 had more sensor ports, sensors on the back side of the robot could be added as well.
There is a number of problems can be noticed in this video:- During completion of first "turn around" command, one of the motors stopped in the middle of the turn. This happens occasionally during various turns. It didn't happen, when robot completed second "turn around" command. This is likely a glitch of ev3dev Python library. I have never seen this in the original LEGO firmware, which is also a Linux-based operating system.- Sometimes Alexa failed or delayed to repeat a command or say an event phrase. This was especially noticeable when "Alexa, turn 120 degrees" command was issued. I had to say "Alexa" one more time to get Alexa repeating the command. However, as you can see on the video this issue doesn't affect sending commands to the robot. This probably happens because of background music or event handlers replacing each other in order to extend session. I didn't notice this in Mission 3, which utilizes reprompt to extend session. It would be great if someone could take a look and offer a solution for that.- The commands have to be issued loudly when robot moves and makes noise. I had to yell "stop" when robot was moving backward in order to stop within a ring from the first attempt.
There was also a situation when I said "Alexa, turn left" then made a pause estimating an angle and then added "10 degrees". Alexa obviously took first part of the command (before the pause) and turned left until the robot detected an obstacle. It is not a problem, but we need to keep in mind that command needs to be issued without pauses.
Gyro sensor troubleshootingAs I mentioned previously the best way to implement turning for a specific angle is using a Gyro Sensor. It is included in the LEGO Education EV3 Core Set - 45544. Owners of Retail LEGO MINDSTORMS EV3 Set - 31313 can order it online separately. It is good for solving variety of navigation problems. However, there is a problem, Gyro sensor often has drift. It also frequently causes exception when it is being initialized within Python scripts in ev3dev operating system. After struggling for a while with theses problems, it was decided:- Don't initialize gyro sensor at the beginning of the script by default and use on_for_rotations function converting angle to the number of rotations.- Add Alexa-powered voice control to check, enable, disable and troubleshoot gyro sensor. It has been demonstrated on the video.
Taking into account that an attempt to initialize or access gyro sensor often causes exception, the entire command handler was taken into try-except block sending an appropriate event to Alexa when exception occurs:
try:
    if command in Command.GYRO_SENSOR_ENABLE.value:
        ...........................................
    elif command in Command.GYRO_SENSOR_DISABLE.value:
        ...........................................
    elif command in Command.GYRO_SENSOR_CHECK.value:
        ...........................................
    elif command in Command.GYRO_SENSOR_CHANGE_MODE.value:
        ...........................................
except:
    self.useGyro = False
    self._send_event(EventName.GYRO_SENSOR_EXCEPT, {})
    print("Gyro Sensor caused exception. It has been disabled.")
Once gyro sensor was enabled and drift was fixed using a workaround ("change mode" command), the robot managed to complete several turns controlled by gyro sensor (instead of angle to the rotation conversion) in the video. However, after the last turn command ("turn right 30 degrees") gyro sensor failed again. The robot kept spinning and had to be stopped using "stop" command.
This is an example that Alexa-powered voice interface can be used for troubleshooting in addition to move/turn commands and it was very convenient because the robot was unplugged from a laptop. Using LCD display on the robot to see printed error messages is nearly impossible due to small size of the font in ev3dev.
Sumo challenge (finally)In this video autonomous robot was slowed down 3 times from its normal setting. After some practice I was able to push it out of the ring as shown on the video.
Comments: Alexa gadget (Python) and Alexa skill (Node JS) code packages are available in the Attachments.- common.js, util.js, and package.json Node JS Alexa skill files were not changed. They are exactly the same as in Mission 4.


_dyynx0bnuf_8u4Xi07d4z.png?auto=compress%2Cformat&w=48&h=48&fit=fill&bg=ffffff)


Comments
Please log in or sign up to comment.