Every year, 30% to 50% of the human population over 65 experience falls. This is a major cause of injury in older persons and the leading cause of accidental death. Statistics shows more than 30% of fall resulted in death for persons over 65 if medical attention is not received in time. This number goes high up to 60% for persons over 85 years age.
In modern world, most of the elderly person ( or couple) live alone in small apartment or houses. While fall is inevitable at old age, we should have a mechanism to contact emergency contact person or doctor or even 911 when a person experience fall.
What's my solution?Well, I am not going to claim that my prototype will solve of the problems but definitely would solve some and provide direction how to enhance the scope of the prototype to solve more problems related to fall.
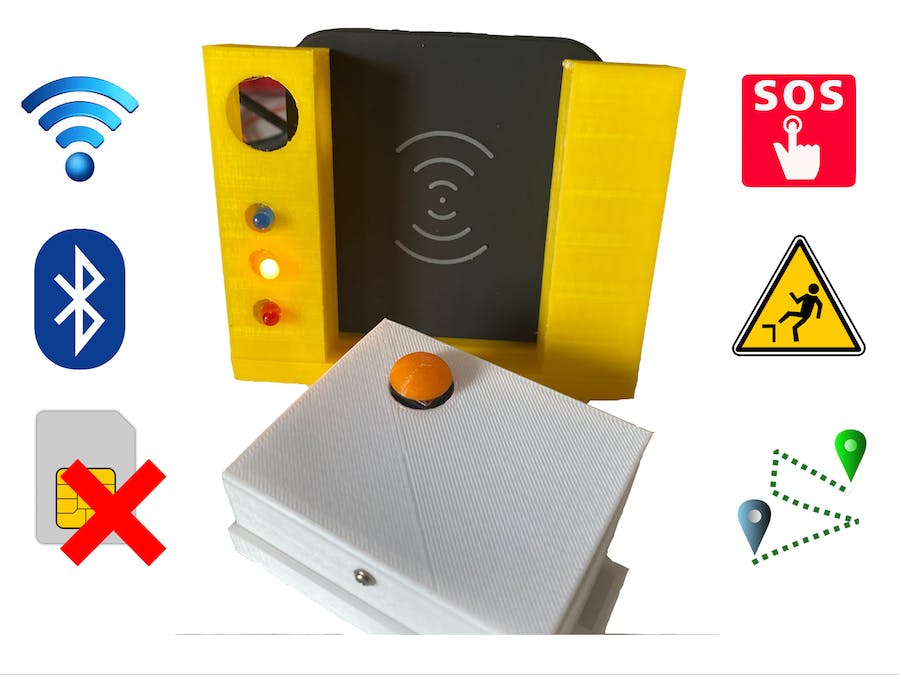
My prototype includes 3 components
1. A Wearable Device
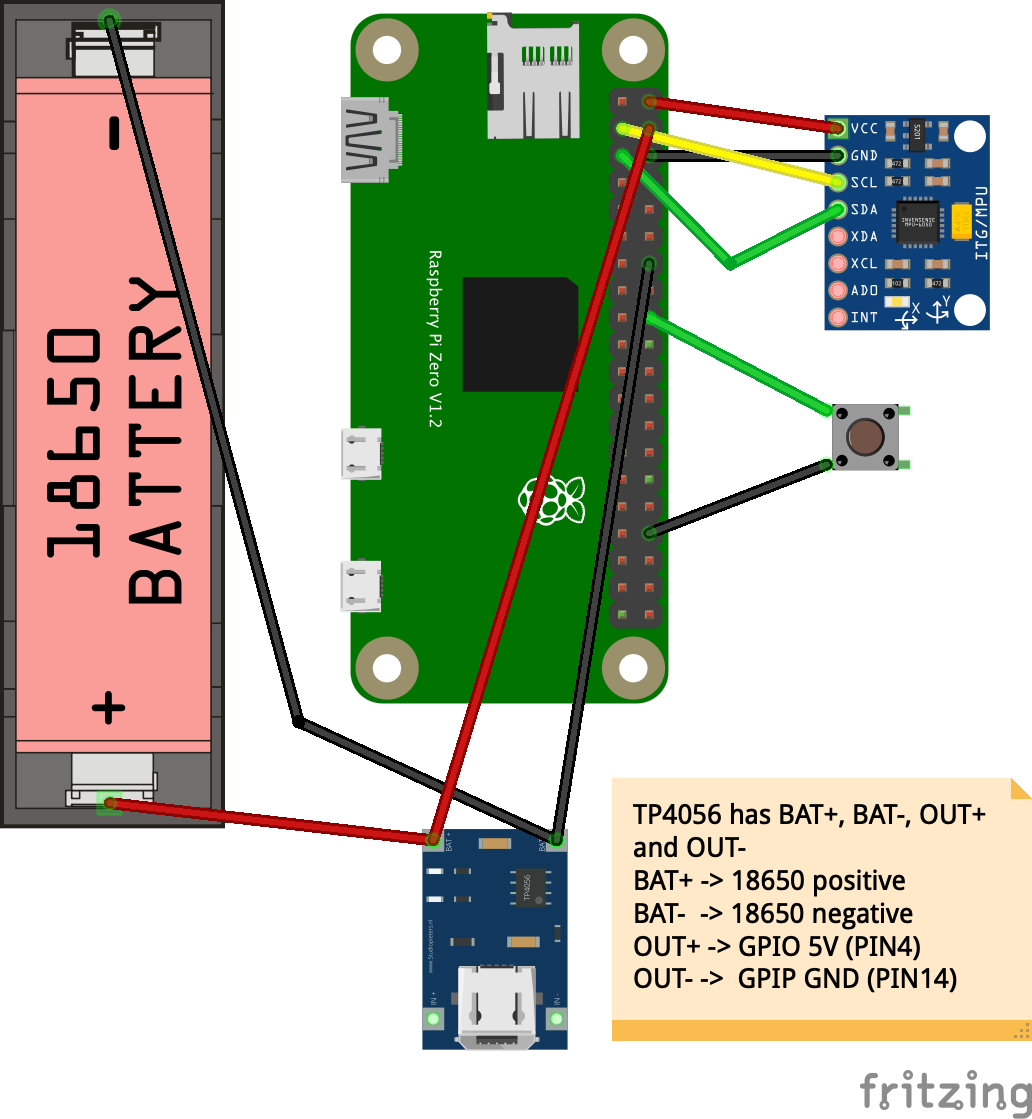
which elderly person will hang over neck or upper arm. This device has one "MPU 6050 Triple Axis Accelerometer and Gyro" sensor which helps to determine fall. Device is powered by one rechargeable 18650 battery and TP4056 module for micro usb charging. Device is equipped with a panic button which triggers text message and call to the emergency contact person/care givers. Device is also act as iBeacon BLE transmitter which is used by docking station for indoor location tracking.
2. A Docking Station
which delivers audio messages for medicine reminders and activate siren whenever a fall is detected or panic button is pressed on wearable device. Docking station is equipped with wireless charger for charging wearable device wirelessly. This sounds trivial but very important for elderly persons who struggle to plug into micro usb because of shaky hand movements. It also has some LEDs for visual indication if wearable device is online, any medicine reminders announced recently etc. Docking station also receives iBeacon signal transmitted by wearable device and calculates the distance of the person from the station and post the data to mobile app in real time.
3. A Mobile App
which is built for care givers or emergency contact persons. Using the app, user can setup emergency phone numbers which will receive text message and voice call if fall is detected by wearable device or panic button is pressed on wearable device. User can setup medicine reminders, acknowledge an incident. If incident is not acknowledge in 30 minutes, 2nd contact person is notified via same communication protocol to ensure person gets attention as soon as possible. User can also track indoor location of wearable device in realtime to get an idea where the person is.
1. Fall detection.
2. Text message and voice call to emergency contacts or caregivers.
3. Automatic incident escalation if first emergency contact does not acknowledge within 30 minutes
4. On device panic button which triggers incident and notifies emergency contacts.
5. WiFi enabled. No SIM card, No monthly cellular carrier fees!
6. Wireless charging station
7. Voice medicine reminders
8. Bluetooth indoor location tracking
9. Siren when fall is detected or panic button is pressed. Very useful when someone around the house other than emergency contact persons, usually spouse.
10. On Dock LEDs for visual indication of wearable device is online or any recent medicine reminders were delivered.
Watch working demo videoHigh level architecture/communication diagramPrimary communication protocol among the devices and mobile app is MQTT. Data is stored in SQLite database and backend is deployed to Amazon EC2 instance. REST protocol is used to communicate with backend service.
AWS Polly is used to generate speech alert from the text (medicine alerts) and AWS Pinpoint is used to make voice calls and text messages without using any SIM card or cellular carrier.
Wearable device acts as iBeacon transmitter and docking station acts as receiver. Dock station calculates the distance of transmitting signal and post to MQTT. Mobile app listen on the topic and update location realtime.
How to recreate this projectWell, as you understand this project has 3 major components, I will talk about one at a time.
Before you begin, I would request you to clone the gihub repository to your laptop.
1. Wearable device
Let's start with wearable device which is built using a Raspberry Pi Zero. I assume you already have pre-configured Raspberry Pi with nodejs, npm and python3 installed. If you are new to Raspberry Pi development, there are many great tutorials on internet. You may look at https://www.w3schools.com/nodejs/nodejs_raspberrypi.asp. Raspbian OS comes with both Python 2 & 3 and NodeJS pre-installed. Once you burn your SD card with Rasbian image, insert that into your Pi. Boot your Pi Zero and configure Wifi. Once done, next you will install few other software of bluetooth transmission. I encourage you to read below two articles which will guide you step by step how to install necessary software to act your pi as ibeacon transmitter.
http://www.wadewegner.com/2014/05/create-an-ibeacon-transmitter-with-the-raspberry-pi/
https://hackncheese.com/2014/01/28/PiBeacon/
Once done, create a folder named "detection" under /home/pi and FTP all the files from <github-repo>/ble-device to this folder. To be precise there are 4 files.
You can use any FTP software for this. I personally prefer FileZilla which is free!
Now, cd into detection folder and execute below command to install python dependencies
sudo pip3 install paho-mqttAs you are done with software installation, let's look at the schematic and connect your sensors and other hardwares. To make sure MPU5060 is recognized by your Pi, run below command and you should see address "68" showing up. If it does not then check if IC2 interface is enabled for your Pi from configuration preference.
sudo i2cdetect -y 1Next you need to get MAC address of your bluetooth device. Execute below command and copy the highlighted MAC address. You need this address in few places. So copy to a text file or notes.
Also copy UUID from ibeacon_start file. You need that later.
sudo hciconfigBefore you register the service, check the script by manually running them.
./ibeacon_startIn another terminal run
sudo python3 fall_detection.pyIf you don't see any error in the console, you are all set! Now execute below command to register these two scripts as service so that when you restart your Pi, these scripts start up automatically.
sudo sh detection-service.shThen reboot your pi
sudo rebootOnce your Pi starts up again, type below command to to check if your service is in active state.
sudo systemctl status detection.service2. Backend
Next we are going to spin up backend service. It's NodeJS project and I have deployed to AWS EC2 but you can deploy anywhere, even run on your local. If you are running on local, you need use "ngrok" or something similar so mobile app can connect to your server over internet. To startup server, you just need to execute below commands. I am assuming you have NodeJS 8+ installed.
npm install
node server.js
3. DockingStation
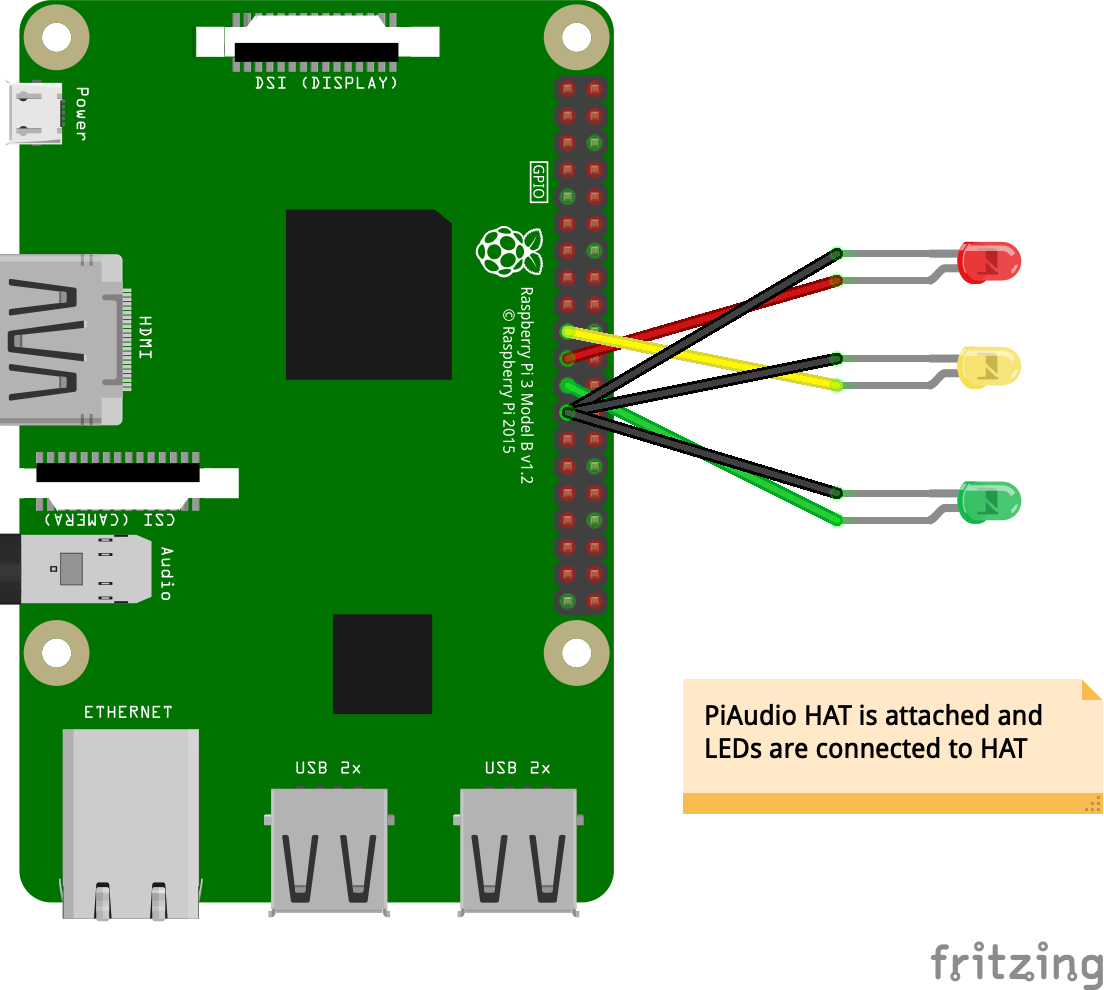
It's time to get the docking station up and running. I have used Raspberry Pi 3 Model B but you can use Pi Zero ( I just did not have a spare Pi Zero ). Make sure you have similar OS and softwares installed as in wearable device. Then follow the schematic and connect the LEDs. I have used RASPIAUDIO (https://www.raspiaudio.com/raspiaudio-aiy) as speaker. Follow the link to install necessary softwares. You can use any other speaker with 3.5 connector but keep in mind that you may need separate power supply which is another reason I chose RASPIAUDIO.
Once you are all set with above procedures, copy all the files from <github-repo>/dock to /home/pi/dock folder.
As we are using AWS Polly, you need to configure AWS CLI. Run below command to install it and then configure it. You need to create a user in AWS console and give permission to AWS Polly.
sudo apt-get install awscli
sudo aws configure
Then install other python dependencies
sudo pip3 install paho-mqtt boto3Then install nodejs dependencies
npm installYou need to change BACKEND_URL variable inside main.py according to your backend public url.
You also need to change addressToTrack variable inside scan.js file. This is the MAC address of your wearable device which you copied earlier. Please remove all ":" and paste 12 character MAC address.
Before you register the service, run the scripts manually to make sure there is no error.
sudo node scan.jsAnd in another terminal
sudo python3 main.pyIf both scripts are running without error, stop them and execute below script
sudo sh dock-service.shThen reboot
sudo rebootOnce your pi booted up, check the status of service
sudo systemctl status dock.serviceIf it shows "active" and your wearable device is running, you should see Green and Amber LEDs turned on which will ensure wearable device is online. Green is for fall detection and amber is for ibeacon transmission.
4. MobileApp
Now the last component. This is an Ionic hybrid mobile app which can run on browser as well if you don't want to deploy on your mobile device as an app. If you don't have ionic cli installed, please visit ionic official website https://ionicframework.com and install it.
After you install, go inside <github-repo>/mobile-app directory and issue below command.
npm installThis should install all necessary dependencies. Then go inside src/environments/environment.ts file and change the url variable according to your public backend url. Then issue below command to run the app on your browser
ionic serveThis should open up the app on your default browser. You should see the login page as below. The project has one user pre-loaded for you. usename is owner@gmail.com and password is password. You may need to update the phone numbers and wearable device MAC ID.
That's it ! If everything goes fine, you should see your wearable device is Online and tracking will be activated.
3D PrintingI have attached the 3 printing files which I designed and printed. But my 3D printing skill is at beginners level. So I would encourage you to modify my files or create your own or at least review before you print.


Comments
Please log in or sign up to comment.