

Hardware components | ||||||
 |
| × | 1 | |||
 |
| × | 1 | |||
| × | 1 | ||||
In this guide, we’ll walk through the process of turning an Apple Watch into a DIY Matchbox Clock using an ESP32 microcontroller and a tiny OLED display. By the end, you’ll have a miniature clock that’s both unique and functional, powered by Wi-Fi to fetch accurate time.
Materials You’ll Need:- Dead Apple Watch (for inspiration and some salvageable parts)
- Matchbox (standard size)
- ESP32 microcontroller (small but powerful for IoT projects)
- 0.96-inch OLED display (for displaying the time)
- 3.3vLiPo battery (or any battery from dead device )
- Wires and a soldering iron
- Basic tools (screwdriver, precision knife, etc.)
- Hot glue or double-sided tape (for assembly)
The first step is to disassemble the dead Apple Watch. While it may no longer work, its parts—especially the case—can serve as inspiration or be repurposed. Gently remove the screen, battery, and any other internal components using a screwdriver. While not all of the original parts will be used, it's always good to keep them on hand for potential future projects.
- Tip: Be careful when removing the internal components to avoid damaging anything that might be usable in other DIY projects.
Once we’ve salvaged what we can from the Apple Watch, it’s time to test the battery. If you’re lucky, the battery might still hold a charge. But in most cases, the battery is likely dead. If that’s the case, replace it with a small, rechargeable LiPo battery that will fit inside the matchbox.
- Funny note: "Tried charging it with the original Apple cable, and it said, 'Nope, I’m too good for this!' Switched to a regular cable, and boom! It’s alive—guess it just needed a bit of humble tech."
Now we’re getting to the heart of the project—the ESP32 microcontroller and OLED display. The ESP32 will allow our Matchbox Clock to connect to Wi-Fi and fetch the current time, while the OLED display will showcase the time.
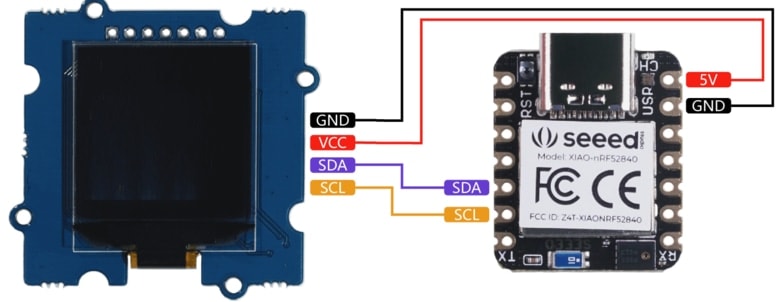
Wiring:
- OLED to ESP32: Connect the SDA pin of the OLED to D5 and SCL to D4 on the ESP32.
- Battery to ESP32: Connect the battery to the appropriate VIN and GND pins of the ESP32.
- Use jumper wires to neatly organize the setup within the matchbox.
Now it’s time to put everything together. Start by carefully cutting a hole in the matchbox where the OLED display will peek through. Make sure the hole is precise enough for the screen to be securely held in place without blocking the view of the time.
- Tip: Use hot glue or double-sided tape to hold the OLED display, ESP32, and battery in place inside the matchbox.
Assemble the components inside, ensuring the wires are neatly arranged to avoid clutter. This will give your Matchbox Clock a clean, professional look, even though it’s built from scratch!
Once everything is assembled, give the clock a test run. Power it up and check if the OLED display lights up and shows the correct time. If everything works as expected, you’ve successfully created your Matchbox Clock from a dead Apple Watch!
- Tip: If you encounter any issues, double-check the wiring and code. Small mistakes in connections or code can easily be fixed with a little debugging.
Congratulations! You’ve now created a fully functional Matchbox Clock using parts from a dead Apple Watch. This is not only a unique way to repurpose old tech but also a fun project to show off your creativity and engineering skills. Whether you use it as a conversation starter or a practical clock, it’s sure to turn heads.
Here’s the finished product in action:
- Video Demo:YouTube Link
This project showcases how we can repurpose old technology and turn it into something both functional and innovative. The Matchbox Clock is a simple yet effective DIY project that’s perfect for anyone interested in electronics, coding, or upcycling.
Since this is my first project, I’d love your support and feedback! Whether it’s a like, a comment, or some tips to improve, your encouragement means the world to me. Let’s build an awesome community together!
Follow me on Youtube!
If you enjoyed this tutorial, be sure to check out more of my projects on Hackster, or Subscribe my YouTube channel ( Short circuit Lab )for more creative DIY tech builds!
Follow me on Instagram!
Stay updated with more fun projects and behind-the-scenes content on my Instagram: [https://www.instagram.com/shortcircuitlab/]
Thanks for your time. Happy Learning


Comments