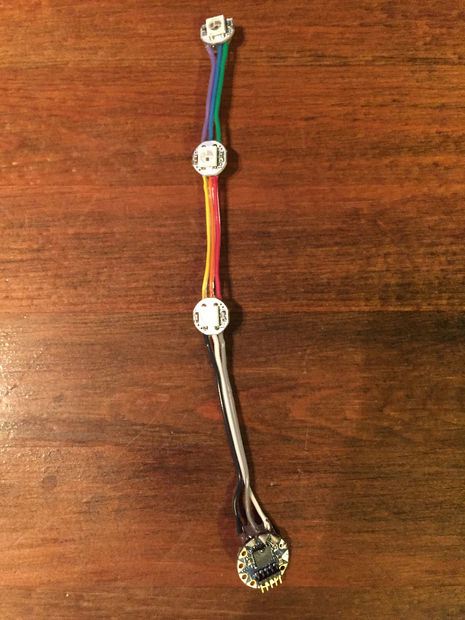
Who doesn't want a bit of extra sparkle in their everyday life? This simple wearable is easy to make (if you know how to solder) and very comfortable and light. Inspired by the wonderful Adafruit Neopixel Crown, but a bit less labor-intensive, and with a much lower profile.
Step 1: Gather Materials
1. Tiny Lily
For super low-profile wearables like this, you really can't find a better board than the Tiny Lily. I absolutely adore this teeny tiny arduino. The size makes it easy to add to almost any project, the round form factor makes it perfect for wearables, and it's STILL as powerful as the Lilypad Arduino.
3. Neopixels
For this project, I used these Mini PCB Neopixels. But either the Breadboard Friendly or the Flora Smart Neopixels would be a little easier. For this exact project, I'd choose the Breadboard Friendly ones.
4. Wire. I used this ribbon, zippable, 28 AWG, lead-free wire from Digi-Key.
5. Battery
Step 2: Gather Tools
1. Soldering iron
2. Wire-stripper
3. Hot glue gun
Step 3: Wire everything up
The Neopixels are generally very well-labeled. V+ on the Neopixel connects to V+ from the Tiny Lily. GND connects to Ground. The signal from the Tiny Lily goes to the IN pin of the first Neopixel. The OUT pin from that Neopixel connects to the IN pin of the next Neopixel, and so on. Chain together the Neopixels in the configuration that you'd like to use. I didn't want to have to use any kind of external structure, so I made mine very simple.
The wires hold everything together. Be sure to test the connections as you're going. Once you're satisfied with the soldering, put some hot glue on the solder joints for strain relief.
If you're new to soldering, you can check out Adafruit's Guide to Excellent Soldering.
Step 4: Upload the Code
I haven't found a better sketch than this one, posted by johncarl81. It was ported from the LolShield for use on Neopixels. The patterns it makes are mesmerizing: both unpredictable and very smooth.
To load this onto your project, you'll need to edit two lines:
https://github.com/johncarl81/neopixelplasma/blob/...
The first parameter of that constructor is the number of LEDs attached, and the second is the pin they're connected to. In the original sketch, there are 40 Neopixels connected to pin #6:
const int NUM_LEDS = 40; const int LED_PIN = 6;
Adafruit_NeoPixel strip = Adafruit_NeoPixel(NUM_LEDS, LED_PIN, NEO_GRB + NEO_KHZ800);
You'll need to update those numbers to work on your project. For instance, if you have 5 Neopixels connected to pin #1, those lines would look like this:
const int NUM_LEDS = 5; const int LED_PIN = 1;
For this project, my 3 Neopixels are attached to pin #3, so it looks like this:
const int NUM_LEDS = 3; const int LED_PIN = 3;
Adafruit_NeoPixel strip = Adafruit_NeoPixel(NUM_LEDS, LED_PIN, NEO_GRB + NEO_KHZ800);
You can also play around with the parameters. For instance, these two lines have an effect on the speed and colors that you'll see:
https://github.com/johncarl81/neopixelplasma/blob/...
Step 5: Connect it all together, and wear it!
Note that the TinyLily connects to the Battery Adapter in a non-intuitive way. You need to connect it so that two pins are "in" the adapter, and three pins are out. Apparently there was a small error in the design process.
This little battery is light enough to simply tuck underneath the LEDs. I hold it in place with some bobby pins. It's so light I usually forget it's there.
If you wanted to make this blend in a bit more, you could use wires that are the same colour as your hair. Personally, I enjoy the way the wires look. I wonder how this would look in blonde or gray hair!


Comments
Please log in or sign up to comment.