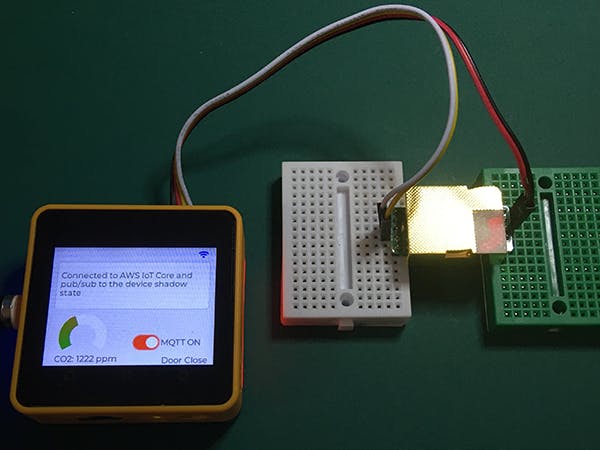
In a world where COVID-19 is prevalent, many of you may be working remotely. When doing so, if the room is closed off, the carbon dioxide level will rise before you know it and you will not be able to concentrate properly. My project is a system that uses M5Stack Core2 for AWSIoT EduKit as the core, and works with AWS to detect CO2 sensor readings and door opening/closing status, and alerts the user via voice.
- AWS Account
- Amazon Developer Services Account
To use this system, you will need the above two accounts since you will be using AWS Lambda and Alexa Skills.
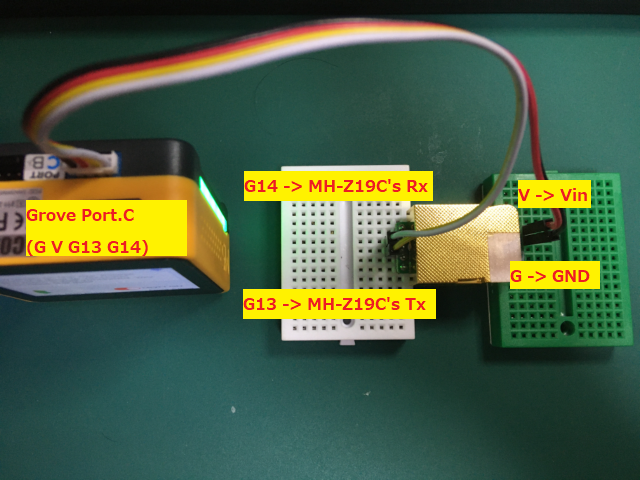
How To UseConnect the CO2 sensor with Port.C of M5Stack Core2 for AWSIoT EduKit. C of M5Stack Core2 for AWSIoT EduKit. After that, turn on the power and turn on the switch that says "MQTT OFF" to start communication with AWS.
- Warning starts when CO2 sensor readings exceed 1500ppm. When the door is opened, the warning will stop, and when it is below 1000ppm, it will inform you of the message that it is safe to close the door.
1. Amazon Echo and SwitchBot Contact Sensor and Hub Mini
Connect them to your network and set it up to work with Alexa.
2. Alexa App(iOS or Android)
Create two routines with the following settings.
(1) routine for open
- NAME: SwitchBot Contact Sensor open
- WHEN: door sensor opens
- ALEXA, : Customised→"open skill <<SkillNameForDoorOpen>>"
- FROM: Your Echo device
(2) routine for close
- NAME: SwitchBot Contact Sensor close
- WHEN: door sensor closes
- ALEXA, : Customised→"open skill <<SkillNameForDoorClose>>"
- FROM: Your Echo device
Attention:
<<SkillNameForDoorOpen>> and <<SkillNameForDoorClose>> where you enter the call invocations that you will set later.
3. Alexa Skills Kit
3.1. Create two Skills(for door open and for door close)
Create two skills that are invoked when the door is opened and when it is closed. The endpoint will be the ARN of the Lambda function. For endpoint, specify the ARN of the AWS Lambda to be created next.
(1) Skill Name: Door open ( and Door close)
(2) PrimaryLocale: English(US)
(3) Choose a model to add to your skill: Custom
(4) Choose a method to host your skill's backend resources: Alexa-hosted (Python)
(5) Click "Create Skill"
(6) Choose a template to add to your skill: Start from Scratch
3.2. Skill Setting
(1) Invocation
Attention: You cannot use open or close as the call name. Also, names that overlap with other skills are not allowed, so I chose the following two names.
Example:
- <<SkillNameForDoorOpen>>: takao's door sensor first
- <<SkillNameForDoorClose>>: takao's door sensor second
(2) Endpoint
The Skill ID will be copied to the Lambda function to be set later, so make a note of it. Also, set the ARN of the Lambda function you just set to the endpoint.
3.3. Build Model
After setting up Alexa Skills, you build each of the two skills.
4. AWS Lambda
4.1. Create two functions
Create two functions on AWS Lambda. Create them with the following Serverless Application Repository as the base. Application name
serverlessrepo-alexa-skills-kit-python36-factskill
When creating two applications, add -open and -close at the end to avoid duplication of names and create two applications.
(1) AWS Lambda Dashboard -> Create Function
(2) Choose「Browse serverless app Repository」 -> serverlessrepo-alexa-akills-kit-python36-factskill
(3) Application settings
- Application name: switchbot-contact-sensor-open ( and -close)
- SkillFunctionName: switchbot-contact-sensor-open ( and -close)
4.2. Setting
Set the same settings for the two functions. (But note that the values are different for open and close.
(1) Add trigger
Delete the automatically created triggers and add AlexaSkillsKit triggers by specifying the ARNs created by AlexaSkillsKit.
(2) Attach policy (AWSIoTDataAccess)
Attach the policy to the role of the Lambda function.
4.3. Change the code
Please refer to the comments and modify the code.
# ========== Add three lines to the first part.

import json
import boto3
iot = boto3.client('iot-data')

# ========== Change the GetNewFactHandler class as follows
# ========== The line with ### on the far right should be Open and Close,
# ========== and the <<<---CLIENT_ID--->>> part should be rewritten.

class GetNewFactHandler(AbstractRequestHandler):
    """Handler for Skill Launch and GetNewFact Intent."""
    def can_handle(self, handler_input):
        # type: (HandlerInput) -> bool
        return (is_request_type("LaunchRequest")(handler_input) or
                is_intent_name("GetNewSpaceFactIntent")(handler_input))

    def handle(self, handler_input):
        # type: (HandlerInput) -> Response
        logger.info("In GetNewFactHandler")
        topic = "$aws/things/<<<---CLIENT_ID--->>>/shadow/update"           ###

        payload = {
            "state" : {
                "desired" : {
                    "message" : "switchbot_contact_sensor_01",
                    "doorStatus" : "op" # or "cl"                           ###
                }
            }
        }
        try:
            iot.publish(
                topic=topic,
                qos=1,
                payload=json.dumps(payload, ensure_ascii=False)
            )
            iot_result = "Success! "

        except Exception as e:
            print(e)
            iot_result = "Failed! "

        speech = "The door is opened." # or "The door is closed."           ###

        handler_input.response_builder.speak(speech)
        return handler_input.response_builder.response
5. M5Stack Core2 for AWSIoT EduKit
Please refer to the README.md of M5Core2AWS_CO2_Monitor published in the Code topic. The URL of the MQTT endpoint is the same as in blinky-helloworld. Please refer to that one as well.
This application is modified version of AWSIoT EduKit's Smart-Thermostat. The setup is the same as blinky-hello-world.
https://edukit.workshop.aws/en/blinky-hello-world.html
ImprovementsAs a newbie to both AlexaSkill and AWS Lambda, I couldn't figure out how to pass in parameters when starting a skill. If I can parameterize the door state like "open skills <<skill name>> open" when I call it from the routine, I only need one AlexaSkill and one Lambda.
I'll try to improve it when I have time.
AcknowledgementsThanks to Hackster.io and AWS for organizing this contest, I found out that the potential of M5Stack Core2 for AWS is quite high.


Comments