
Hardware components | ||||||
| × | 1 | ||||
| × | 1 | ||||
 |
| × | 1 | |||
 |
| × | 1 | |||
| × | 1 | ||||
| × | 1 | ||||
| × | 1 | ||||
 |
| × | 1 | |||
| × | 1 | ||||
| × | 1 | ||||
| × | 1 | ||||
| × | 1 | ||||
Hand tools and fabrication machines | ||||||
 |
| |||||
 |
| |||||
This is adapted from Shawn Hymell's cloud connected cloud tutorial here.
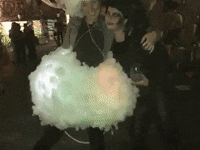
You may have seen these fun, fluffy clouds hanging in someone's house or office as light fixtures. We're going to adapt the design to be a wearable. Yup, a giant, fluffy, cloud shaped wearable. Also, it won't be cloud connected, but it will use a button to change patterns, which for our purposes actually works better.
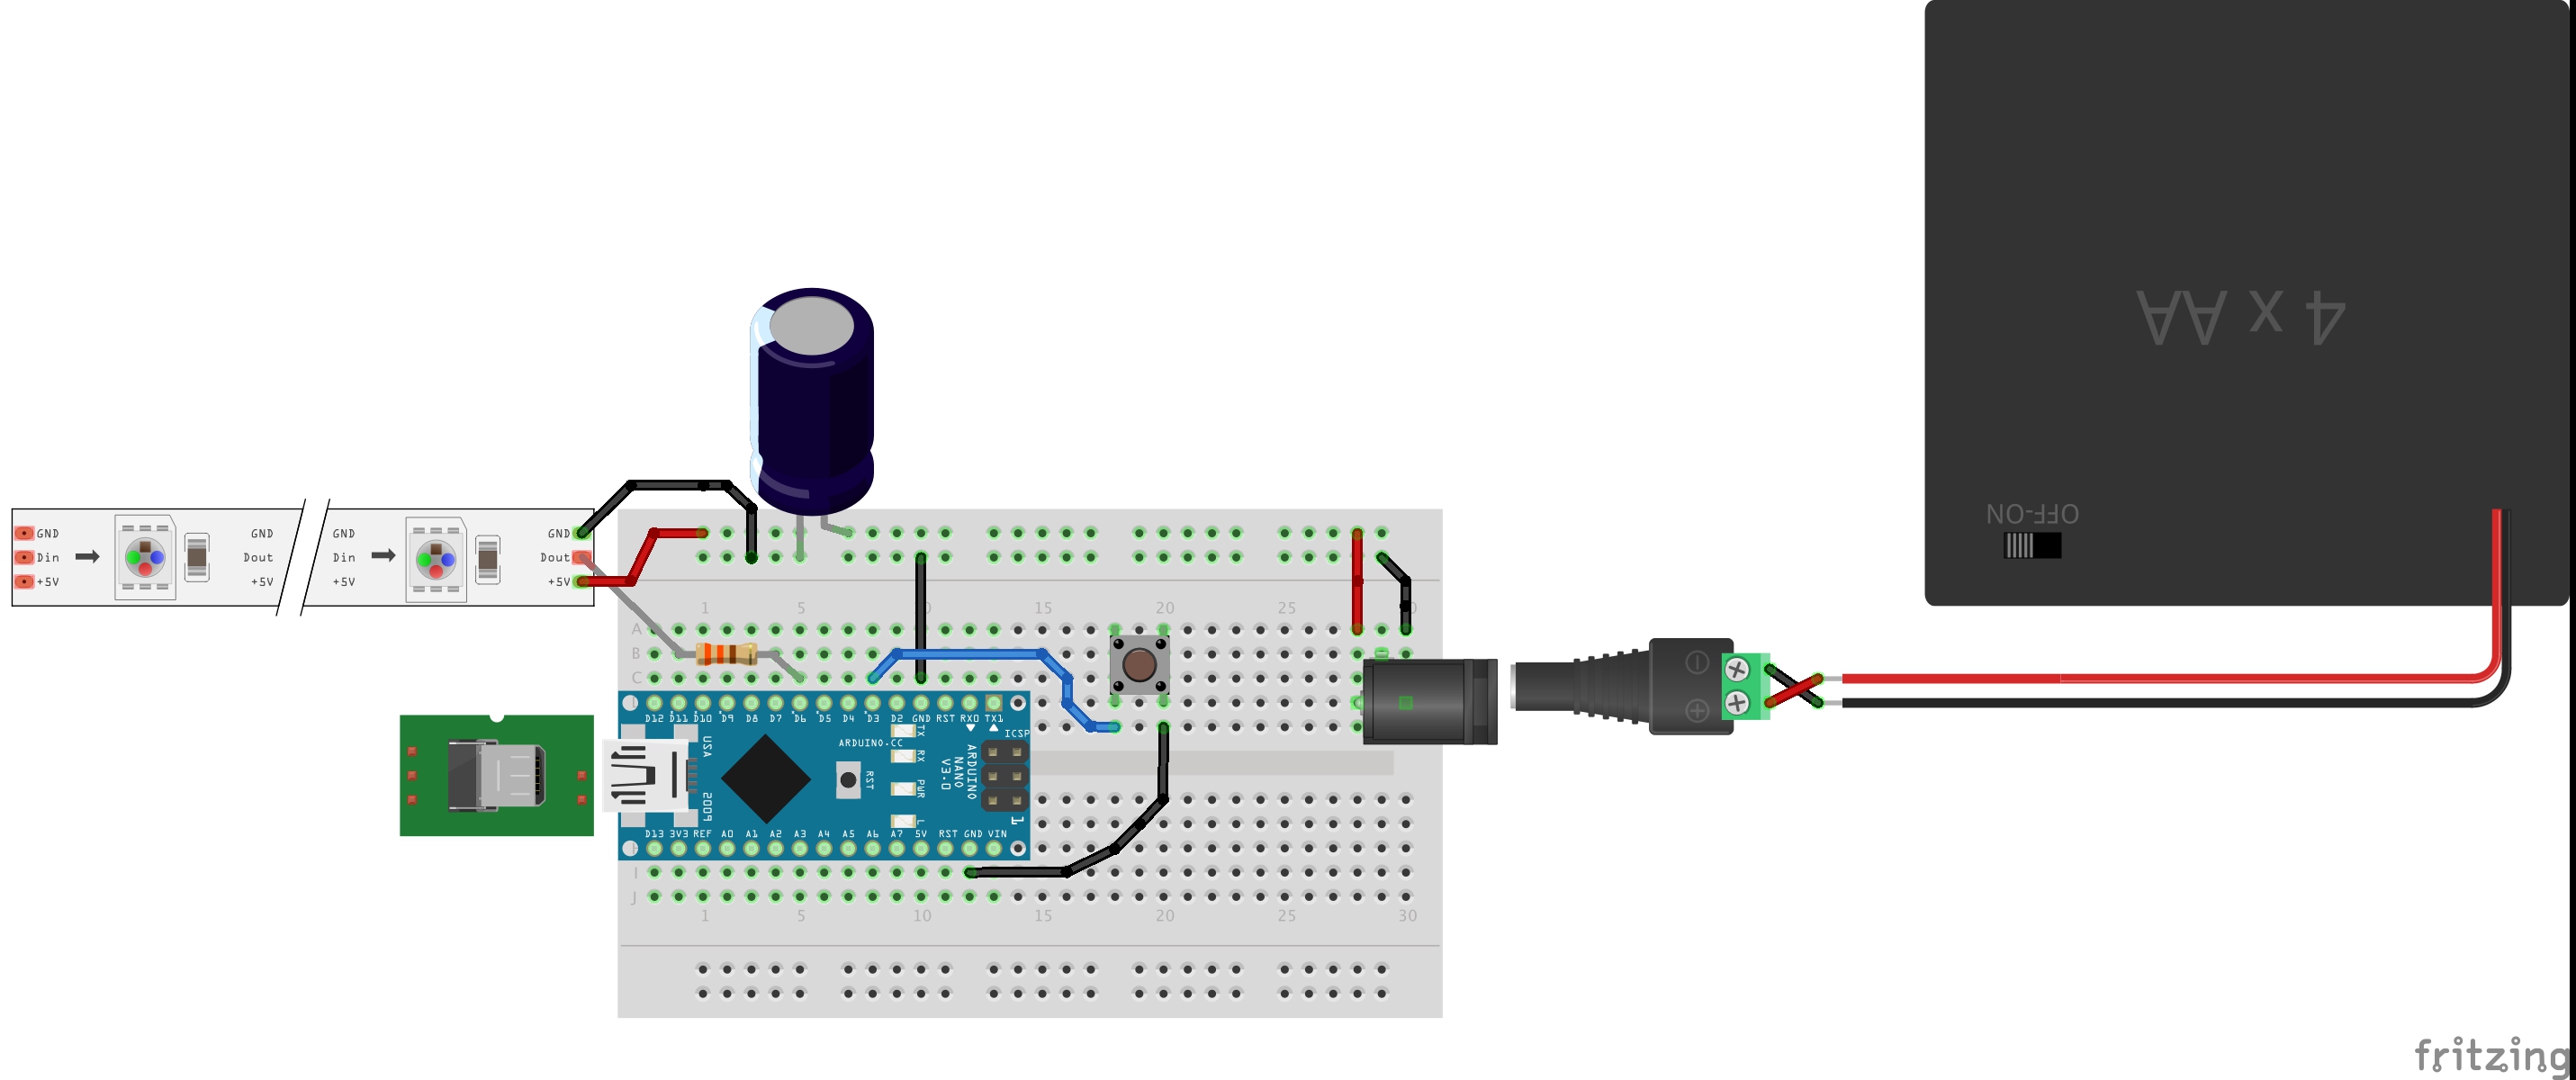
Gather your suppliesI'm using an Arduino Nano in this project because that's what I had. I like to use up my old hardware before getting new stuff.
The circuitThe circuit consists of a USB portable charger (not shown) connected to the arduino. The 5V LED strip has a 1000mF capacitor between ground and power and is connected via 330ohm resistor to pin 6 on the Arduino. There is a button connected to pin 3.
The barrel jack connects to the power source. Barrel jacks come in different polarities. The one I had, which I believe is this one from Sparkfun, worked like this:
Yours may need to have ground connected to the middle pin.
Powering the projectSince this is a costume, I've modified it to include two portable 5V power sources - a holder for 4 AA batteries for the LEDs and a portable charger for the Arduino.
I'm using a Nano 3.0.
From the docs:
The Arduino Nano can be powered via the Mini-B USB connection, 6-20V unregulated external power supply (pin 30), or 5V regulated external power supply (pin 27).
The portable charger we're using is regulated at 1 amp. It's 5V, so we should be good.
Powering the LEDsWe'll be powering the LEDs and our microcontroller separately. I just used a simple battery pack to power the microcontroller, and I'm using a 4 AA battery holder to power the LEDs.
Solder an 8"-12" three wire connector to the LEDs that you'll be powering (the one with the helpful arrow pointing âway).
Why is there a capacitor between the LED's ground and power?
- Before connecting NeoPixels to any large power source (DC “wall wart” or even a large battery), add a capacitor (1000 µF, 6.3V or higher) across the + and – terminals as shown above. The capacitor buffers sudden changes in the current drawn by the strip.
Why is there a 330 ohm resistor from the data pin?
- Place a 300 to 500 Ohm resistor between the Arduino data output pin and the input to the first NeoPixel. The resistor should be at the end of the wire closest to the NeoPixel(s), not the microcontroller. Some products already incorporate this resistor…if you’re not sure, add one…there’s no harm in doubling up!
Why is there a ground wire running from the board to the power sources ground?
- If your microcontroller and NeoPixels are powered from two different sources (e.g. separate batteries for each), there must be a ground connection between the two.
If you don't use the capacitor and resistor in the circuit, you'll greatly reduce the lifespan of your LEDs. You'll probably notice that the blue LEDs start to go first, leaving you with boring reds and greens. Follow the best practices and you'll save yourself some pain and ugly colors!
If you're having trouble with your circuit, here are some more troubleshooting practices from Adafruit's complete NeoPixel uberguide: https://learn.adafruit.com/adafruit-neopixel-uberguide/best-practices
Will our power source last the length of the party?We have 300 pixels, and we'll estimate 20mA per pixel.
300 NeoPixels X 20Ma ÷ 1000 = 6 Amps
A typical alkaline or NiMH battery in the standard “AA” size has 2 to 3 Ah. Four of these will give us 8-12 Ah, so the costume is going to last about 1.5-2 hours. You're probably going to need some spare batteries.
Actual results may vary.
Mine ended up lasting from 7pm to midnight, probably because the chasing patterns didn't use much power.
Making it lastGluegun glue is the trick to making the project last. I ended up losing my entire circuit board when I danced too hard and it fell off about six hours into my first Halloween party. When recreating it for the second party, I hot glued all of the wires. I also put the circuit board in a fanny pack.
Creating the cloudNow that you've created the circuit, it's time for the hard part - glueing pillow stuffing to a paper lantern in a way that will last through a Halloween party.
Cut the wire out of the top and bottom of the paper lantern. Cut a four inch line down two sides of the top of the lantern, and fold it over to create a hole in the top of the lantern big enough to fit your hips. Glue the folded over piece. Repeat on the underside.
Tear the poly-fil into small pieces and twist it to make it look interesting. Glue the pieces securely to the lantern, being careful not to burn your fingers. I recommend wearing gloves. Considering that it's the one I most frequently injure myself with, hot glue guns might be the most dangerous tool I use.
You don't have to cover every inch of the lantern - one bag of poly-fil will be more than enough. To get a neat poofy look that works well with the LEDs, vary the thickness of the pieces.
For the straps, cut two one foot lengths of elastic. These will provide some fun bounce. They might look short, but the elastic is pretty stretchy so the cloud should fall somewhere around your waist. To make straps, tie both ends of a strap about six inches apart around one of the lantern's wire supports 2-3 inches from the top. Add a dab of glue. If you have two arms, do the same on the opposite side of the top of the lantern. Don't tie the elastic to the top wire supports, as it will rip them out.
Now glue the LED strip facing inwards into the costume. With 5 meters I was able to do 3 loops around the cloud, which looked great.
I admit that after eight hours of dancing, my own costume was in tatters. I had to recreate it using a lot more glue for my second party.
Don't forget to spray your costume with flame retardant spray! If something short circuits, you don't want to go up in flames.
Adding the codeI added the Bounce2 library to debounce my button. I've also customized the code to use millis, rather than an interrupt, since the Arduino Nano I was using was tweaking out a lot and not processing the interrupt correctly.
The Nano has some particularities, and it especially seems to have difficulty with USB cables, so you may need to try various USB ports and cables if your code isn't uploading correctly.
This code certainly isn't perfect since I haven't had time to update it since I wrote it last minute before my Halloween party.
I also made a hatThe hat is optional, but I feel like it made me look more respectable.


_3u05Tpwasz.png?auto=compress%2Cformat&w=40&h=40&fit=fillmax&bg=fff&dpr=2)
Comments