


Hardware components | ||||||
_baVEVgguW1.jpg?auto=compress%2Cformat&w=48&h=48&fit=fill&bg=ffffff) |
| × | 1 | |||
 |
| × | 1 | |||
 |
| × | 1 | |||
Software apps and online services | ||||||
 |
| |||||
| ||||||
This project covers what bluetooth low energy is and how to use it with the Arduino 101. We'll go over services, characteristics, and how to control inputs and outputs on the Arduino via the LightBlue app on our phone.
Fun fact: bluetooth gets its name from a viking king, Harold Bluetooth, and the bluetooth logo is a combination of two runes.
A Bluetooth product, like a headset or watch, contains a tiny computer chip with a Bluetooth radio and software that makes it easy to connect to other bluetooth devices. When two Bluetooth devices want to talk to each other, they need to pair. Because bluetooth can't connect at long distances, bluetooth networks are called 'pico-nets' (pico means tiny).
As you might have guessed, there are different types of Bluetooth. The kind you use to stream high quality audio or video (for instance, in your wireless headphones) is called BR/EDR (basic rate/enhanced data rate). BR/EDR and Bluetooth Low Energy (BLE) are fundamentally different. Bluetooth with low energy functionality is built on an entirely new development framework using Generic Attributes, or GATT. Today, we're exploring BLE, since that's what Arduino 101 and most IoT devices use.
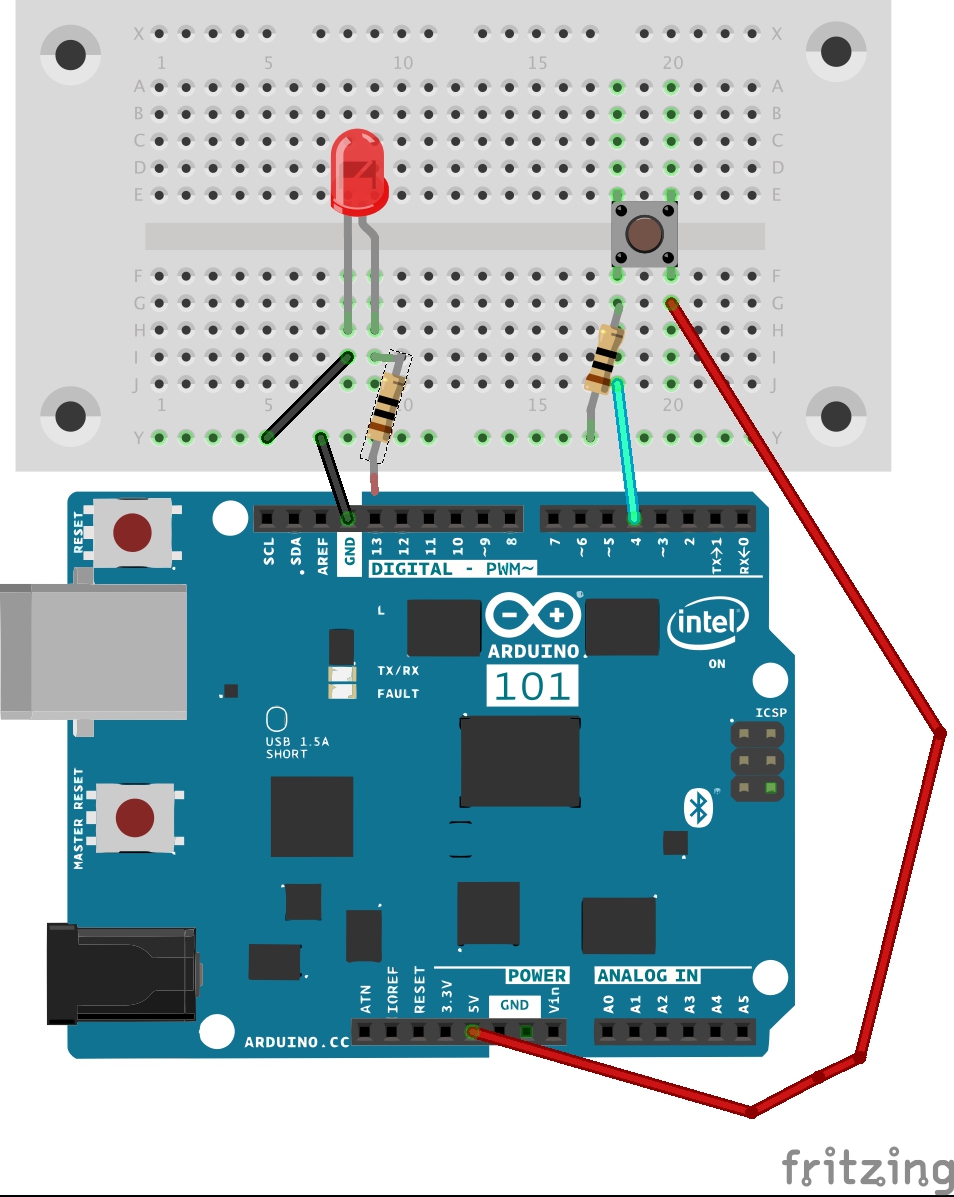
- Attach a button and an LED to Arduino pins 4 and 13 respectively (see diagram)
- Connect the Arduino 101 to your computer
- Upload the sketch 'Arduino 101 Button LED' to your Arduino 101.
- Install either LightBlue for iOS or nRF Control Panel for Android on your phone. I'll be using screenshots from LightBlue on my iphone, but nRF is easy to figure out!
- Turn bluetooth on on your phone.
- When you open the app, you'll probably see a device called 'ARDUINO 101-XXXX.' Click on it.
Once you're connected, you can see the advertisement data, including its Local Name (ButtonLED gets cut short to ButtonLE since the General Advertising Profile uses the Shortened Local Name, which only allows 8 characters). You can also see the service UUIDs and characteristic UUIDs (in this case they're the same). UUIDs are the randomly generated 128-bit characters that identify a unique Bluetooth service. All this data together is called the GAP, or General Advertising Profile.
The profile is created within the setup on lines 25-28 of the sketch:
 // set the local name peripheral advertises
 blePeripheral.setLocalName("ButtonLED");
 // set the UUID for the service this peripheral advertises:
 blePeripheral.setAdvertisedServiceUuid(ledService.uuid());
You can think of your Arduino 101, or any BLE Peripheral, as a newspaper publisher, say, the New York Times. The Arduino 101 prints 'news', called a service, every now and then. Readers or Central Devices like your phone can subscribe to the news.
Just as the New York Times prints both the Times and The Boston Globe, the Arduino 101 can have multiple services. Each service, in turn, can have multiple characteristics. These are like the different sections in the newspaper.
Services and characteristics are defined in the sketch here:
BLEService ledService("19B10010-E8F2-537E-4F6C-D104768A1214"); // create service
// create switch characteristic and allow remote device to read and write
BLECharCharacteristic ledCharacteristic("19B10011-E8F2-537E-4F6C-D104768A1214", BLERead | BLEWrite);
// create button characteristic and allow remote device to get notifications
BLECharCharacteristic buttonCharacteristic("19B10012-E8F2-537E-4F6C-D104768A1214", BLERead | BLENotify); // allows remote device to get notifications
In our case, we have an LED characteristic and a button characteristic.
On your phone, you can choose which characteristics you wish to subscribe to via a mechanism called notify. If you're subscribed to a characteristic, then every time the value of that characteristic changes, you get a notification. In this case, the characteristic you can subcribe to is whether or not our button was pressed.
Click on the UUID that has 'Read Notify' properties and try pressing the button a few times
:
Do you see the value changing from 0x00 to 0x01?
There's another property, called 'indicate,' which is the same as notify except that your reader sends back a response to let the peripheral know that they got the notification. We won't be using it in this sketch, but some reader devices require their peripherals to use indicate rather than notify, so it's good to be aware of it.
Characteristics can also be 'write' accessible. To extend the New York Times metaphor, this is kind of like letters to the editor, where the subscriber can send something to the publication. In this case, we're going to write a value to our light to tell it to turn on.
You can turn it to on by sending any value other than zero, and turn it back off by sending zero:
Rad! So now you can receive data from your peripheral (the Arduino 101) on your reader (your phone), as well as turn an LED off and on.
You also learned about read, write, notify and indicate properties, and how to combine them in characteristics to create services.
But guess what? You won't always need to create your own custom services or characteristics, because any service you can imagine has already been defined as a GATT service. Remember that GATT stands for General Attributes? Yeah, I have no idea how they came up with that acronym either. Anyway, GATT is the layer that defines services and characteristics and enables read/write/notify/indicate operations on them. Check out these long lists of predefined services and characteristics.
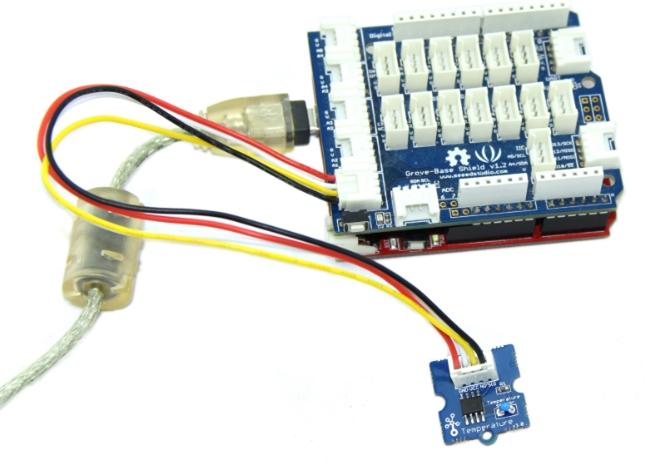
Let's set up a temperature monitor to test out one of these predefined services.
- Plug your grove temperature sensor into A0 of your grove shield attached ro your Arduino 101 as shown in "the circuit" above.
- Note: I used grove parts to simplify this, but you can easily use another temperature sensor - just be sure to include the appropriate library in your code!
- Open the BLE_Thermometer_blank sketch
I've left some of the values out of this sketch and given them placeholders (written in CAPS).
Each service and each characteristic that is predefined in the General Attributes has an ID. We'll need to find the documentation for the temperature service, choose the characteristics that we need, and find their IDs.
Go to the Gatt specifications page on bluetooth.com. Find the Health Thermometer Service.
On the service page, each characteristic is noted as being mandatory or optional. In the Temperature service, the mandatory one is called "Measurement."
Click on the blue text, and you'll be taken to the Temperature Measurement page. Here you can find the ID for the Measurement Characteristic. Add this to your code.
Now your code should look more like the BLE_Thermometer_final sketch. Upload it to your Arduino and run it! Connect your phone to your arduino with the Light Blue app. Hey look, we're getting data! But why does it say 0x0016? It's the temperature in hexadecimal.
In the Light Blue app, there's a list of data types that you can use. Hexadecimal is the default, but you can choose binary, bytes, integers, and signed integers, and you can choose big endian or little endian and how many bytes to include. We could spend all day playing with these, but we'll leave the discussion of data types for another day:
Unfortunately, the data in the LightBlue app isn't available to me in decimal, so I need to convert it to get the temperature in thei format that I'm used to. I pull out my handy hexadecimal converter and convert 0x0016 to decimal. I get 22. Hey look! The temperature showing in the serial monitor is also 22!
Nice work! Hopefully you understand slightly better how bluetooth communication is structured. Need an extra challenge? Try converting the temperature from Celcius to Farenheit.
Further reading:Using Bluetooth Low Energy with the Arduino 101
BLE Services: A beginners tutorial
BLE Characterstics: A beginners tutorial
Examples from the Arduino 101 pageDefinitely try these out!


_3u05Tpwasz.png?auto=compress%2Cformat&w=40&h=40&fit=fillmax&bg=fff&dpr=2)
Comments
Please log in or sign up to comment.