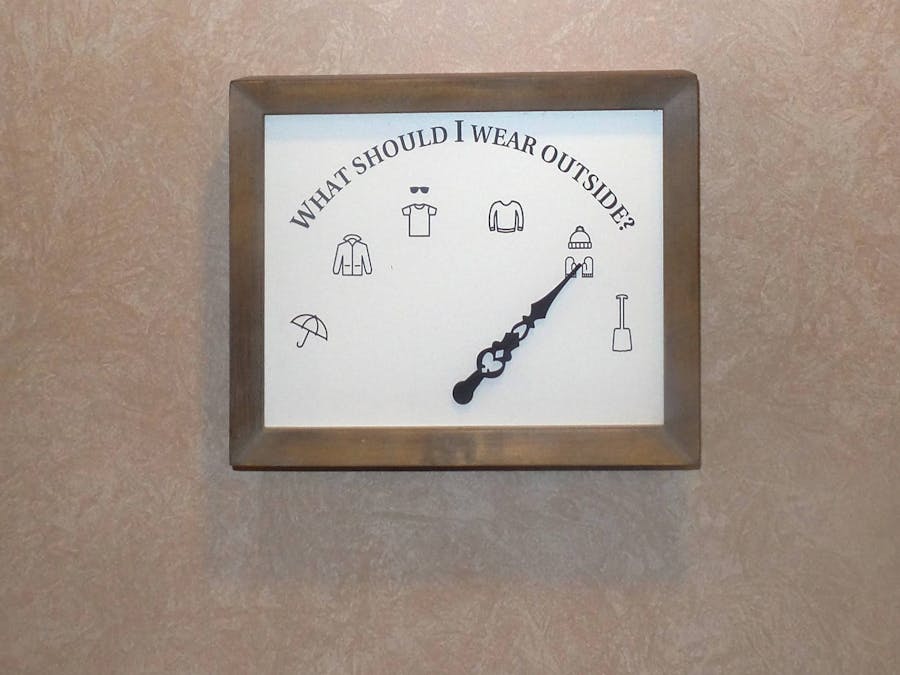
Here's some high tech decor element for your house: a clock that tells you what kind of clothes you need to be comfortable outside.
The idea is simple: use a servo motor to move a clock hand to point to a type of clothes based on the current weather forecast retried by the Particle Photon from forecast.io. The whole kit can be powered by batteries.
Let's see how to build it!
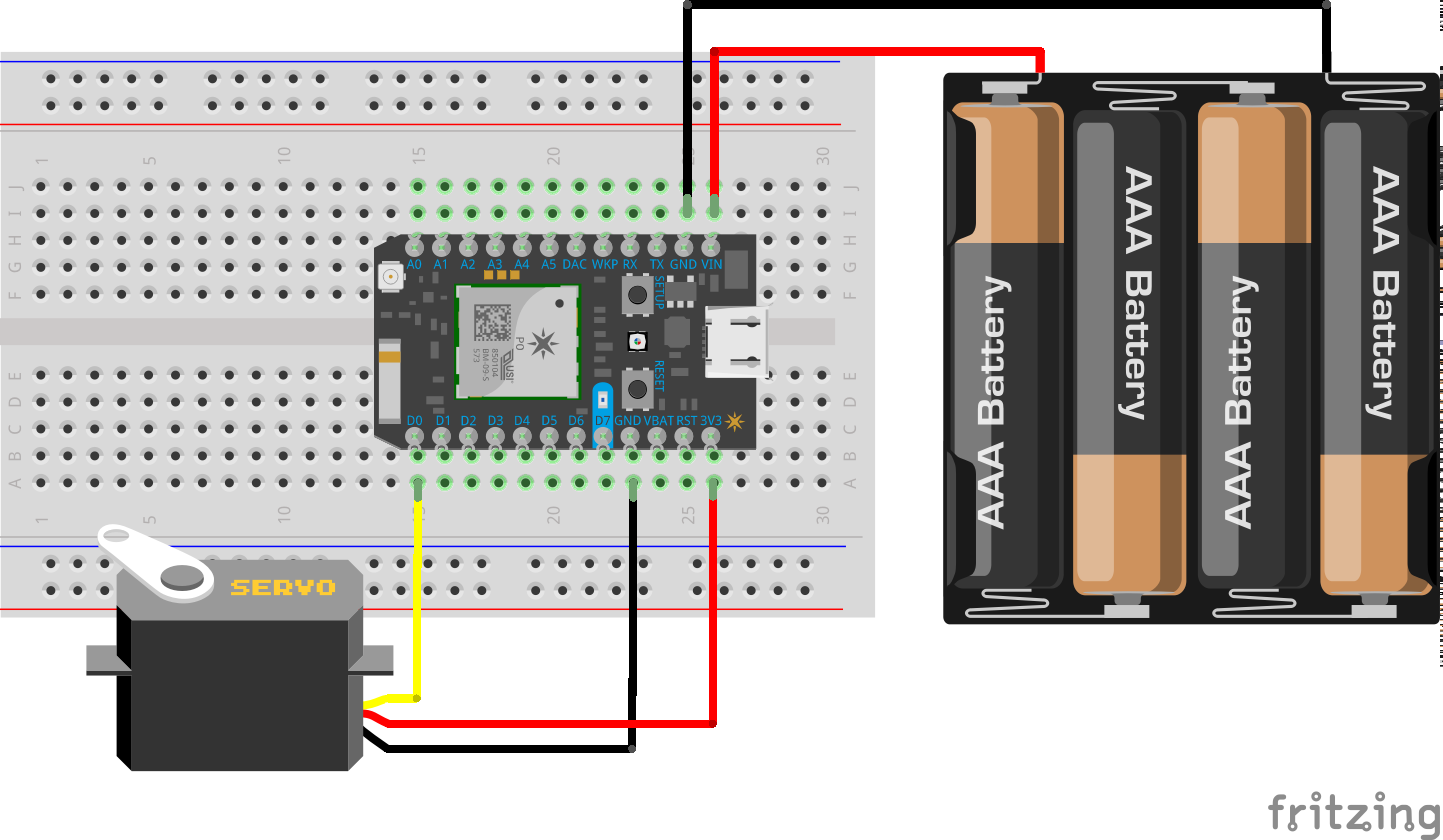
The prototypeFirst prototype the circuit on a desk. I used the servo that comes with the Particle Maker Kit. It has a range of about 170 degrees. The 3 wires are: power (orange), ground (brown) and desired position (yellow). I used a simple firmware to configure D0 as a servo pin and set the position of the servo from a cloud function.
You'll need a clock hand that can be controlled by the servo. Time for some 3D printing!
I found a very nice antique clock hand vector graphic in the cairo clock project.
Used Inkscape to convert that SVG file to a DXF (a 2D drawing format used in CAD programs). I used these instructions.
Essentially make sure the path was closed (add a stroke of a different color and make sure there are no gaps), then convert the curved lines to straight lines with Extensions -> Modify paths -> Flatten Beziers. The export is through Save as -> DXF R14.
To convert the 2D drawing to a 3D render I recommend using OpenSCAD. That program takes command to construct geometry instead of drawing directly on the screen. As a programmer, I find it more straightforward to use than CAD software geared towards mechanical engineers.
Notice how I left a notch in the 3D part? That will fit the white servo arm shown in the first photo.
You can print the clock hand yourself or have it done by an external company. I ended up printing the part through Shapeways in the black strong and flexible material. It looks great!
You'll need some kind of deep frame called a shadow box. I found exactly what I needed at Target. The dimentions are 8.5" x 11" by 1.25" deep.
To hold the servo in the frame you'll need to mount the servo to a 8.5" x 11" piece of foam core and cut a slot in the side of the frame to hold the foam core. I did those cuts on a table saw.
Assemble the shadow box by first putting the thin pieces of side, followed by the foam core assembly with the clock hand and servo, followed by the thick pieces of side. On top of that goes the shadow box back board. That back piece has hooks for hanging the project on the wall.
I split the software into 2 parts: the Photon firmware to move the pointer and a hook.io script to figure out which clothes to wear from the forecast.io weather forecast. The Particle cloud acts as a bridge between the Photon and the hook.io script.
The main reason for splitting is that it will be easier to continue tweaking the clothes decision code without draining the batteries in the frame by continuously reprogramming the Particle Photon.
The Photon firmware is straightforward.
- It connects to WiFi
- It sends a Particle event to ask what clothes to wear. That event will be forwarded to the web service through a Particle webhook
- It receives the webhook response with the clothes to wear
- If the clothes are different than last query, it moves the pointer
- It goes to deep sleep for 1 hour to preserve the batteries
The firmware source code is at:
https://github.com/monkbroc/what-to-wear/tree/master/firmware
To flash your own Photon, download the code and flash it with the Particle CLI
particle flash my_device_name firmware
The cloud service is made with hook.io, a simple way to create HTTP micro-services. You can read more about hook.io in this other Hackster article I wrote.
The code for the script does the following:
- Fetch the weather forecast for the requested location from
- If the forecast summary contain the words "rain" or "snow", recommend an "umbrella" or a "shovel"
- Depending on the current temperature, recommend "hat and gloves", "jacket", "sweater" or "tshirt"
Thanks to Chris Schults, co-founder of Fashion Stylist, for sharing his clothes determination code with me at the Ann Arbor Ruby meetup!
The hook source code is in a GitHub Gist.
https://gist.github.com/monkbroc/3f49f6bc6bd15fc9cbd8
To create your own hook, sign up to hook.io, create a new hook and point it to the Gist above. Don't forget to put your forecast.io API key and your latitude/longitude at https://hook.io/env
You can see my hook in action at http://hook.io/monkbroc/what-to-wear
Finally, tie together the Photon and the hook.io script by creating a Particle cloud webhook that will call the hook when the Photon publishes an event
particle webhook create what-to-wear http://hook.io/monkbroc/what-to-wear
Battery life is crucial in a portable project. Since the Photon is in deep sleep most of the time, I expected a long battery life.
Since the batteries ran down in 2 weeks only, I knew there was an unwanted current draw while the Photon slept.
To measure the current draw I inserted a 1 ohm resistor in series with the positive battery wire. A 1 volt drop across that resistor corresponds to a 1 ampere current in the clock circuit.
While the Photon is awake and connecting to Wi-Fi, the current ranges from 30 mA to 100 mA. This is expected.
When the Photon is asleep, the current is still 7 mA. This is the reason the batteries run down quickly. When disconnecting the servo motor ground wire, the current goes to 0 mA.
I have to disconnect the servo from the battery power while the Photon sleeps.
For this, I used an NPN transistor as a low-side switch. See this page for more details on using a transistor as a switch.
I also took the opportunity to connect the servo supply directly to the battery as suggested by John Horton in the comments. Thanks!
Update 6 months laterWith the changes above the battery life is now 4 1/2 months.
From now on, just glance at your weather clock on your way out the door.
Thanks!Thanks for reading and let me know if you build a weather clock too!


Comments
Please log in or sign up to comment.