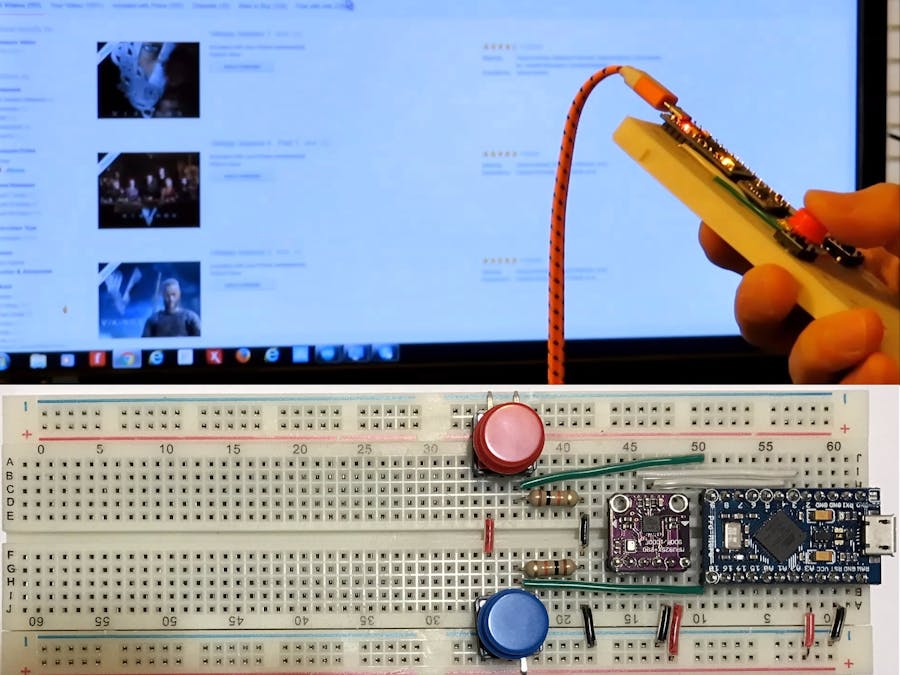
This project describes how to make a mouse that works in the air, using a 9DOF IMU and Arduino Pro Micro. The IMU detects movement of the mouse in your hand, and Arduino Pro Micro translates that movement to the cursor position on your computer screen. Essentially, you can swing your own mouse as a remote controller, and turn your computer to a smart TV. Is that cool?
DemoWhy do I want to make it? First of all, I am interested in using IMUs to detect human body motion and use that motion information to control machines. IMUs can be a perfect sensor for human machine interface applications. A mouse is probably the easiest human-computer interface (HCI) device, and you can easily realize it with Arduino Pro Micro. Second of all, it makes sense even from the practical perspective. Imagine when you are a bit far from your computer screen, e.g. when you are taking a break and sitting on your chair meters away from your computer, and want to watch YouTube videos. This mouse would allow you to select the video you like and navigate back and forth using the mouse by moving it in the air. You do not need a bench for your mouse any more.
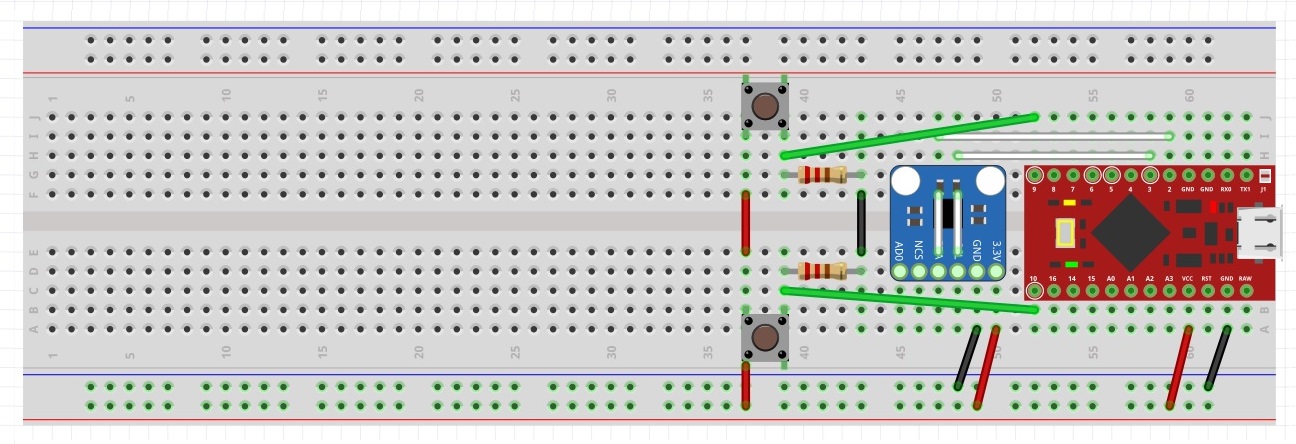
How does it work?The circuit schematic is shown in Figure 1, and you can connect all components on a breadboard as shown in Figure 2.
Following the a step-by-step description of the schematic along with its realization on breadboard.
1. Solder a pair of 11-pin connectors onto the Arduino Pro Micro and insert it into the breadboard.
2. Solder a 6-pin connector to the 10DOF IMU (MPU9250+BMP280) and insert it into breadboard;
3. Connect 4 corresponding pins from the Pro Micro and 10DOF IMU using copper wires on the breadboard, as shown in Figures 1 & 2. Pay attention to the SCL and SDA connection. There are 2 short white wires beneath the 9DOF IMU on breadboard (shown in Figure 1). The connections are:
Arduino Pro Micro <> IMU
- VCC <-----> +3V3
- GND <-----> GND
- 3 <-----> SCL
- 2 <-----> SDA
4. Two buttons are used as left and right buttons of the mouse. For each button, a 10k Ohm resistor is used as a pull down resistor. It is connected between GND and one end of a button, which is also connected to digital detection pin of Arduino Pro Micro (D9 and D10). The other end of a button is connected to VCC. Therefore, when the button is not pushed, the signal detected by Pro Micro is low; when the button is pushed, a high level signal is detected by Arduino Pro Micro. Use a micro USB cable to connect the Pro Micro to your computer. At this moment, you have built the hardware. Next step, we will develop the code for the mouse.
5. Download the code from here. Open the code in Arduino and download the code to the Pro Micro. Now, you have completed the air mouse development. Move the bread, and push the left and right button to check its function.
Understanding the codeBefore we go, let us understand the code. The code essentially has 2 major functions. One is to acquire motion measurement data from the IMU. The second is to make Pro Micro a mouse device and translate the motion information to control mouse cursor position on screen.
In this project, the orientation information is a direct output from MPU 9250's Digital Motion Processor (DMP), which is accurate enough for mouse application. To get this information, first you need to include the library file that defines the sensor class. Here we use MPU 6050's file:
#include "I2Cdev.h"
#include "MPU6050_9Axis_MotionApps41.h"
Next, you need to declare a sensor object, and initialize the sensor and its DMP function:
MPU6050 mpu;
mpu.initialize();
devStatus = mpu.dmpInitialize();
If the sensor works just fine, you can read and calculate the orientation information from DMP using the following code:
           mpu.dmpGetQuaternion(&q, fifoBuffer);
           mpu.dmpGetGravity(&gravity, &q);
           mpu.dmpGetYawPitchRoll(ypr, &q, &gravity);
           yaw = ypr[1] /PI * 180;
           pitch = ypr[2] /PI * 180;
           roll = ypr[0] /PI * 180;
The heading angle and tilting angle is used to control the position of the cursor on the screen. To make the Pro Micro a mouse, you only need to include the head file "mouse.h", which is already included in the Arduino Library. The following code shows how to convert the angle obtained from IMU's DMP to mouse movement and how to use the left and right button.
       vertValue = yaw - vertZero;
       horzValue = roll - horzZero;
       vertZero = yaw;
       horzZero = roll;
       if (vertValue != 0)
         Mouse.move(0, vertValue * sensitivity, 0);                                      // move mouse on y axis
       if (horzValue != 0)
         Mouse.move(horzValue * sensitivity, 0, 0);                                      // move mouse on x axis
       if ((digitalRead(left_button_pin))&&(!leftClickFlag))
       {
         leftClickFlag = 1;
         Mouse.press(MOUSE_LEFT);
       }
       else if ((digitalRead(left_button_pin))&&(leftClickFlag))
       {
         leftClickFlag = 0;
         Mouse.release(MOUSE_LEFT);
       }
       if (digitalRead(right_button_pin))
       {
         Mouse.click(MOUSE_RIGHT);
       }
Now, an IMU mouse that can work in the air is realized. By the way, this is also how a smartTV remote controller works.


Comments
Please log in or sign up to comment.