

Hardware components | ||||||
 |
| × | 1 | |||
 |
| × | 1 | |||
 |
| × | 1 | |||
Software apps and online services | ||||||
 |
| |||||
 |
| |||||
| ||||||
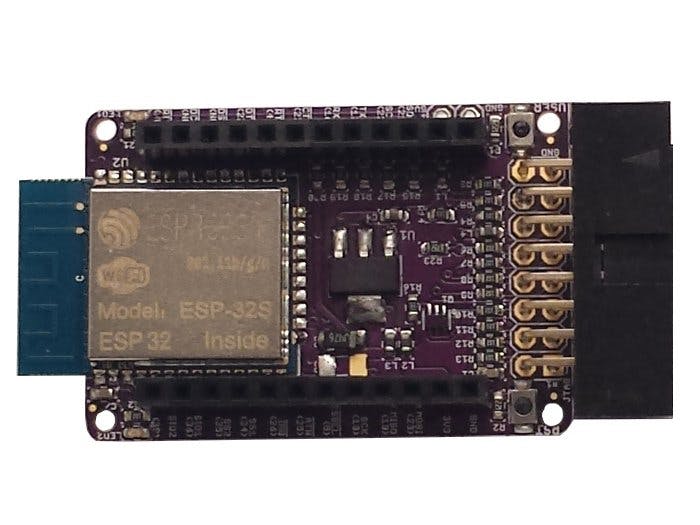
The TSOC_ESP32S is a new radio module from Espressif Systems. It is designed to be used either as a standalone module, or as a radio peripheral for other thingSoC processor modules. It is compatible with both the thingSoC module standard as well as the Mikrobus standard.
The ESP32 can perform as a complete standalone system or as a slave device to a host MCU to reduce communication stack overhead on the main application processor. The ESP32 can interface with other systems to provide Wi-Fi and Bluetooth functionality through the SPI / SDIO or I2C / UART interfaces.
The TSOC_ESP32S is a low cost, embeddable module featuring an ESP322 Radio device :
- Xtensa Dual-Core 32-bit LX6 microprocessor
- 160 or 240 MHz , performing at up to 600 DMIPS
- 520 KiB SRAM
- Wi-Fi 802.11b/g/n/e/i
- 12-bit SAR Anaalog to Digital Converter (18 Channels)
- 8-bit Digital to Analog Converter (2 Channels)
- Touch Sensing (10 Channels)
- Temperature Sensor
- SPI (4 Channels)
- I2S Audio (2 Channels)
- I2C (2 Channels)
- UART (3 Channels)
- SDIO/MMC Host (1 Channel)
- SDIO/SPI Slave (1 Channel)
- CAN Bus 2.0 (1 Channel)
- Power and USER LEDs
- Reset and Boot Mode Pushbuttons
- Optional 32Khz Crystal for Real-Time Clock
- thingSoC Compliant Module
- Mikrobus Compatible Module
Getting Started: The TSOC_ESP32S is very flexible, and there are a number of different ways to power and reprogram the board, including Over the Air using a Li-Po battery, using a thingSoC USBUART, or other "FTDI" type USB to UART adapters, as well as JTAG/SWD interfaces for "bare metal" programming.
Using the thingSoC USB to UART Adapter:- Plug the USBUART in the ESP32S and connect your USB cable to your computer.
- Note that the Green Power LED (LED2) illuminates, indicating the the ESP32S is powered
- Check your Wi-Fi connections, and you should see "Ai-Thinker_ESP32_xxxxxx", where the "xxxxxx" will be a unique number based on your MAC ID.
- Connect to the "Ai-Thinker_ESP32_xxxxxx" as your Wi-Fi hot spot connection.
- Now open a Web Browser and enter the URL "http://192.168.4.1" and you should see the following test web page :
- Using a USB-to-UART adaper, like the Sparkfun 5.0 Volt "FTDI Basic", plug the ESP32S board into your Windows, MAC, or Linux PC.
- Make sure to use the "top" row of pins and align the Ground Pins on top as shown below. THIS IS IMPORTANT, as you can DAMAGE your ESP32 board if connected incorrectly.
- Make sure that you only use the "top" row of pins – the bottom row is for 3.3V JTAG/SWD programming only!
Using the thingSoC "Miniprog" JTAG Adapter: The TSOC_ESP32S board can also be used with the thingSoC "Miniprog" adapter board, as shown below. The thingSoC "Miniprog" adapter board breaks out the UART, I2C, and the JTAG/SWD connections for testing and monitoring.
If you need to do "bare metal" JTAG programming, this provides a simple connection.
Lithium Battery Operation: The TSOC_ESP32S board includes two(2) pins for connecting a 5V power adapter, or directly connecting a 3.7 Volt to 4.2 Volt Lithium-Ion battery. That is all you need to do to power up the board when using Over-the-Air (OTA) programming. We are working on separate application note for Over-the-Air (OTA) programming using the ESP32S.
Safe Handling Precautions:- Always remove/unplug all power before inserting or removing peripherals.
- Always ground yourself by touching a ground point before handling your boards.
- Use a static safe bag when transporting your TSOC_ESP32S board.
Adding Peripherals:
The TSOC_ESP32S board supports both thingSoC and Mikrobus peripherals.
- Make sure to align the SQUARE/CUT edges of the boards together to insure that the polarity is correct. Push down evenly to seat the boards in the socket.
- Note that the "stacking pins" are somewhat longer by design, and there will be some extra space between the boards when using stacking connectors.
The TSOC_ESP32S has footprints on the reverse side of the board that are not populated by default. These include options for a Real-Time Clock Watch Crystal (32Khz) , and tank capacitors. Add these optional components if you require use of the on-board Real-Time Clock (RTC).
Complete documentation, including schematics, layouts, gerbers, and Bill of Materials (BOM) are available on the thingSoC website at: https://github.com/thingSoC/TSOC_ESP32S/tree/master/TSOC_ESP32S
There is also a project Wiki available for asking questions and more information at: https://github.com/thingSoC/TSOC_ESP32S/wiki


_3u05Tpwasz.png?auto=compress%2Cformat&w=40&h=40&fit=fillmax&bg=fff&dpr=2)
Comments