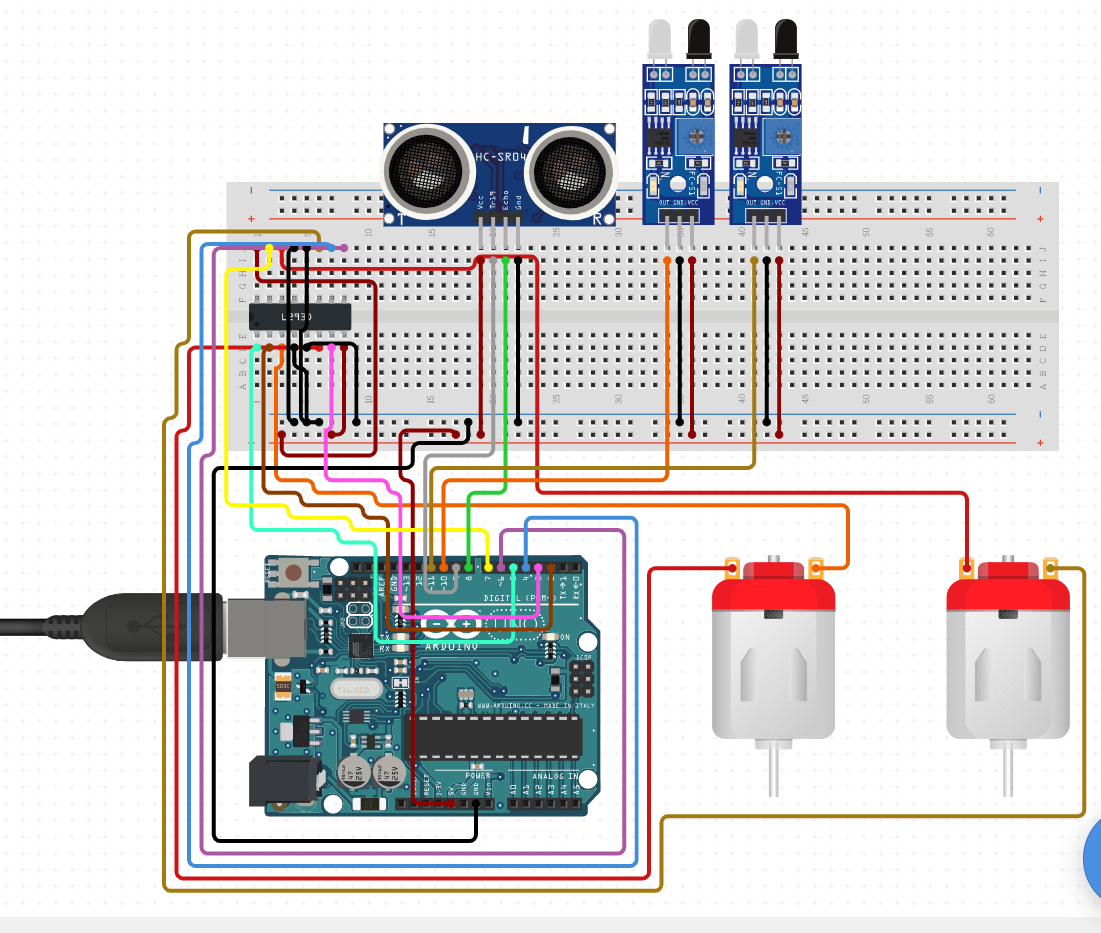
My project is a simple line follower robot. As the name itself implies, it is a robot that can follow a line. In this case, it is a black line on a white surface. In this tutorial, I will be explaining how to make a line follower robot and will also show one made by me.
I decided to make it for fun. I bought the Starter Kit for Arduino from RoboIndia. It is not necessary to use this kit to make it. However, it is a lot easier to do so, as you don't have to search for individual components.
Here is a full list of the required components:1. Chassis-These generally have to be bought, but they can also be something like wood which you can get on your own.
2.Wheels-These generally have to be rubber wheels.
3. Battery case- This is for putting batteries and running your robot. Should be good for 6 AA batteries.
4. Arduino board
5. Motor Shield. A simple motor shield is enough, with places for connections to the Arduino board. Usually, since the motor shield has direct connections with the Arduino board, and so if you connect something to a pin on the motor shield, it will be connected to the Arduino board.
6. IR sensors- The 2 IR sensors are used to detect the color of the surface.
7. BO Motors:-These are the motors which will actually be used to turn the wheels. 2 of these will be good enough.
8. Castor wheel- This is the wheel used in trolleys in supermarkets. This is what will be used in order to
Now, let's get to making the robot! Assembling it should not be that hard. All that is needed is to get the wheels under the robot. The IR sensors should be placed in such a way that the two LEDs on it face the surface on which the robot will be running. The HC SR04 should be placed where you think that it can detect other objects. Preferably somewhere higher will be good, although this is entirely up to you. The battery pack can be placed anywhere. I attached it under the main chassis.
The connections from the components to the board are very important. The motors should be connected to a motor driver. Mine is L293D.
In BO Motors, one wire is for moving backward, while the other wire is to move forward. So, while connecting the wires to the motor shield, it is generally good to connect two wires of the same motor next to each other. My motor shield, purchased from RoboIndia, comes with labels for where to put the wires in.
All of the other components have to be connected normally. They can either be connected to the Arduino or to the motor shield, as many motor shield already have connections to the Arduino. You will have to confirm if the pin number on the motor shield matches the pin number on the Arduino. The IR sensors have three wires. Here's how you connect the IR sensors to the Arduino:
IR --> Arduino
5v --> 5v
GND --> GND
D --> Any pin you want. My IR sensors are connected to pins 7 and 8. My left sensor is connected to 7 and my right sensor is connected to pin 8.
My motor shield comes with multiple pins for 5v and GND. If this is not the case with your motor shield, consider using a breadboard. These connections are quite simple to understand. The IR sensors need to have a power supply from 5v and then they should be connected to ground to complete the circuit. A pin is needed to program the sensor!
Next comes the connections made the HC SR04. If we can connect this, then we are done!
HC SR04 --> Arduino
VCC --> 5v
Echo --> Any pin
Trig --> Any pin
I have connected Echo to pin 10 and Trig to pin 9. An HC SR04 works in order to calculate the distance from it to the nearest object in front of it. The trig sends a sound pulse while the echo receives the sound pulse. Using the time taken for this, the distance can be calculated. However, in my code, I am using a library to make things a whole lot easier.
And that is all that is needed in terms of setting up. The last thing that is also very obvious is to just put the batteries into the battery case. Now we are ready to program our robot. I have explained the code in detail below.
Before we delve into the code, we must must understand how the robot works.
- First the distance to the nearest object is measured.
- If the distance is more than 29 cm, it means that the robot will not stop.
- Then, it checks the IR sensors.
- If the left IR sensor detects black, then the robot will move left in order to correct its path.
- If the right IR sensor detects black, it will move right to correct its path.
- When both IR sensors detect white, it will move forward.
- Finally, if both IR sensors detect black, it will stop. This is good for making it to stop.
Now, coming to how the robot will be able to perform the motions.
- To move forward, both motors have to spin in the forward direction. Simple enough.
- To turn right, the right motor has to stop and only the left motor has to spin forward.
- To turn left, the left motor has to stop and only the right motor has to spin forward.
- To stop, both motors have to stop spinning.
Here is a video of the robot working:


_ztBMuBhMHo.jpg?auto=compress%2Cformat&w=48&h=48&fit=fill&bg=ffffff)


Comments
Please log in or sign up to comment.