


Hardware components | ||||||
_ztBMuBhMHo.jpg?auto=compress%2Cformat&w=48&h=48&fit=fill&bg=ffffff) |
| × | 2 | |||
 |
| × | 1 | |||
 |
| × | 1 | |||
 |
| × | 1 | |||
 |
| × | 2 | |||
 |
| × | 1 | |||
Software apps and online services | ||||||
 |
| |||||
This project demonstrates the communication between two Bluetooth HC-05 modules. Here One Bluetooth module configures as master and the other is the slave.
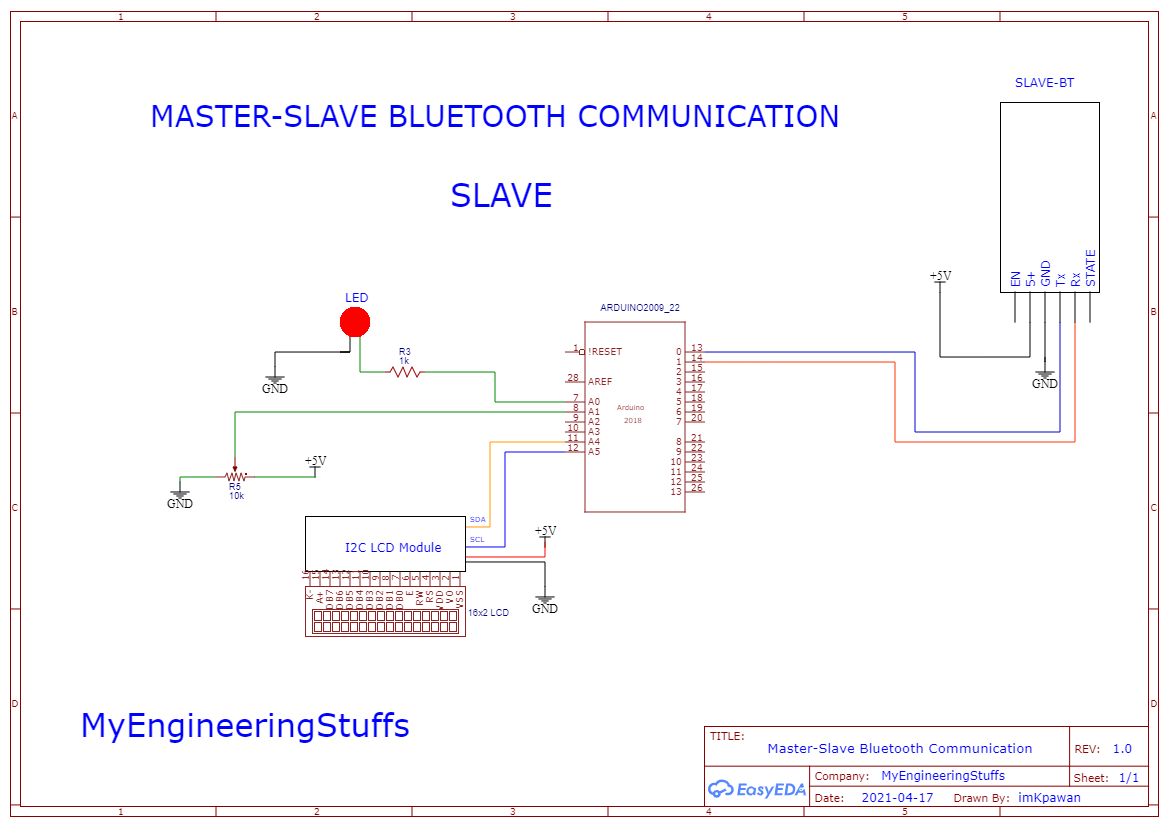
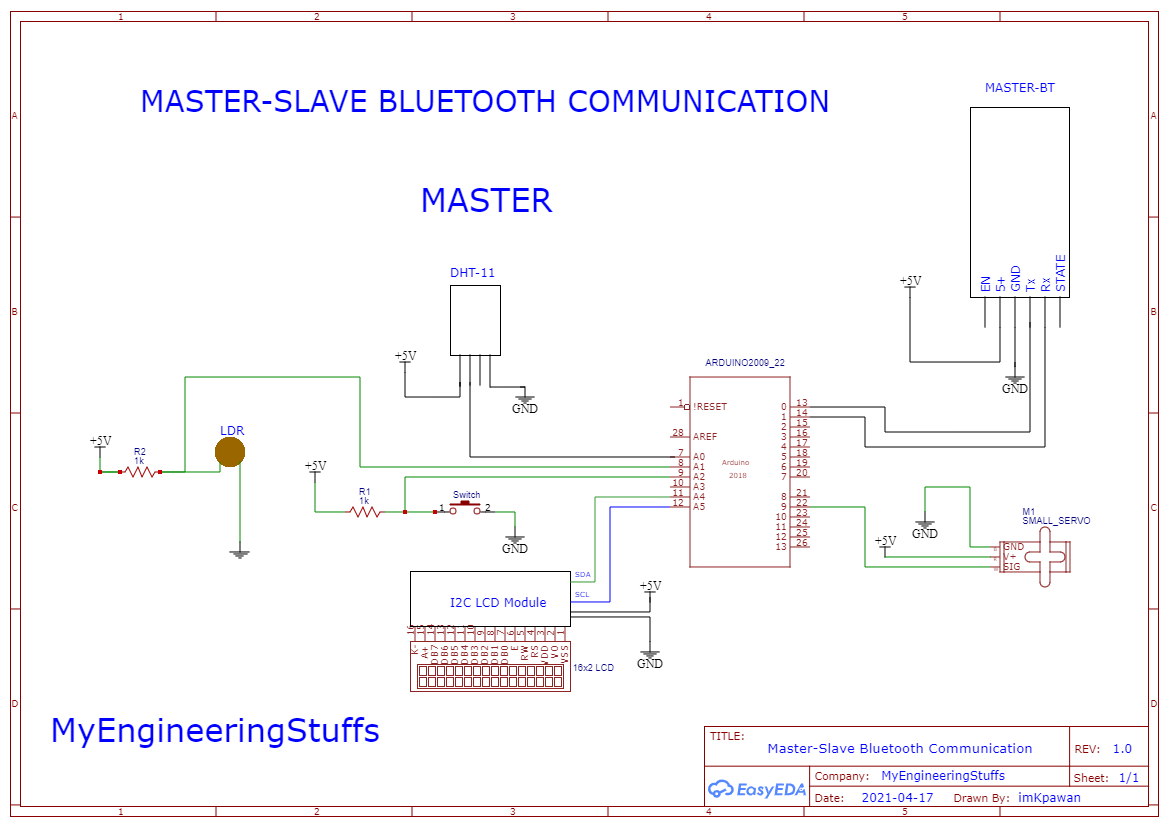
This project is built using Arduino UNO, servo, DHT11 sensor, LCD, LDR sensor, HC-05, and switch on the master side, whereas on the slave side Arduino UNO, LCD, 10K ohm variable pot, and HC-05 module is used.
The project works in the following manner:
- After turning ON both the system, Bluetooth modules automatically get connected, because the Master is configured to connect with a predefined Bluetooth module with the address.
- After successful connection data from the master starts displaying on the slave LCD.
- The user needs to turn the variable resistor and the servo movement and be seen on the master side.
Same at the master side a switch is there to turn ON the LED on the slave side.
Hardware Requirements:
MASTER SIDE:- 👉 Small Bread Board
- 👉 Arduino UNO
- 👉 I2C LCD Module
- 👉 16x2 LCD Module
- 👉 HC-05 Bluetooth module
For the complete components requirements, you can click here.
SLAVE SIDE:For the complete components requirements, you can click here.
Software Requirements:
- Arduino IDE (You can download it from HERE).
- Arduino DHT Library (Download it from HERE).
- Arduino I2C LCD Library (Download it from HERE).
- Wire Library (Inbuilt within the IDE).
- Servo Library (Inbuilt within the IDE).
Configure HC-05 as master and slave using AT-COMMANDS
Follow the above circuit diagram and provide the below AT-COMMANDS one after another to convert as MASTER or SLAVE.
SLAVE:STEP1: AT to check the module status and it will respond with OK.
STEP2: AT+ROLE? is to get the module role if it responds with '0' it is in SLAVE mode and if it is '1' then it is in MASTER mode. After checking if it is '0' then no need to change anything. But if it responds with '1' then again provide AT+ROLE=0 in the serial terminal to change the module to SLAVE mode.
STEP3: AT+ADDR? the command is to get the address of the module. (mine 21:13:5B50) DONE!
MASTER:STEP1: AT to check the module status and it will respond with OK.
STEP2: AT+ROLE? is to get the module role if it responds with '0' it is in SLAVE mode and if it is '1' then it is in MASTER mode. After checking if it is '1' then no need to change anything. But if it responds with '0' then again provide AT+ROLE=1 in the serial terminal to change the module to MASTER mode.
STEP3: AT+CMODE=1 this command is provided to fix the address of the slave. And whenever the slave and master turned ON the master will automatically get connected with the slave's address.
STEP4: AT+BIND=21, 13, 5B50 this command will bind with the slave address. As you can see my Bluetooth address is 21:13:5B50 but we have provided it with a comma-separated. So, you need to follow the same procedure to work properly. DONE!
Testing: Now just turn on both the modules, and you will see the master will connect automatically to the slave by changing the LED blinking frequency. It increases the time delay between the blinks.
You can follow the complete video tutorial for more details.
To understand the complete master circuit and connection you can click here.


Comments
Please log in or sign up to comment.