


Hardware components | ||||||
| × | 1 | ||||
| × | 1 | ||||
| × | 1 | ||||
| × | 1 | ||||
| × | 1 | ||||
| × | 1 | ||||
| × | 1 | ||||
Software apps and online services | ||||||
| ||||||
 |
| |||||
Hand tools and fabrication machines | ||||||
 |
| |||||
 |
| |||||
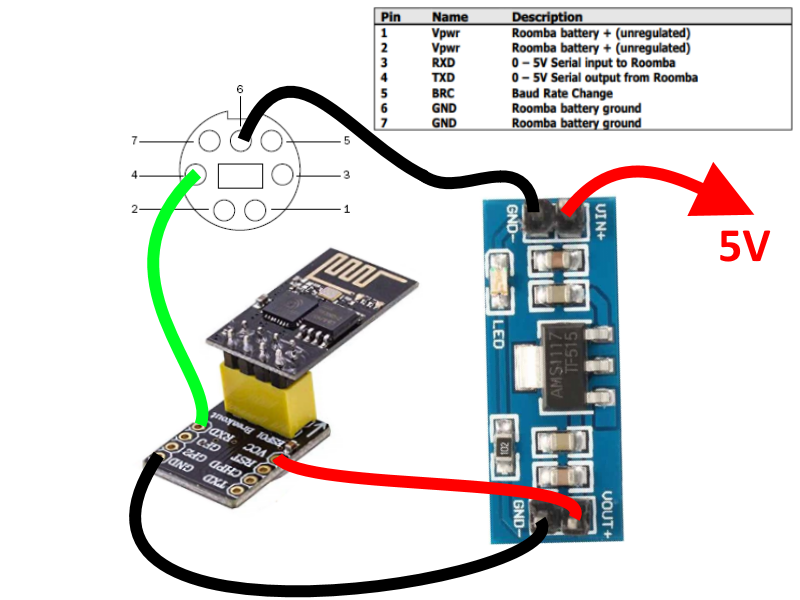
I replaced the AMS1117 voltage stabilizer with MP1584EN so there is no need to solder on the motherboard. More info here: iRobot Roomba voice control with Amazon Alexa
We can start the Roomba with a quick voice command before leaving the apartment to keep the floor clean by the time we get home. The implementation requires a working ioBroker server, a properly licensed IoT Assistant adapter, Amazon Echo, or Echo Dot to control the robotic vacuum cleaner with Alexa.
Of course, the hardware is essential, an iRobot Roomba (I had a 531 victim) ESP8266-01 with Breadboard Adapter and AMS1117 Voltage Stabilizer.
You can issue commands to Roomba via a serial port. This is a mini DIN 7-pin connector called “iRobot Roomba® Open Interface”.
First, we dismantle the Roomba. Remove the dust container and brushes first. After removing the 4 screws, lift off the bottom cover and then remove the battery.
In the next step, remove the bumper, remove the top cover plate, and then unscrew the bolts underneath. The 2 screws on the handle do not need to be removed.
Remove the cover.
Prepare the circuit as follows.
Find a stable 5V source on the motherboard to power the circuit. I found it here on my Roomba 531 vacuum cleaner.
Then let's install it. I found space for ESP8266-01 and AMS1117 at the bottom right, it fit exactly.
Of course, the ESP8266 must be programmed before assembly. Open the Arduino app and load the code. Enter the information required to connect: SSID, Password and ioBroker IP address, then upload the code.
/**************************************/
//  https://myhomethings.eu           //
//  Generic ESP8266 module            //
//  Flash size: 1M (no SPIFFS)        //
/**************************************/

#include <ESP8266WiFi.h>
#include <PubSubClient.h>

const char* ssid = "SSID";
const char* password = "Password";
const char* mqtt_server = "192.168.x.xxx";

WiFiClient espClient;
PubSubClient client(espClient);

void setup_wifi()
{
  delay(100);
  WiFi.mode(WIFI_STA);
  WiFi.begin(ssid, password);

  while (WiFi.status() != WL_CONNECTED)
  {
    delay(500);
  }
  randomSeed(micros());
}

void reconnect()
{
  while (!client.connected())
  {
    String clientId = "ESP8266Client_Roomba";

    if (client.connect(clientId.c_str()))
    {
      client.subscribe("Roomba");
    }
    else
    {
      delay(6000);
    }
  }
}

void callback(char* topic, byte* payload, unsigned int length)
{
  payload[length] = '\0';
  String strTopic = String(topic);
  String strPayload = String((char * ) payload);

  if(strTopic == "Roomba")
  {
    if(strPayload == "true")
    {
      Serial.write(128);  // start command
      delay(50);
      Serial.write(131);  // safe mod
      delay(50);
      Serial.write(135);  // clean
    }
    if(strPayload == "false")
    {
      Serial.write(128);  // start command
      delay(50);
      Serial.write(131);  // safe mod
      delay(50);
      Serial.write(143);  // dock
    }
  }
}

void setup()
{
  Serial.begin(115200);
  setup_wifi();
  delay(1000);
  client.setServer(mqtt_server, 1883);
  client.setCallback(callback);
}

void loop()
{
  if (!client.connected())
  {
    reconnect();
  }
  client.loop();
}
If the circuit is assembled, ESP8266-01 is programmed, assemble the Roomba in the reverse order of disassembly. Be careful not to get caught in the wires.
With this, the hardware is ready.
Let’s look at ioBroker on the Object tab under MQTT, the new device had to appear.
If set to “true” it will start cleaning, if “false” it will look for the dock.
I assume the “IoT Assistants” adapter is installed, configured, and properly licensed. On the Instances tab, select the iot.0 adapter and add the Roomba device as a switch to the Alexa devices.
This completes the ioBroker section.
Now open the Amazon Alexa app on your phone and add a new device.
Within the Amazon Alexa app, you can create routines, automate the process, and more...
From now on, you can also control the roomba with your voice using Amazon Echo / Echo Dot. : “Alexa, turn on Roomba”
See more ESP32, ESP8266, and Arduino examples.
I hope you enjoyed this post. I look forward to your feedback.
Have a nice day!


Comments
Please log in or sign up to comment.