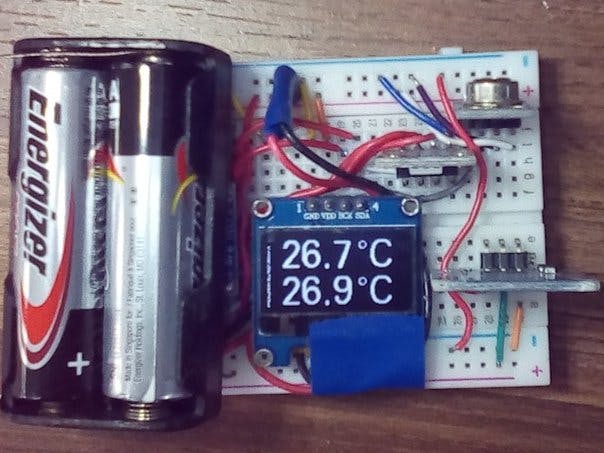
It took a long time to make a work, a Forehead thermometer! The only work that was useful during the epidemic!
Recap
Since February 2020, the new crown pneumonia epidemic has been out of control, making everyone very scared.
In April 2020, when I was studying programs at school, my teacher told me that I found a website to teach you how to make a cheap forehead thermometer, so I clicked it in and took a look. The next day, the teacher took out three electric components:
1.Arduino Pro Micro
2.mlx90614
3.SSD1306 oled
Then tell me that I bought the parts to make the forehead gun, and I can show you the research. I first tried to use the sample program on the webpage, but that sample program only constantly updates the sensed values, so I decided to improve it. Wo first added a button on it and added a program to read the button signal, but it was unsuccessful. Later I found that the button I used usually outputs 1, and when pressed, it outputs 0. After a change, it succeeded. Ya! Later, I added an LED to indicate the temperature, but it was still not accurate after the time measurement, so I added a continuous reading for 1 second, reading every 0.1 seconds, and finally calculating the average value, it became accurate!
step
1. Prepare all the materials first.
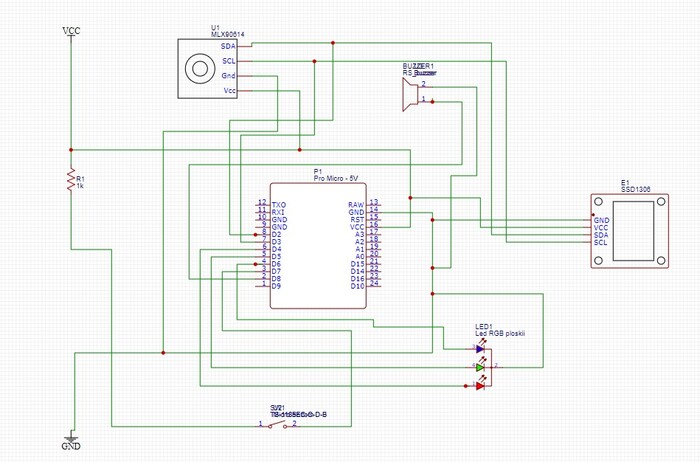
2. Start to assemble the circuit.
3. Connect to the computer and write the program!
Sample program:
#include <Wire.h>
#include <Adafruit_MLX90614.h>
#include <U8glib.h>
String getSerialChar(HardwareSerial *serial) {
 String content = "";
 content += (char)serial->read();
 return content;
}
float GH;
float a = 0.0;
float b = 0.0;
float c = 0.0;
float d = 0.0;
float e = 0.0;
float f = 0.0;
float g = 0.0;
float h = 0.0;
float i = 0.0;
float j = 0.0;
Adafruit_MLX90614 mlx = Adafruit_MLX90614();
U8GLIB_SH1106_128X64 u8g(U8G_I2C_OPT_NONE); // I2C / TWI ;
float tmax = 0.00;
void draw(void) {
// graphic commands to redraw the complete screen should be placed here
u8g.setFont(u8g_font_fur25);
u8g.setPrintPos(10, 29);
u8g.print(GH,1);
u8g.drawStr( 80, 29, "\260C");
u8g.setPrintPos(10, 63);
u8g.print(tmax,1);
u8g.drawStr( 80, 63, "\260C");
}
void setup() {
Serial.begin(9600);
Serial.println("Adafruit MLX90614 test");
mlx.begin();
pinMode(7, INPUT);//switch
pinMode(8, OUTPUT);//buzzer
pinMode(4, OUTPUT);//red
pinMode(5, OUTPUT);//green
pinMode(6, OUTPUT);//blue
digitalWrite(8, HIGH);
// flip screen, if required
// u8g.setRot180();
}
void loop() {
if (digitalRead(7) ==LOW ) {
   while (!digitalRead(7) ==HIGH );
 }
 digitalWrite(5, HIGH);
     digitalWrite(6, HIGH);
 a = mlx.readObjectTempC();
 delay(100);
 b = mlx.readObjectTempC();
 delay(100);
 c = mlx.readObjectTempC();
 delay(100);
 d = mlx.readObjectTempC();
 delay(100);
 e = mlx.readObjectTempC();
 delay(100);
 f = mlx.readObjectTempC();
 delay(100);
 g = mlx.readObjectTempC();
 delay(100);
 h = mlx.readObjectTempC();
 delay(100);
 i = mlx.readObjectTempC();
 delay(100);
 j = mlx.readObjectTempC();
 delay(100);
digitalWrite(5, LOW);
digitalWrite(6, LOW);
 digitalWrite(8, LOW);
delay(100);
digitalWrite(8, HIGH);
GH = (a + b + c+ d + e + f+ g + h + i + j) / 10;
Serial.print("Ambient = "); Serial.print(mlx.readAmbientTempC());
Serial.print("*C\tObject = "); Serial.print(mlx.readObjectTempC()); Serial.println("*C");
Serial.print("Ambient = "); Serial.print(mlx.readAmbientTempF());
Serial.print("*F\tObject = "); Serial.print(mlx.readObjectTempF()); Serial.println("*F");
Serial.print(GH); Serial.println("*C");
Serial.println();
if (tmax<mlx.readObjectTempC()){
tmax = mlx.readObjectTempC();
}
u8g.firstPage();
do {
draw();
} while( u8g.nextPage() );
if (GH > 37.5) {
   digitalWrite(4, HIGH);
   delay(1000);
   digitalWrite(4, LOW);
 } else if (GH < 37.0) {
   digitalWrite(6, HIGH);
   delay(1000);
   digitalWrite(6, LOW);
 }
delay(1000);
}
Program explanation
Lines 1-3: Refer to the library of the screen and temperature measurement module.
Lines 12-22: Temporarily store the output data of the temperature measurement module.
Lines 24-26: Initialize the temperature measurement module.
Line 28-36: Display the temperature on the screen.
Lines 38-50: Initialize the Arduino Pro Micro version and set the pins of peripheral components.
Line 52-113: Main program.
Lines 53, 54: Determine whether the switch is pressed (The switch I used usually outputs 1 and outputs 0 when pressed. Readers, if you use a switch that outputs 1 when pressed, remember to change it to: if (digitalRead(7) == HIGH) {.......
Lines 57-58: lights up (blue and green).
Line 61-78: Record the temperature.
Line 82-83: Turn off the lights.
Line 84-86: Let the buzzer be longer than 0.1 second.
Line 87: Take the average of ten values.
Line 95-100: Display the temperature on the screen.
Lines 101-110: Determine whether the temperature exceeds 37.5 degrees Celsius, and if so, turn on the red light.
manufacture complete!


_3u05Tpwasz.png?auto=compress%2Cformat&w=40&h=40&fit=fillmax&bg=fff&dpr=2)
Comments
Please log in or sign up to comment.