


Hardware components | ||||||
 |
| × | 1 | |||
Software apps and online services | ||||||
 |
| |||||
Hand tools and fabrication machines | ||||||
| ||||||
I have done fab isp using FTDI cable to connect to the pc before, a different model since in this design there is tricky idea to power the micro-controller during the initial burning.
The 0 OHM resistor is used to power the micro-controller for the first time it is designed such a way that we can break of the resistor part after the initial burning of AtTiny 44A. This is the design.
I have set the copper plate and since I was milling first chose the 1/64 bit and adjusted the bit to the space i wanted to mill and brought to the right place and using allen keys made the bit touch the surface.
Then I didn't got the right milling.
Since i found the depth is not enough for my board earlier I gave it "-0.1" and I have changed it to "-0.15" then it started milling correctly, After Completion of milling changed the bit to "1/32" and loaded the cut out image and got it correctly like this.
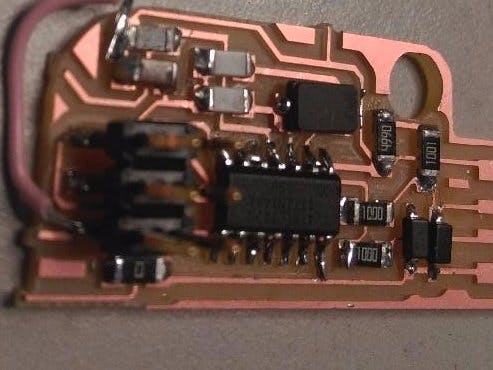
Here goes my FabISP.
I just picked all the components and kept it in the respective slot in the list that I made in my letter pad so that I can pick things easly while soldering. Now i wanted start soldering I was not a SMD Solder expert so need some time on exploring several methods and so as to choose one .that suits me. So I chose to try all 3 methods I found and chose one like dropping lead in the place I wanted to solder before then place the component and just heat the lead drop and solder directly the other side.
Finally my board goes here after soldering.
Now i wanted to Program the ISP
Programming the ATtiny 44A Before using the FabISP, you need to program the ATtiny44 on it. To do this, I used another (programmed) FabISP. It's also possible to used Atmel ICE or Arduino to program the Attiny44. We need Avrdude (for programming) and GCC (to compile C code). To get GCC and avrdude on Ubuntu, I used tutorials from fabacademy, How To Assemble and Program the FabISP. Don't forget to power the FabISP Board by using the 6-pin programming header Download and UnZip the firmware.zip file from the Fab Academy Electronics Production page and move into the newly created firmware directory. Open the firmware directory in terminal. Make Clean Make Hex Now go to the make file generate in folder and open it with text editor. Edit the line in the make file for your programmer. I am using usbtiny to program my board, so I uncommented the below line: AVRDUDE = avrdude -c usbtiny -P usb -p $(DEVICE) Save the file and close. For the next lines the board had to be connected. Continue to enter these lines in folder opened in terminal. make fuse make program.
Removing the solder jumper...!!Highlight of this board is this feature that is we can remove the short connection after initial burning of the ATtiny44A.
nadeem@codemonk [2] fabISP_mac.0.8.2_firmware % make program
This error occurred when i connected my ISP to the system and in CLI checked the available ports by lsusb
and tinyISP was not able to found,that was because some soldering issues in the ISP my microcontroller pins was not precisely soldered, i have corrected the issue by soldering it properly,there where another problem too.Problem was that a small piece was not properly milled so i had to manually remove it...it was just a small track.
nadeem@codemonk [1] emb % avrdude -P usb -b 19200 -c usbtiny -p m328p -v
Error again..!! No vcc is connected to my ATtiny44A, when solder jumper was removed in the valentin's ISP there is no vcc connection when I analysed the PCB so what to do, I have only one way thats to connect an external piece of wire
Making an isp header(2x3).
Here goes my "hero"
All set..! It's working properly... but only on desktop pc's. I was not able to use the same in the laptop.

Comments
Please log in or sign up to comment.