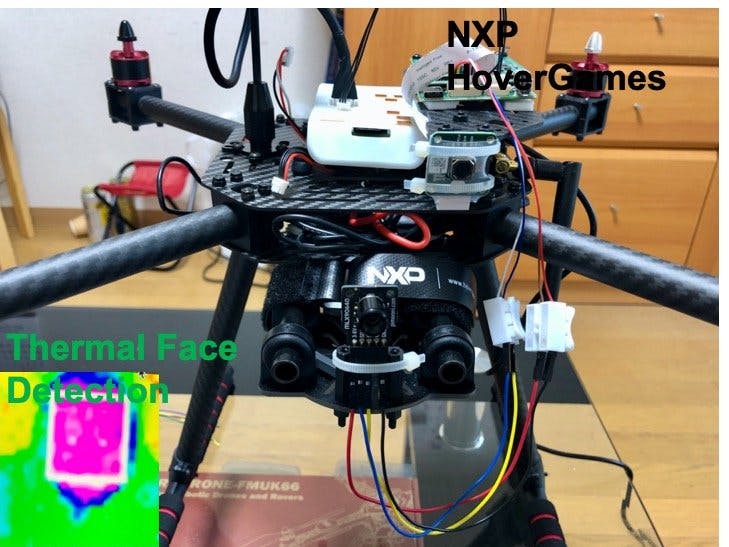
In this project, I built an application which can be used to measure the temperature of a human face from thermal camera readings and can accurately measure person temperature by extrapolating the facial skin temperature. This application has many use-cases for example, it can be used to search and rescue a person in dark or low light condition where generic digital camera may not work. It can be used as a contactless temperature monitoring. This application also serve as a demo for use of Tensorflow Lite on RDDRONE-8MMNavQ "NavQ" Linux companion computer platform based on NXP i.MX 8M Mini SOC.
Following applications/softwares has been used in this application.
- OpenCV
- GStreamer
- MAVSDK
- Tensorflow Lite
This step needs a lot of time at least for beginners. I have followed the tutorials at NXP Hovergames Gitbook for the step by step assembly instructions. The video tutorials are quite helpful. Although everything went well but there are few lessons which could be useful for new users. If we are going to use NavQ we should connect the power cables before putting the top plate. Also, inserting the bullet connector to the ESC should be done before fixing the ESC to the plate because it needs a lot of force to push the bullet connector inside the ESC and it was very difficult when the ESC was already fixed with the double sided tape. When I finished almost half assembly steps it was like the image below.
I have followed the step by step instructions here to program FMU with PX4 boot-loader and application. To configure the RDDRONE-FMUK66 we need to install QGroundControl software on the development machine. We can also install Preconfigured virtual machine image with development tools which has QGroundControl preinstalled. The configuration steps can be found here.
Test FlightNavQ setupTo create and deploy the application we need to setup NavQ Linux companion computer. I downloaded the latest image from here. I am using a macOS development machine so I used the commands below to flash the (unzipped) image to the SD card. Note: please replace '/dev/disk2' with your SD card mount point.
$ sudo diskutil unmountDisk /dev/disk2
$ sudo dd if=navq-february-2021.wic of=/dev/disk2 bs=1m
A quick start guide is available here to setup everything to getting started. In the rest of the documentation it is assumed that we already set up wifi connection at the NavQ and we are able to ssh and run commands at shell. Please follow the quick start guide to setup wifi connection.
Installation of prerequisites for the applicationWe need to install following softwares.
Image processing libraries
$ sudo apt install python3-opencv
$ sudo pip3 install pillow
MLX90640 C++ and Python library build and installation:
$ sudo apt install libsdl2-dev swig  libi2c-dev
$ sudo apt install libavutil-dev libavcodec-dev libavformat-dev
$ sudo pip3 install smbus
$ git clone https://github.com/pimoroni/mlx90640-library.git
$ cd mlx90640-library
$ make all
$ cd python/library
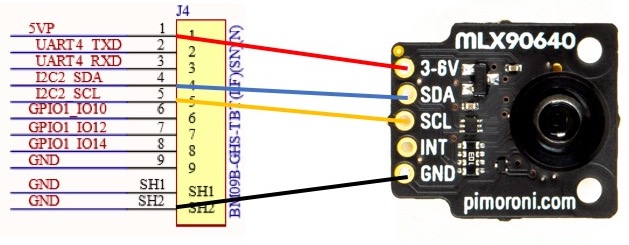
$ sudo python3 setup.py installThe MLX90640 thermal camera is connected to the NavQ using a 9-pin JST-GH cable. The pin connection diagram can be found in the schematics section.
Also, we can test if the connection was OK using the command below.
$ sudo i2cdetect -y 1

0 1 2 3 4 5 6 7 8 9 a b c d e f
00: -- -- -- -- -- -- -- -- -- -- -- -- --
10: -- -- -- -- -- -- -- -- -- -- -- -- -- -- -- --
20: -- -- -- -- -- -- -- -- -- -- -- -- -- -- -- --
30: -- -- -- 33 -- -- -- -- -- -- -- -- -- -- -- --
40: -- -- -- -- -- -- -- -- -- -- -- -- -- -- -- --
50: -- -- -- -- -- -- -- -- -- -- -- -- -- -- -- --
60: -- -- -- -- -- -- -- -- -- -- -- -- -- -- -- --
70: -- -- -- -- -- -- -- --The deep learning models available in the public domain are mostly used for the images taken by photographic cameras. Usually they require high end computer with GPU or neural network accelerator to perform at high frame rates. For this project I wanted to keep the cost low but still develop a device which can be used accurately at considerable speed. For this very purpose BlazeFace model is used which shows considerable accuracy in bounding faces in the low resolution thermal camera images. The model is used with the default trained weights without any transfer learning on the thermal images.
Application developmentThe main application is a multithreaded Python 3 script which is mostly about getting data from the thermal camera and do the face detection and temperature measurement. The code is available at the Github repository mentioned in the code section.
Inferencing on the deviceThe BlazeFace TensorFlow Lite model was downloaded from https://github.com/google/mediapipe. The TensorFlow Lite Runtime Python API is used to run inference on the device.
Install Tensorflow Lite Runtime
$ sudo pip3 install --extra-index-url https://google-coral.github.io/py-repo/ tflite_runtimeClone application from GitHub repository
$ git clone https://github.com/metanav/hovergames2_thermal_face_detectionRun application
$ cd hovergames2_thermal_face_detection
$ sudo python3 main.py
we need to run the application using sudo because the GStreamer plugins need root privilege. Also, replace the "host=192.168.3.3" in the main.py with your host machine IP address within the same network. We can see the output in the QGroundControl or if it does not work you can install GStreamer to the host machine and run the command below:
$ gst-launch-1.0 udpsrc port=5600 caps="application/x-rtp,encoding-name=H264" ! queue ! rtph264depay ! decodebin ! videoconvert ! autovideosinkWe can extend the application by adding the support for communicating with the FMU. We need to install the MAVSDK to communicate from python script via mavsdk_server. The MAVSDK-Python already has embedded mavsdk_server which starts automatically when we use the script.
$ sudo pip3 install mavsdkThis device does not use a photographic camera to detect the face instead it uses a thermal sensor to generate a thermal image and only find the face boundaries using a ready-to-use locally deployed deep learning model. There is no privacy threats using this device since it does not capture any real image of the user and does not send out any data to the cloud or any other location. The internet connection is only used for deployment and updates. The accuracy of the face detection can be improved further by transfer learning with thermal camera images.
I would like to thank all the participants and admins who replied to my questions and were always helpful. I like this kind of healthy competitions where we do not compete to each other but we help to each other to learn and share knowledge. I would like to thank NXP for organizing this awesome contest and providing HoverGames Kit discount coupons.


Comments
Please log in or sign up to comment.