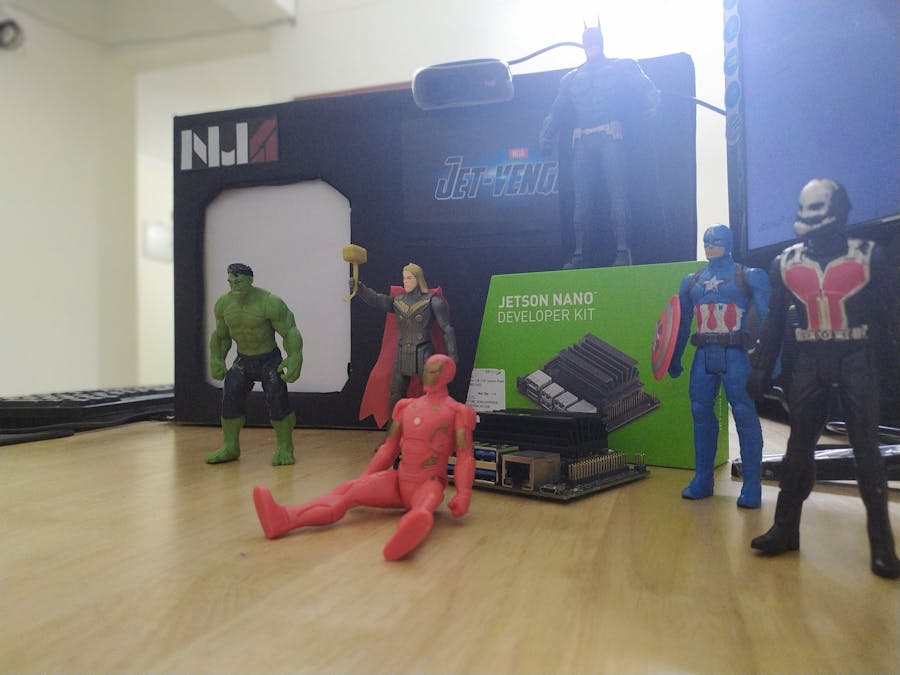
A few months back, I had this idea of building a face recognition system with Jetson Nano for my educational curiosity. Later that got tweaked to activating a sliding door along with the original idea. To make it feasible, me and my buddies, Mrugank & Suman, brainstormed to implement the same with action figures.
But it just remained an idea without much action. All thanks to the 'AI at the Edge Challenge', hosted by Nvidia and Hackster.io, we formed ourselves a team (Nerds United Alpha) and pushed ourselves to shape this idea into reality.
We decided to give it the aura of an 'Avengers Smart House' that would welcome only Marvel action figures with a custom voice welcome message for each character.
Creating The DatasetIn stock, we had a few action figures but unfortunately, there's no dataset available for action-figures. Hence, we had to build one. Since, this is a Computer Vision use-case, which needs deep learning, a dataset of around 10 -15k images would suffice.
Manually clicking/collecting so many images would be a tedious process. Hence, to our rescue we figured out two steps to automate the process of creating our deep learning image dataset:
1. Image collection with Search Query: All thanks to an interesting tutorial by PyImageSearch, we were able to automate the process of collecting images through Bing Search query. Microsoft offers its Bing Search API for free till a certain limit (~3000 search queries per day). You can also use the same to populate your own dataset. We collected around 100 images for each class.
2. Data Augmentation: Performing a few data augmentation techniques to create synthetic images works really well when you lack enough data for your task. Techniques like random rotation, crop, filters and horizontal flip can do the trick. We used skimage library to perform the same.
To train our model, we chose the Nvidia GPU runtime available at Google Collaboratory. PyTorch was our choice of Deep Learning framework to build and train our model. Hence, we referred to the official transfer-learning tutorial by PyTorch.org. Hence, all you need to do is run the Google Colab instance and upload your dataset to google drive. As per the code, make sure the dataset folder is segregated to 'train' and 'val' folders, with the individual classes as sub-directories.
ResNet-18 is one of the most popular pre-trained neural convnets available. We readily went ahead with it for transfer learning.
Since we are just transfer learning we won't need backward propagation in our neural net. Hence, we deactivate it at the first step after getting the pre-trained model, and modify the fully connected layer, by making it linear and providing the number of classes, i.e. '8', with the number of features in the model, as arguments.
It's a necessary step to use GPUs for faster training, and hence, the model needs to transferred to the 'device', which happens to be an Nvidia GPU. You are free to choose your criterion. Both 'CrossEntropyLoss' and 'NLLLoss' are some of the preferred choices.
Now it's time to train and classify images with our model. Refer, the train_model method in the notebook to gain further insights.
The best validation accuracy for us was around 0.99, which is a pretty good performance. The predictions also turned out to be amazing! Now, save the model with the necessary torch.save() function.
Let's get started with deploying our model for inference with Jetson Nano!
The Nvidia Jetson Nano, is an Embedded SoC with an onboard Tegra GPU, optimized and built for 'AI at the Edge'. To get started with Jetson Nano, you can refer the official guide for setting it up for the first boot. In brief, you just need to flash a UHS-I SD Card with the latest 'Linux For Tegra (L4T)' image by Nvidia. Following that, make sure you have the pre-requisite hardware to power and boot Jetson Nano.
1. The Pre-Requisites
We recommend you to have:
- microSD card (32 - 64 GB UHS-1)
- USB keyboard and mouse
- Computer display (either HDMI or DP)
- Power Adapter (5V=4A) [Mobile adapters like OnePlus, MiA1, etc.]
- USB to 5V DC (2.1 mm) Barrel Jack cable
The device comes with JetPack with an inbuilt suite of Nvidia software and necessary CUDA libraries. The latest L4T (r32.1.1 ) update for Nano comes with default OpenCV 4 version, which is a huge boon for the Computer Vision community.
2. The Inference Library
Note that, Jetson Nano is an Edge device well-suited for AI inference tasks. Kindly don't be mistaken that you can train your models with it. It will heat up and boom! For ourdeep learning inference purpose, we need the following libraries and packages.
- PyTorch
- Torchvision
- Py2trt - To build our TensorRT Inference Engine compatible with PyTorch models
To get the above list of prerequisites simply visit the Nvidia forum link for a step-by-step procedure to build from source. To install py2trt module just execute the following command in terminal:
pip install torch2trt3. Loading& Converting Our Model (Py2TRT)
Nvidia has made it very easy to port a model trained in PyTorch to its TensorRT counterpart, in just a single line. Refer the image below for the necessary steps.
- Initialize pytorch model object
- Load model state dictionary
- Create an example tensor (Make sure it matches the resolution of your cv2 window capture size/image size you generally trained on): We provided (480, 640) to match 640x480 res size.
- Pass the example tensor and loaded model to the TensorRT (TRT) module as arguments
- Save the TRT model
1. Getting The GPIO Ready
As, we are done with the pre-requisites for inference, next let's shift our focus to installing the IOT components for our project. Refer to the BOM in the eariler section of the blog for a complete list of necessary components.
The Jetson.GPIO module makes the Jetson Nano GPIO ports ready for IOT devices/motor/sensors connectivity. Perform the necessary step to install it.
pip install Jetson.GPIO2. Getting The Motor Ready
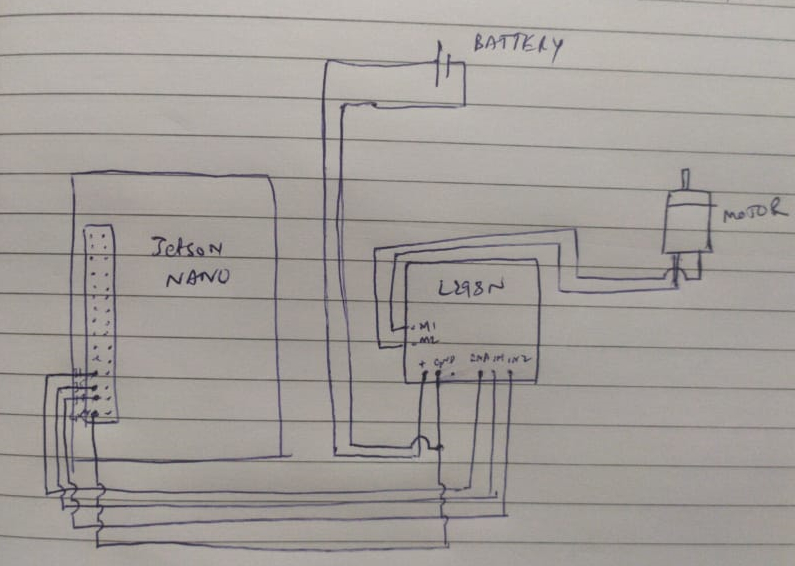
We referred the following tutorial to connect our DC motor and L298N motor driver with Jetson Nano.
The video below is a demo of our working DC motor rotating in forward and backward direction. It's ready!
Refer this code to gain further insight about the GPIO mode action to set the motor in motion.
This rotating motor will help us in facilitating the sliding door
3. Choosing A Sliding Door Mechanism
Above is a reference image for a rack and pinion mechanism to slide our door in the forward and backward direction. The rotating DC motor creates the necessary force to rotate the gear. The gear when attached to compatible teeth, helps the attached jaw slide in the opposite direction.
As per the image above, you can see a prototype of our smart-house with the sliding door. The Jetvengers House is ready. We 3D printed the important components of the sliding door, namely the 'rack'.
PS: We built our house with cardboard and the L2989N (one with the red LED) is powered by a UPS battery XD!
Integrating AI & IOTIt's now time to put our Jetvengers HQ smart functionalities in action. Thanks to JKJung's work with custom tegra-cam, we were able to get the GStreamer pipeline work with OpenCV on Jetson Nano.
Note that for faster streaming of data in computer vision, you need the gstreamer plugin pipeline, else the stream will lag drastically thus hampering your work.
To know about how to create a gstreamer pipeline, you can check our code but we won't get very deep into it. Our focus is rather on how we are recognizing the action figures with simple image classification.
1. Capture the Frame For Preprocessing
This code is available in the gstreamer.py file located in our repo. Have a glance to be familiar with the code.
First, make sure you import these necessary modules
Provide a counter variable to capture every 48th frame in the stream (every 2 seconds if framerate = 24 per second). Pass the captured frame for preprocessing. Increment the counter after all the processes. Make sure you provide the conditions for wait-key and interrupt to continue/discontinue the stream.
2. Image Pre-Processing
Of course we need to perform this step to match the state when training and validation images were transformed during the training process.
Make sure you perform these steps. Don't forget to convert the image to RGB because OpenCV captures every frame in BGR format.
3. Image Prediction (Identify the action figure)
We attached a softmax layer to get the probability in a readable format, else the values won't be interpretable by us for further processes. We need the probability and the top class to be returned, so that we can prints its value in the terminal and also use it for further processes.
4. It's time to perform the IOT actions
Since the identification (AI part) is done, let's automate the rest of the actions:
i) Greet the action figure with a voice message ii) Open/close the door to let our guest inside iii) If the character is from DC (say Batman), play the necessary message audio and don't allow the character inside by not opening the door
We perform the validation step to ensure that the character is from Marvel universe only. If yes, then you can pretty much guess from the code itself. Refer the play_audio( ) and door_activate( ).
The play_audio( ) plays the audio greeting corresponding to a particular label.
The door_activate( ) sets the GPIO pins of Jetson Nano in action, which sends the necessary signal to the L298N motor driver. The motor driver puts the motor in action, which activates the sliding door!
Hoorah! We did it! Wasn't that too simple? Want to see this in action? Watch the video below!
To have a closer look, also watch the video below.


Comments
Please log in or sign up to comment.