I usually tend to forget about items placed on cooking stove's gas burner after exiting kitchen and indulging myself in other stuff such as watching TV/mobile which results wastage of cooking gas. In this project I wish to address this with help of Azure Sphere kit and Panasonic Grid-eye.
Panasonic Grid-eye is thermopile sensor array capable of detecting temperature of a body without contact. Panasonic Grid-eye has 64 (8rows x 8cols) such pixels. In this project, I am using Panasonic Grid-eye evaluation kit connect to Azure Sphere kit.
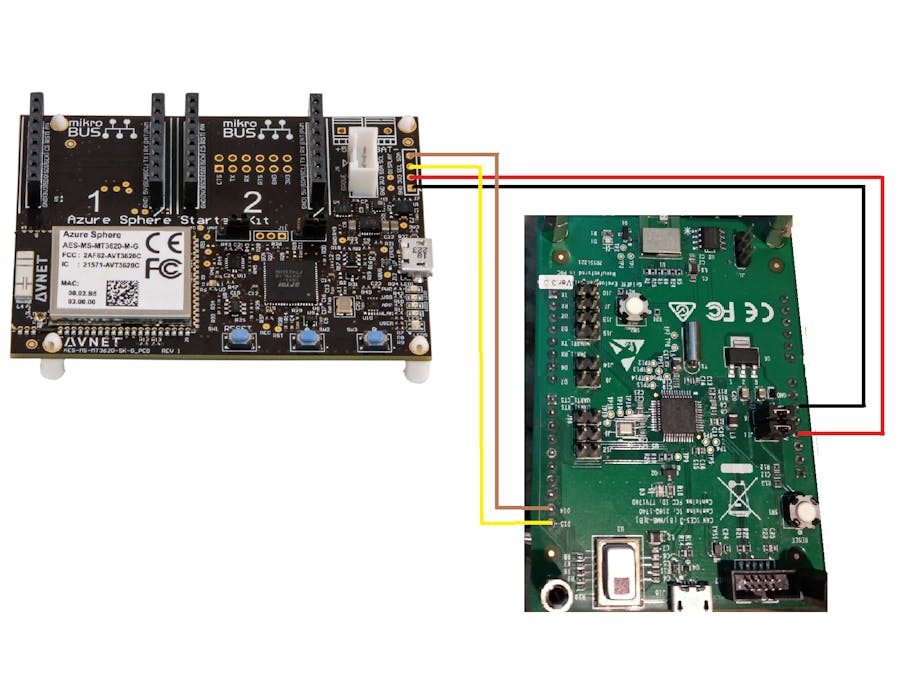
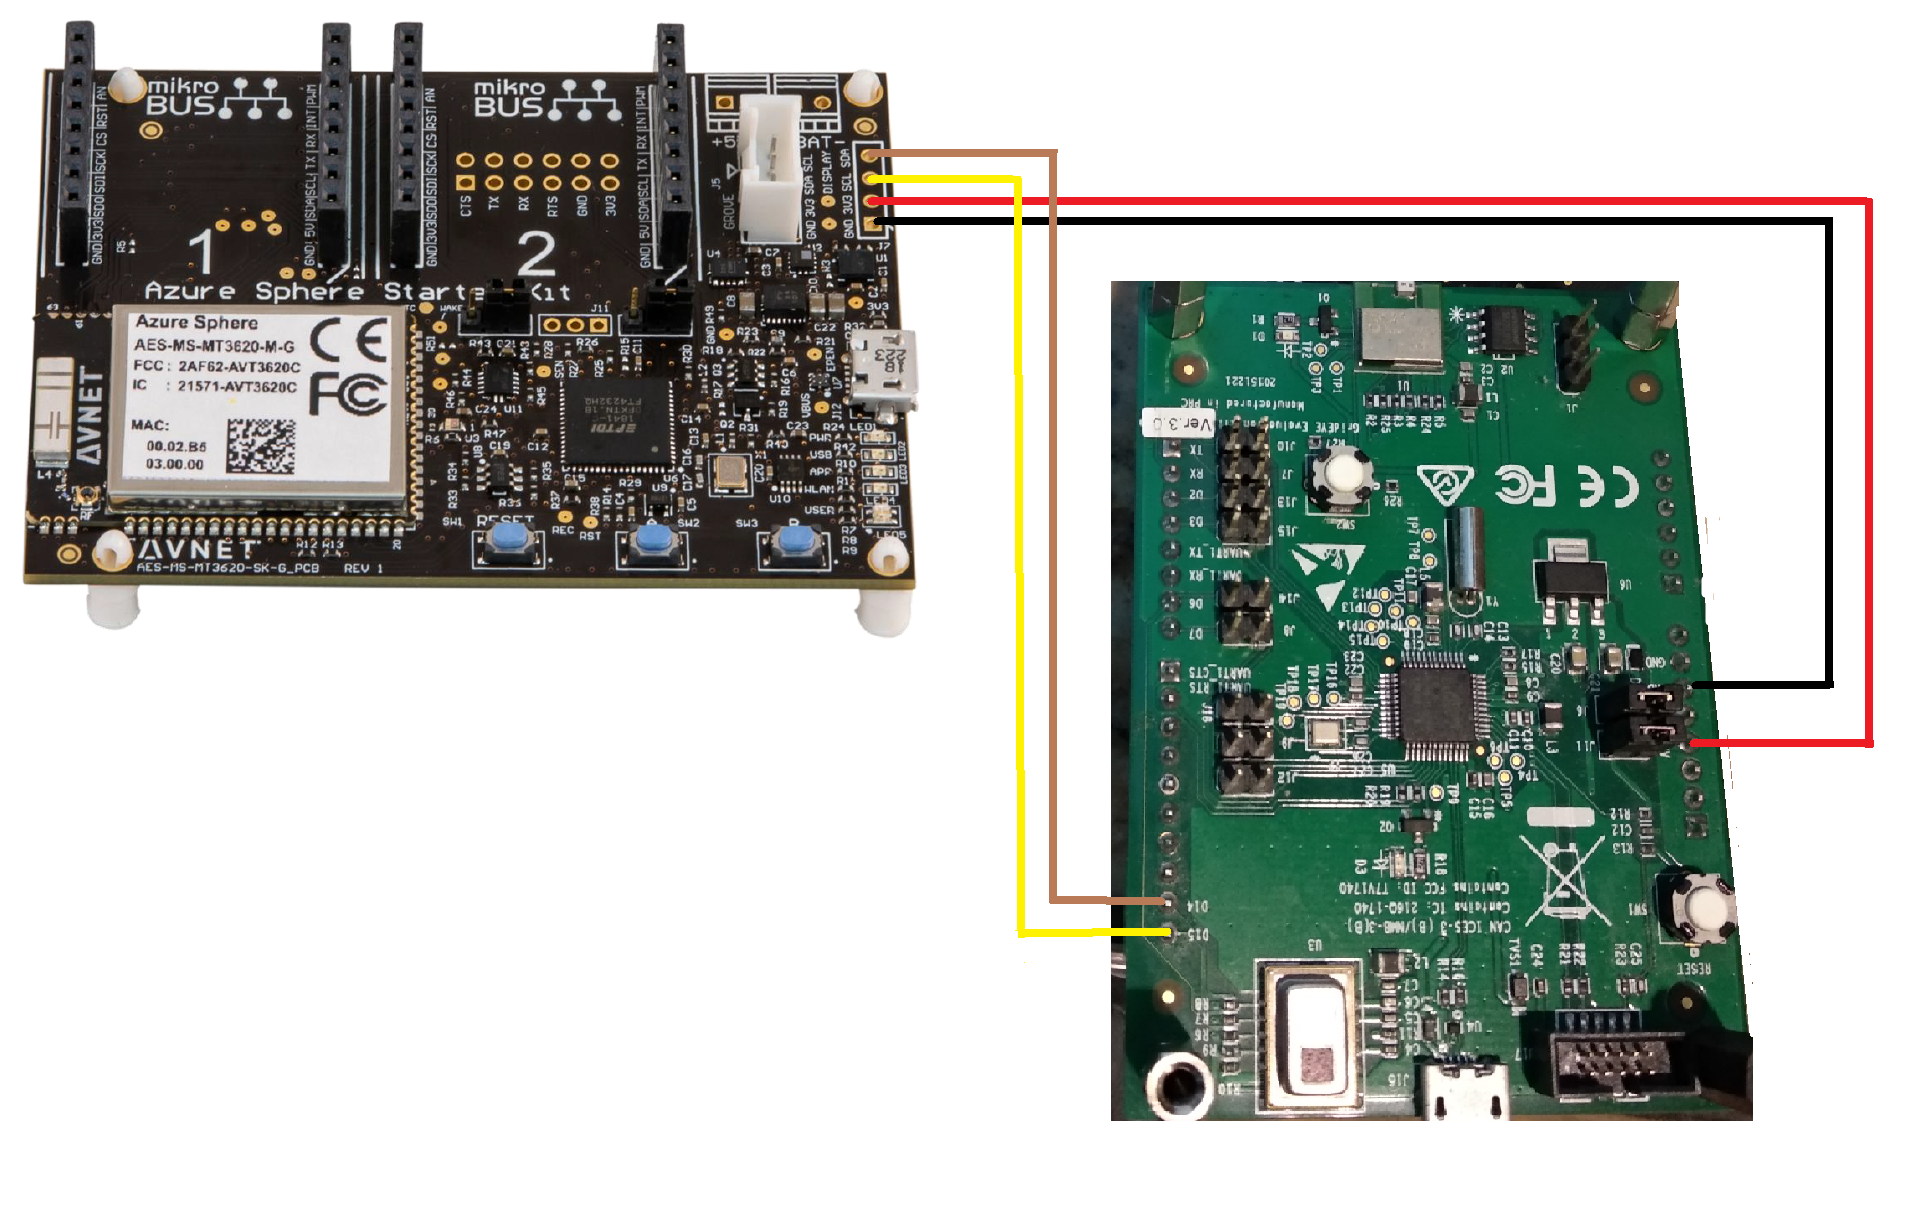
I fly-wired the connection between Azure Sphere kit and Panasonic Grid-eye evaluation kit. Connection details are as below,
Signal --------|------Panasonic Grid-eye evaluation kit--------|--------Azure Sphere kit
Vcc-------------|---------------J4-4-------------------------------------------|---------------J7-2
GND-----------|---------------J4-7 ------------------------------------------|----------------J7-1
SDA------------|---------------J5-9 ------------------------------------------|---------------J7-4
SCL------------|---------------J5-10 -----------------------------------------|---------------J7-3
Below is the image of my setup,
Make sure to remove all the jumpers as shown below,
I have attached this setup to my chimney above my cooking stove covering all burners which in my case is 2. Below is the heat map when a vessel filled water is placed on right burner and water reaches its boiling point.
Note: Temperatures shown in above image is not the actual boiling point temperature of water. Accuracy of thermopile sensor reduces with increase in distance from the object.
Idea here is to monitor temperatures using Grid-eye every 30 seconds to check for "unchanged" temperature reading. We are looking for unchanged temperature because after reaching boiling point the temperature would not change much. Accounting the lack of accuracy due to distance between setup and boiling liquid below, during my testing I did not see change in temperature within 30 seconds after reaching boiling point.
For monitoring temperature in Azure Sphere application, two "heatmap" are used for comparing temperatures every 30 seconds. Below is code to check for same temperature value per pixel along with reading more than threshold and swap previous and current heatmap pointers.
for (index = 1; index < GE_TOTAL_PIXELS; index++)
{
    if (prev_heat_map[index] == curr_heat_map[index])
    {
        if (prev_heat_map[index] > HEAT_THRESHOLD)
        {
            if (match_val < prev_heat_map[index])
            {
                match_val = prev_heat_map[index];
            }
        }
    }
}
/* Swap pointers for next iteration */
ptr = prev_heat_map;
prev_heat_map = curr_heat_map;
curr_heat_map = ptr;
The threshold temperature is determined using placing a finger on thermopile sensor. This value added to a constant is used as HEAT_THRESHOLD in above code. During my testing, I found HEAT_THRESHOLD value of 300 to be sufficient to overcome detection of human body part. This is necessary to avoid false trigger when a human is actively moving his/her hand under thermopile sensor. Only when pixel values of current and previous heatmap (which is greater than HEAT_THRESHOLD) matches, an event is sent to Azure IoT Hub which then generates mail which is used to notify user.
Let's start configuring Azure Sphere Kit out of the box.
First launch azure developer console program. Next, login into Microsoft using below command,
azsphere login
Create a tenant with name
azsphere tenant create --name <name>
A WiFi scan be performed to list networks available
azsphere device wifi scan
Connect to WiFi network using below command
azsphere device wifi add --ssid <SSID> -p <PASS>
Connection can be confirmed using below command.
azsphere device wifi show-status
Time to claim the attached device with below command.
azsphere device claim
To enable debugging Azure Sphere application below command must be issued.
azsphere device prep-debug
Let's start with configuring azure portal to forward notifications of events sent by Azure sphere kit. Go to Azure portal website and you'll be greeted with below page. Click on "Create a resource".
Next page will be as shown below. Click on "IoT Hub".
In next page, select subscription type and fill in other details as shown below. After that click on "Review + Create".
Next page is review page as shown below. Review the details and click on "Create".
Soon after creation, you'll be redirected to resource overview page which shows the status of resource deployment as shown below.
Next, let's create Device provisioning service. Click on "Create resource" available on top left as shown below.
Click on "Internet of Things" on left pane and click on "IoT Hub Device Provisioning Service" as shown below.
Fill in the details and click on create.
You can know the status of resource deployment by clicking on notifications icon as shown below.
Below screenshot is of successful deployment of IoT Hub.
IoT Hub Device Provisioning Service's successful deployment look like below.
Now, let's link IoT Hub and Device Provisioning Service (DPS). Go to DPS resource, click on "Linked IoT Hub" as shown below.
Click on "+Add". Add link to IoT Hub by selecting previously created IoT hub resource and click on save.
After linking, updated "Linked IoT hubs" must be as shown below.
Time to add certificates, Click on "Certificates" on left pane.
Update details as shown below and click Save.
Added certificate's status will be "Unverified" as shown below.
Next, generate verification code and click on "Verify".
After verification, "Certificates" would show status as "verified".
Now, add new enrollment for DPS. Click on "Add enrollment group" as shown below.
Select "Primary Certificate", "IoT Hub" and click on "Save".
Now let's move on to Azure Sphere application. Open Visual Studio 2019. You'll be greeted with below screen.
Click on "Clone or check out code". Next screen would ask for "Repository location". Update this field with https://github.com/NitinBhaskar/azure_sphere_LPG_saver.git and click on "clone".
Double click on AvnetStarterKitReferenceDesign.sln, this would open the Azure Sphere application for this project.
Try adding a "Connected Service". Right click on VS solution and click on "Connected Service" as shown below.
Click on "Device Connectivity with Azure IoT" as shown below.
For, this step failed as shown below.
Alternatively, one can directly modify app_manifest.json as shown below.
Next step would be to create "Logic App" to route incoming events to consumption endpoints which in this project is sending e-mails using Gmail. Click on "Integration" seen on left pane and click on "Logic App" as shown below.
Fill in necessary details as shown below and click on "Create".
After creation, Logic Apps Designer will be launched.
Click on "When a HTTP request is received". A window will be opened as shown below.
Note: After creating Logic App, "HTTP POST URL" is needed by IoT Hub events. Copy the URL.
Click on "Use sample payload to generate schema" and copy paste below content in the window.
{
"items": {
"properties": {
"data": {
"properties": {
"deviceId": {
"type": "string"
},
"hubName": {
"type": "string"
},
"twin": {
"properties": {
"authenticationType": {
"type": "string"
},
"cloudToDeviceMessageCount": {
"type": "integer"
},
"connectionState": {
"type": "string"
},
"deviceEtag": {
"type": "string"
},
"deviceId": {
"type": "string"
},
"etag": {
"type": "string"
},
"lastActivityTime": {
"type": "string"
},
"properties": {
"properties": {
"desired": {
"properties": {
"$metadata": {
"properties": {
"$lastUpdated": {
"type": "string"
}
},
"type": "object"
},
"$version": {
"type": "integer"
}
},
"type": "object"
},
"reported": {
"properties": {
"$metadata": {
"properties": {
"$lastUpdated": {
"type": "string"
}
},
"type": "object"
},
"$version": {
"type": "integer"
}
},
"type": "object"
}
},
"type": "object"
},
"status": {
"type": "string"
},
"statusUpdateTime": {
"type": "string"
},
"version": {
"type": "integer"
},
"x509Thumbprint": {
"properties": {
"primaryThumbprint": {},
"secondaryThumbprint": {}
},
"type": "object"
}
},
"type": "object"
}
},
"type": "object"
},
"dataVersion": {
"type": "string"
},
"eventTime": {
"type": "string"
},
"eventType": {
"type": "string"
},
"id": {
"type": "string"
},
"metadataVersion": {
"type": "string"
},
"subject": {
"type": "string"
},
"topic": {
"type": "string"
}
},
"required": [
"id",
"topic",
"subject",
"eventType",
"eventTime",
"data",
"dataVersion",
"metadataVersion"
],
"type": "object"
},
"type": "array"
}
Time to choose an "Action". Apply "mail" as filter as shown below. Click on Send email.
Update "To" field with gmail address of recepient. In this project, I have update IoT Hub in notification mail's subject. Update the details as shown below. Finally click on "Save".
Now go to IoT Hub resource and click on "Events" as shown below.
Click on "+Event subscription" as shown below.
Fiil in the details as shown below. Important to notice "Endpoint" update with "HTTP POST URL" copied after creating Logic App. Finally click on "Create".
Optionally, Azure time series insights can used to see events logged. During my testing I used water. Below is Gmail notification received once the boiling point was reached.


Comments
Please log in or sign up to comment.