Colorectal cancer is a disease in which cells in the colon or rectum grow out of control. According to the statistics from the International Agency for Research on Cancer (IARC), in 2020, there are 1.93 million new colorectal cancer cases worldwide, which has been the second most diagnosed cancer and caused about 0.93 million deaths that year.
Notably, nearly all colon and rectal cancers begin as polyps. That is, finding and removing polyps earlier helps prevent colorectal cancer. In general, the detection of polyps was performed manually with an endoscopist, which is a time-consuming and exhausting task. Even worse, it still has a certain missed detection rate during the examination.
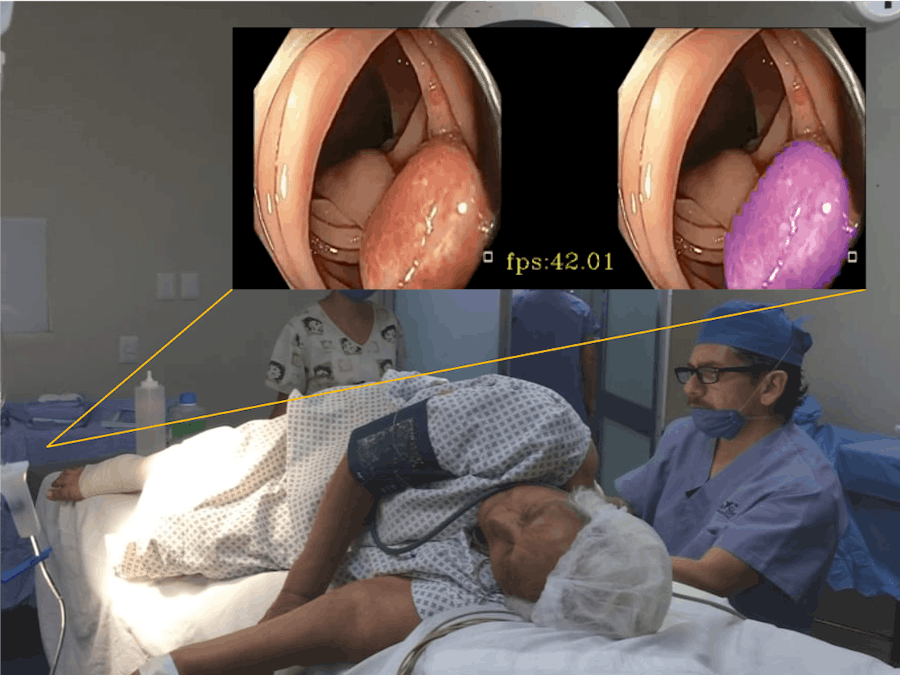
In order to detect polyps precisely and lighten the burden for doctors, we adopt a segmentation model and the Xilinx VCK5000 Versal development card to build a real-time polyp detection system. Besides, our system supports two different modes -- one is for live video, which can apply to real-time applications and thus be the best assistance for doctors to detect polyps during diagnosis. The other one is for pre-recorded videos. Doctors are able to record the examination/surgical procedure and utilize our system to gain predicted/labeled results. With these results, doctors can explain their disease more clearly to patients. Moreover, surgical videos with highlighted polyps are valuable for academic discussion. We hope this idea can contribute to the medical community and help doctors save more lives!
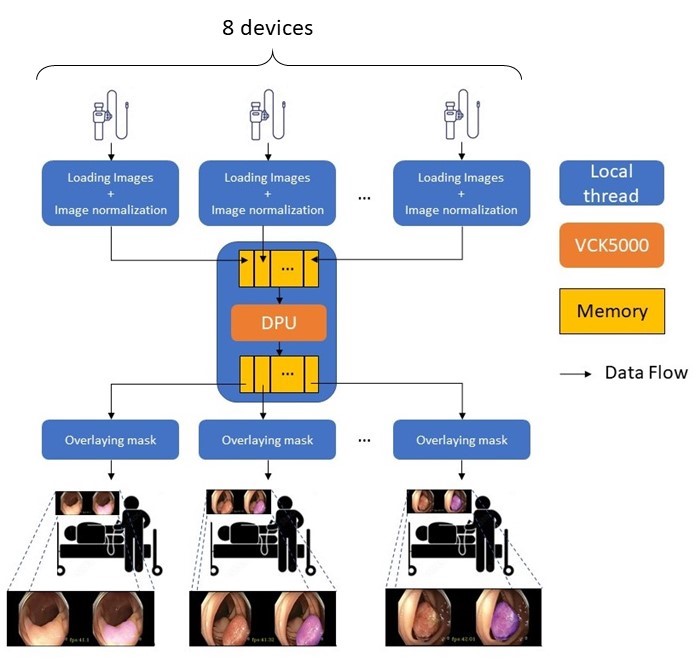
Since a VCK5000 card can process a batch of up to 8 images in parallel, our system successfully releases its maximum power. It thus can handle at most eight live or pre-recorded video streams simultaneously.
The segmentation model we adopted is slightly modified from the model “HarDNet-MSEG, ” which is a CNN-based model that is able to segment polyps precisely. In addition to its overwhelming prediction performance, we also take advantage of its high inference speed to achieve real-time polyp segmentation, which is practical for future usage.
The following figure shows the modified architecture of the network:
The Dataset we used was Kvasir-SEG, which is based on images obtained from the GI tract via an endoscopy procedure and has a total of 1000 images. In our case, 880 images are used for training, and the other 120 images are used for testing.
Images originate from: Kvasir-SEG: A Segmented Polyp Dataset
Compare d with other models:The following table and images are from HarDNet-MSEG.
FPS measures on 2080Ti
To support the multiple branches from several image-capture devices or videos at the same time, we use multi-thread to increase the parallelism. Firstly, we create pre-processing threads to load images and do normalization for each image. Secondly, we utilize the main thread to move data from the local to the DPU access address after packaging them as a batch. Thirdly, we use post-processing threads to overlay masks outputted from DPU onto the original images. Finally, the left thread is to show the predicted results on screens. (Note that the number of pre-processing and post-processing threads depends on the number of videos, and there is only one thread is in charge of DPU running and one is for showing videos.) In this way, we are able to deal with at most eight polyp segmentation tasks simultaneously without sacrificing inference speed for multiple tasks.
Since a VCK5000 card can process a batch of up to 8 images in parallel, it is possible to construct a real-time polyp detection system supporting eight branches in parallel. As shown on the above graph, images from each individual instrument can be sent to the server over networks. After that, the server can utilize VCK5000 with the built-in DPU to detect polyps. The segmentation results will finally be sent back to the original instruments.
Results:(CPU: Intel® Core™ i7-3770)
In a common scenario, each terminal in a clinical exam room only needs to deal with one video. However, the above line graph shows our system can deliver real-time performance for up to 5 videos, even on a 10-year-old PC.
Timing Chart:The timing chart (Figure 8) shows the time cost of each thread, including pre-processing, DPU, and post-processing. To simulate the real condition that there is only one instrument in each clinical exam room, we tested our program and get timing information with only one video. The time stamp on each point means when a thread completes a task, that is, the pre-processing thread completes its first task for an image on 8930ms and finishes the seconds on 8940ms; the DPU thread completes the first operation on 8956ms, and the seconds on 8980ms; so as the post-processing thread. There are several points worth noting. The first one is that the time cost of pre-processing can be hidden. Secondly, although the post-processing thread should always stand by for data outputted from the DPU thread, the time cost can still be hidden by the subsequent operation of the DPU thread. To sum up, the inference time of our system is dominated by DPU, which takes about 24ms (including data/memory moving) for a frame.
According to the chart and two points mentioned above, the FPS for only one video is about 41-42. It seems that DPU runs 2x slower than 2080Ti (Figure 4). However, DPU can run 8 images in parallel. In other words, DPU has 4x overall performance to process images -- that is why we dedicate to releasing its maximum power to support 8 individual devices (or videos).
Install Ubuntu:# Step 1: Download Ubuntu 20.04.4 LTS
Here is the link.
# Step 2: Install Ubuntu
You can follow this tutorial : How to Install Ubuntu Linux in the Simplest Possible Wa
# Step 3: Downgrade Kernel
Since XRT is supported with specific kernel versions, it is necessary to downgrade the kernel. Otherwise, it may fail to install XRT.
$ sudo apt-get install linux-headers-5.4.0-26-generic
$ sudo apt-get install linux-image-5.4.0-26-generic
# Step 4: Restart PC
- Click "Advanced options for Ubuntu".
- Then, click "Ubuntu, with Linux 5.4.0-26-generic".
- Check Ubuntu kernel.
$ uname -rs# Step 1: Go to Vitis-AI Github Page
Here is the link. Remember to choose 1.4.1 branch.
Then, chick "Download ZIP" to download this package.
# Step 2: Setup VCK5000 Card
- Install XRT.
- Install XRM.
- Install DPU V4E xclbin for VCK5000.
$ cd {VITIS_AI_PATH}/setup/vck5000
$ source ./install.sh
Confirm whether the installation is successful.
$ sudo lspci -vd 10ee:# Step 3: Download Two Packages (for Ubuntu)
- Deployment Target Platform : xilinx-vck5000-es1-gen3x16-platform-2-1_all.deb.tar.gz
- Development Target Platform : xilinx-vck5000-es1-gen3x16-2-202020-1-dev_1-3123623_all.deb
$ cd {PACKAGES_PATH}
$ tar -zxvf xilinx-vck5000-es1-gen3x16-platform-2-1_all.deb.tar.gz
$ sudo apt install ./xilinx-sc-fw-vck5000_4.4.6-2.e1f5e26_all.deb
$ sudo apt install ./xilinx-vck5000-es1-gen3x16-validate_2-3123623_all.deb
$ sudo apt install ./xilinx-vck5000-es1-gen3x16-base_2-3123623_all.deb
$ sudo apt install ./xilinx-vck5000-es1-gen3x16-2-202020-1-dev_1-3123623_all.deb
# Step 4: Program VCK5000 card
Find <bdf>.
$ sudo /opt/xilinx/xrt/bin/xbmgmt program --base -d 0000:01:00.0# Step 5: Verify and validate VCK5000 card
$ /opt/xilinx/xrt/bin/xbutil validate -d 0000:01:00.1# Step 6: Environment Variable Setup in Docker Container
Note: This step may take about 2 hours.
$ cd /workspace/setup/vck5000
$ source ./setup.sh# Step 1: Open Docker container
NOTE: If you have a compatible Nvidia graphics card with CUDA support, you may install the GPU docker. Remember to run the GPU docker with replacement of vitis-ai-gpu:latest.
$ cd {VITIS_AI_PATH}
$ sudo chmod 666 /var/run/docker.sock
$ ./docker_run.sh --device /dev/video0 xilinx/vitis-ai-cpu:latestThen, update XRT version in docker container.
Note: Remember to download the package according to your Ubuntu version.
$ dpkg -i xrt_202120.2.12.427_18.04-amd64-xrt.deb# Step 2: Quantize model with Vitis-AI
1. Quantization
Use a subset (70 images) of validation data for calibration.
$ python model_quant.py --quant_mode calib --subset_len 702. Export xmodel
$ python model_quant.py --quant_mode test --subset_len 1 --batch_size 1 --deploy# Step 3: Setup environments
1. Setup VCK5000
$ cd setup/vck5000
$ source ./setup.sh
2. Activate Conda Pytorch environments
$ conda activate vitis-ai-pytorch
$ source ./setup.sh
3. Check if DPU is usable
$ sudo chmod o=rw /dev/dri/render*
$ xdputil query# Step 4: Vitis-AI compilation
$ cd /workspace/
$ vai_c_xir -x HarDMSEG_int.xmodel -a arch.json -o ./ -n dpu_HarDMSEG
# Step 5: Install necessary packages
These packages are for showing the windows on local screens.
$ export DISPLAY=":0"
$ sudo apt update
$ sudo apt-get install libcanberra-gtk-module libcanberra-gtk3-module
# Step 6: Demo
Note: At most 8 videos are supported due to the limitation of DPU.
$ cd {FOLDER_PATH}
$ bash -x build.sh
$ ./{FOLDER_NAME} dpu_HarDMSEG.xmodel {VIDEO_PATH1} {VIDEO_PATH2} {VIDEO_PATH3} {VIDEO_PATH4}
The video shows our system is able to complete the segmentation task for four videos in parallel with 30 fps on a 10-year-old PC.
Benefits:- For hospitals
For hospitals, they just need to spend some money so that they can achieve a cost reduction of manpower expenditure.
- For doctors
Our system is made for doctors. With the assistance of it, doctors will no longer worry about overlooking polyps during the examination.
- For patients
After surgery, patients can realize surgical procedures through recorded videos and learn more about their bodies.
- For students
For students who major in gastroenterology, they can learn how to judge polyps through this auxiliary system.
Reference:- Model: https://github.com/james128333/HarDNet-MSEG
- Dataset: https://arxiv.org/pdf/1911.07069.pdf
- Video source: http://www.depeca.uah.es/colonoscopy_dataset/?fbclid=IwAR2JaIzvWoxeyZ7Gs-2TxHPeJaDaNX_Q1In2zqsu8v-rGYK1hhwJSfGuXjA
- VCK5000 user guide
This work was supported in part by the Ministry of Science and Technology Taiwan under Grant No. MOST-110-2218-E-A49-003, and the computing services from National Center for High-performance Computing (NCHC) and Taiwan Computing Cloud (TWCC).


Comments
Please log in or sign up to comment.