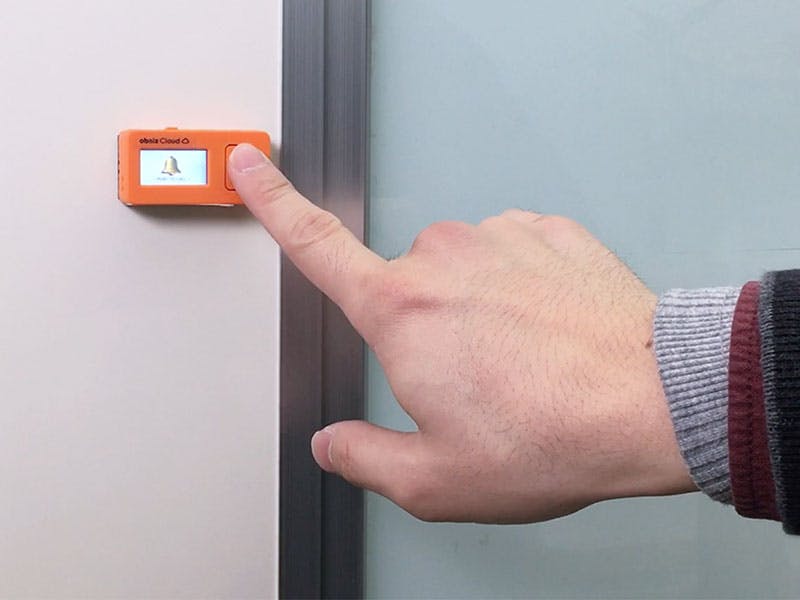
Make a doorbell with a M5StickC.When a visitor presses the doorbell, it pushes a notification to a Slack channel.
Materials- M5StickC with obnizOS x1
- Slack account x1
※You will need an M5stickC with obnizOS.
How to makeHardware
Hardware you need to build a Slack doorbell is just a M5StickC.It is ok as long as it is supplied with power.
Software
As for software, go to this page, and get the Webhook URL to send a message to a Slack.
Select the channel where you want to receive a notification, and press “Add Incoming Webhooks Integration.”
Then, add your Webhook URL to the code below.
Use this URL for “WEBHOOK_URL_HERE,” and replace “CHANNEL_NAME_HERE” with your channel name.Make sure to put “#” before the name.
var url = 'WEBHOOK_URL_HERE';
var data = {
"channel": 'CHANNEL_NAME_HERE',
"username": 'obniz-bot',
"text": msg
};<!DOCTYPE html>
<html>
<head>
<meta charset="utf-8" />
<meta name="viewport" content="width=device-width, initial-scale=1" />
<script src="https://code.jquery.com/jquery-1.10.2.min.js"></script>
<script src="https://unpkg.com/obniz@3.x/obniz.js"></script>
</head>
<body>
<div id="obniz-debug"></div>
<script>
var stick = new Obniz.M5StickC("OBNIZ_ID_HERE");
stick.onconnect = async function() {
printPleasePressView();
stick.buttonA.onchange = async pressed => {
if (pressed) {
onPressed();
}
};
};
async function onPressed() {
sendToSlack("We've got a visitor.");
for (let i = 0; i < 10; i++) {
printWaitingView(i / 10);
await stick.wait(1);
}
setTimeout(printPleasePressView, 3000);
}
function printWaitingView(percent) {
let offset = 100 - percent * 100;
offset = offset < 0 ? 0 : offset;
stick.display.drawing(false);
stick.display.clear(50, 5);
stick.display.font(null, 50);
stick.display.pos(20, 5);
stick.display.print("🚪");
stick.display.pos(50 + offset, 5);
stick.display.print("🏃");
stick.display.font(null, 20);
stick.display.pos(100 + offset, 35);
stick.display.print("💨");
stick.display.font(null, 10);
stick.display.pos(30, 60);
stick.display.print("OK, PLEASE WAIT");
stick.display.drawing(true);
}
function printPleasePressView() {
stick.display.drawing(false);
stick.display.clear(50, 5);
stick.display.pos(50, 5);
stick.display.font(null, 50);
stick.display.print("🔔");
stick.display.font(null, 10);
stick.display.pos(40, 60);
stick.display.print("PUSH TO CALL→");
stick.display.drawing(true);
}
function sendToSlack(msg) {
var url = "WEBHOOK_URL_HERE";
var data = {
channel: "CHANNEL_NAME_HERE",
username: "obniz-bot",
text: msg
};
var dataJson = JSON.stringify(data);
$.ajax({
type: "POST",
dataType: "json",
url: url,
processData: false,
data: "payload=" + dataJson
}).then(
function(data) {},
function(XMLHttpRequest, textStatus, errorThrown) {
console.log("post to bot");
}
);
}
</script>
</body>
</html> Before we get into the project, let's look into obniz.
Here → obniz for DIY electronics
obniz is a cloud-connected IoT development board. You can program on the web browser of any smartphone or computer and the command is sent to obniz through the internet via obniz cloud. By connecting the obniz to the cloud through wifi, users can remotely control devices that are physically connected to obniz.
Thanks to this cloud based approach, you can program with Python, Javascript, or other languages you prefer and control hardware directly. You don't need to integrate firmware into the device side. Recording and analyzing data is also easy with obniz cloud service.
Want to control hardware things with your current Python or Javascript skill? Want to start IoT project but don't know where to start? Want to learn programming with languages you prefer?
obniz will help you broaden your viewpoint and develop both your SW and HW skills.
For more information, please visit our official website → Official Website
Where to get obniz board? → Amazon /Official Store


Comments
Please log in or sign up to comment.