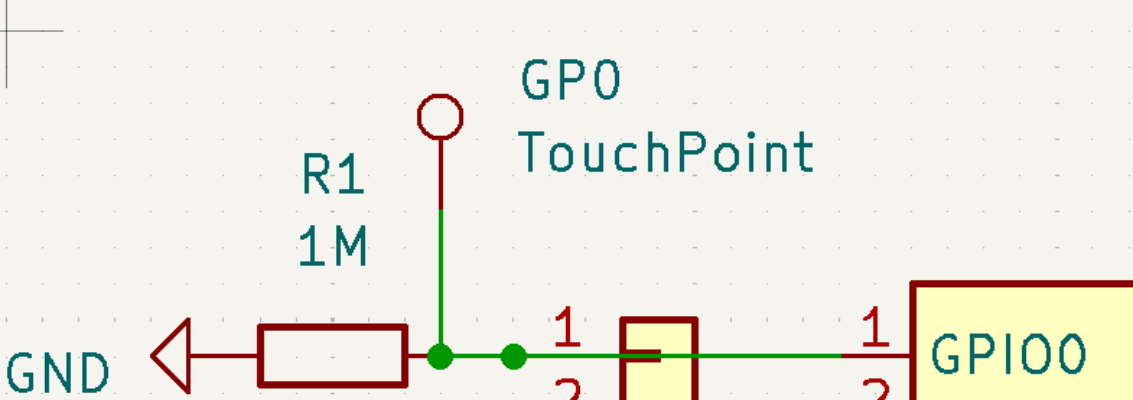
The project started while I was building some interactive musical installations and discovered how to use a single 1M resistor to turn one of the pico's GPIO into a capacative touch sensor. It was so ridiculously easy that I instantly tried it with all 26 available GPIO assuming there'd be issues with thresholds and sensitivities etc. But I was wrong. It worked perfectly. I did lots of tests to put it through its' paces, and finally concluded it was brilliant.
So, the next step was obviously turn it into a PCB to make it easier to prototype with. And once I did that I realised the potential for this board for educational purposes, for prototyping, as a performance tool, as an accesibility tool etc.
Using Adafruits Circuitpython meant coding was super simple. So far I've been using it for USB-MIDI interfacing and also as a HID device to emulate keyboards and mice. mouses. Because of the simplicity of circuitpython + pico, the code can be edited in Notepad without needing to download any IDE's.
My aim is to make it as simple as possible for people to be able to interface with their computers using touch. I've made 2 PCB's, one for prototyping+education and another with a smaller footprint to embed into projects. I'll be doing a kickstarter at some point, but also sharing the knowledge and code so people who are already able to solder/code can do so and make their own versions.
The circuitry is easy. When you place a 1M resistor between any of the Pico's GPIO and Ground, the part between the board and the resistor will become the touch sensor.
We are using Circuitpython and it's native touchio library (examples in the project github). The proper documentation for the library states:
When a reading is taken, the pin's capacitance is charged by setting it to a digital output 'high' for a few microseconds, and then it is changed to a high impedance input. We measure how long it takes to discharge through the resistor (around 50us), using a busy-waiting loop, and average over N_SAMPLES cycles to reduce the effects of noise.
One magic thing about this is that it doesn't need a threshold level to work. Once you power the board it starts this busy-waiting loop and uses the discharge measurement for each pin as its baseline. Touching the part of the circuit before the resistor changes the amount of time it takes the pin to discharge back to ground and so it knows it's been touched. From there it's just a matter of what you do with that input.
Here are some of the initial tests:
Some examples of MIDI instruments already built using the SPOKE-MINI:
For updates on the project either follow the insta account: https://www.instagram.com/spokeboard/
or sign up to the newsletter at spokeboard.com


Comments
Please log in or sign up to comment.