You're feeling observed, you're always disabling the unnecessary cookies on websites you browse?
You've found the best option for a web-radio that will suit your privacy needs.
Most common web-enabled clients talk home to their companies, to share your user-statistics.
To get rid of those home spies, we created an easy to use ESP-32 standalone web-radio. Providing Wi-Fi autoconnection to your local network, an easy to use web-interface.
And most important: no statistics.
AssemblyAs a source of energy we used a LiIon Battery out of a cheap USB Powerbank. If you search on ebay for USB Phone Battery chargers with a capacity of around 2000mAh you are very likely to find ones which use a standard 18650 LiIon-Cell which fits perfectly into the case.
Because of the limited space in the electronic compartment of the 3D printed case you will most likely need to tear the Powerbank apart.
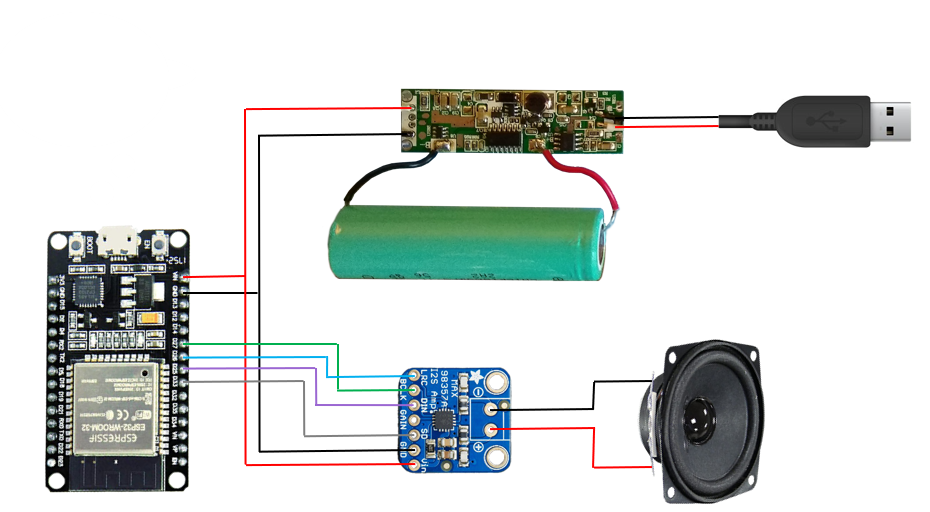
We removed the output USB-A Port using a hot air gun and soldered wires directly to the output terminals. For the input micro USB connector we did the same thing and soldered on the USB-A half of the USB cable that came with the Powerbank.
The speaker is mounted to the inside of the case using four M4x10 metal screws and nuts.
The electronics are assembled according to the wiring diagram an fitted into the electronic compartment.
Make sure you place the battery cell in the lower part and maybe wedge it in with a piece of foam etc. so it won't rattle around.
The Sidepanels for the speaker are cut from wood and glued onto the main part.
To flash the code on the ESP first install VS Code.
Next open VS Code and open the extensions.
Search after PlatformIO and install the extension.
After the installation succeeded close VS Code.
Next step is to clone our repo to your local drive with git. Or download the repo as a zip.
Then reopen VS Code in the directory: "EspWebRadio"
After the initialization is done. You can choose between local upload or, for later improvements, OTA update (without the local tag).
At this point you need to adapt one thing, if you're not living in the Berlin timezone in the RadioAlarm.h file.
After uploading the first time your ESP will generate an access point network. You can connect with it and then add your local wifi credentials in the overlay on your phone.
If you will move the speaker to another place the esp will create an access point again if it can't find stored networks.
When the esp is connected to your local wifi, open the platformio.ini and edit its IP address in the upload_port parameter to use the OTA upload function.
- Radio Settings
- Choose your favorite radio station
- or set to custom
- set the volume
- press play to start the streaming and stop to pause it again later
- In custom mode you can paste in the streaming-url of a not listed radio-station
- Alarm Clock
- Set the station you want to wake up with
- define the the alarm date and time
- set the snoozing time in minutes
- press start or to disable the alarm, press stop
- active alarm
- while the alarm is active the start button becomes the snoozing button


Comments
Please log in or sign up to comment.