Your favorite team may already be knocked out of the World Cup, but there is still time to make an IoT connected sign for your living room, office, or hallway.
First, the end resultThis sign will light up and flash whenever a goal is scored at the 2018 FIFA World Cup. It is designed in such a way that it can be run on a USB power bank and can be adapted in the future to light up for future sporting events.
InspirationSweden was never expected to go very far in the the tournament, so it was time to make the most of it and get involved with the World Cup in whatever way I could. After a short conversation with a friend (shout-out: @aeliassen), the idea to make a light display was born.
However, it had to be cheap to make, therefore materials used had to be things already at home.
Let's make itPrepping the cardboard
It was found that a nice layout for the LEDs was 8 across top and bottom, and 6 on the sides. This totals to 24 LEDs (we count the corners twice).
This fits nicely on the C1 cardboard book wrap you often get when you order from Amazon. The LEDs are split roughly 3cm apart, and 2.5cm from the edges.
Once the location of the LEDs has been drawn on in pencil, get out the 5mm drill and make 24 nice holes that will perfectly fit our 5mm LEDs.
Deciding on colors
The code attached uses a rotating pattern. For the design used in this tutorial, it assumes that the LEDs which are lighting up at the same time will be of the same color.
I found it nice to have the corners one color (white), while the rest of the sign was a mix of yellow and blue (go Sweden!). Of course, feel free to choose your color to support your team or be team-neutral with a mix of colors.
Insert the LEDs
Note: If you (or your kids) want to draw on the cardboard - do so before attaching any LEDs!
Place the LEDs into the holes from the back of the cardboard. As mentioned in the caption above, keep in mind that when you flip your sign, you'll see a mirror image. (Speaking from experience.)
To secure the LEDs in place, use a small piece of tape. The tape is easily pierced by the rods on the LED.
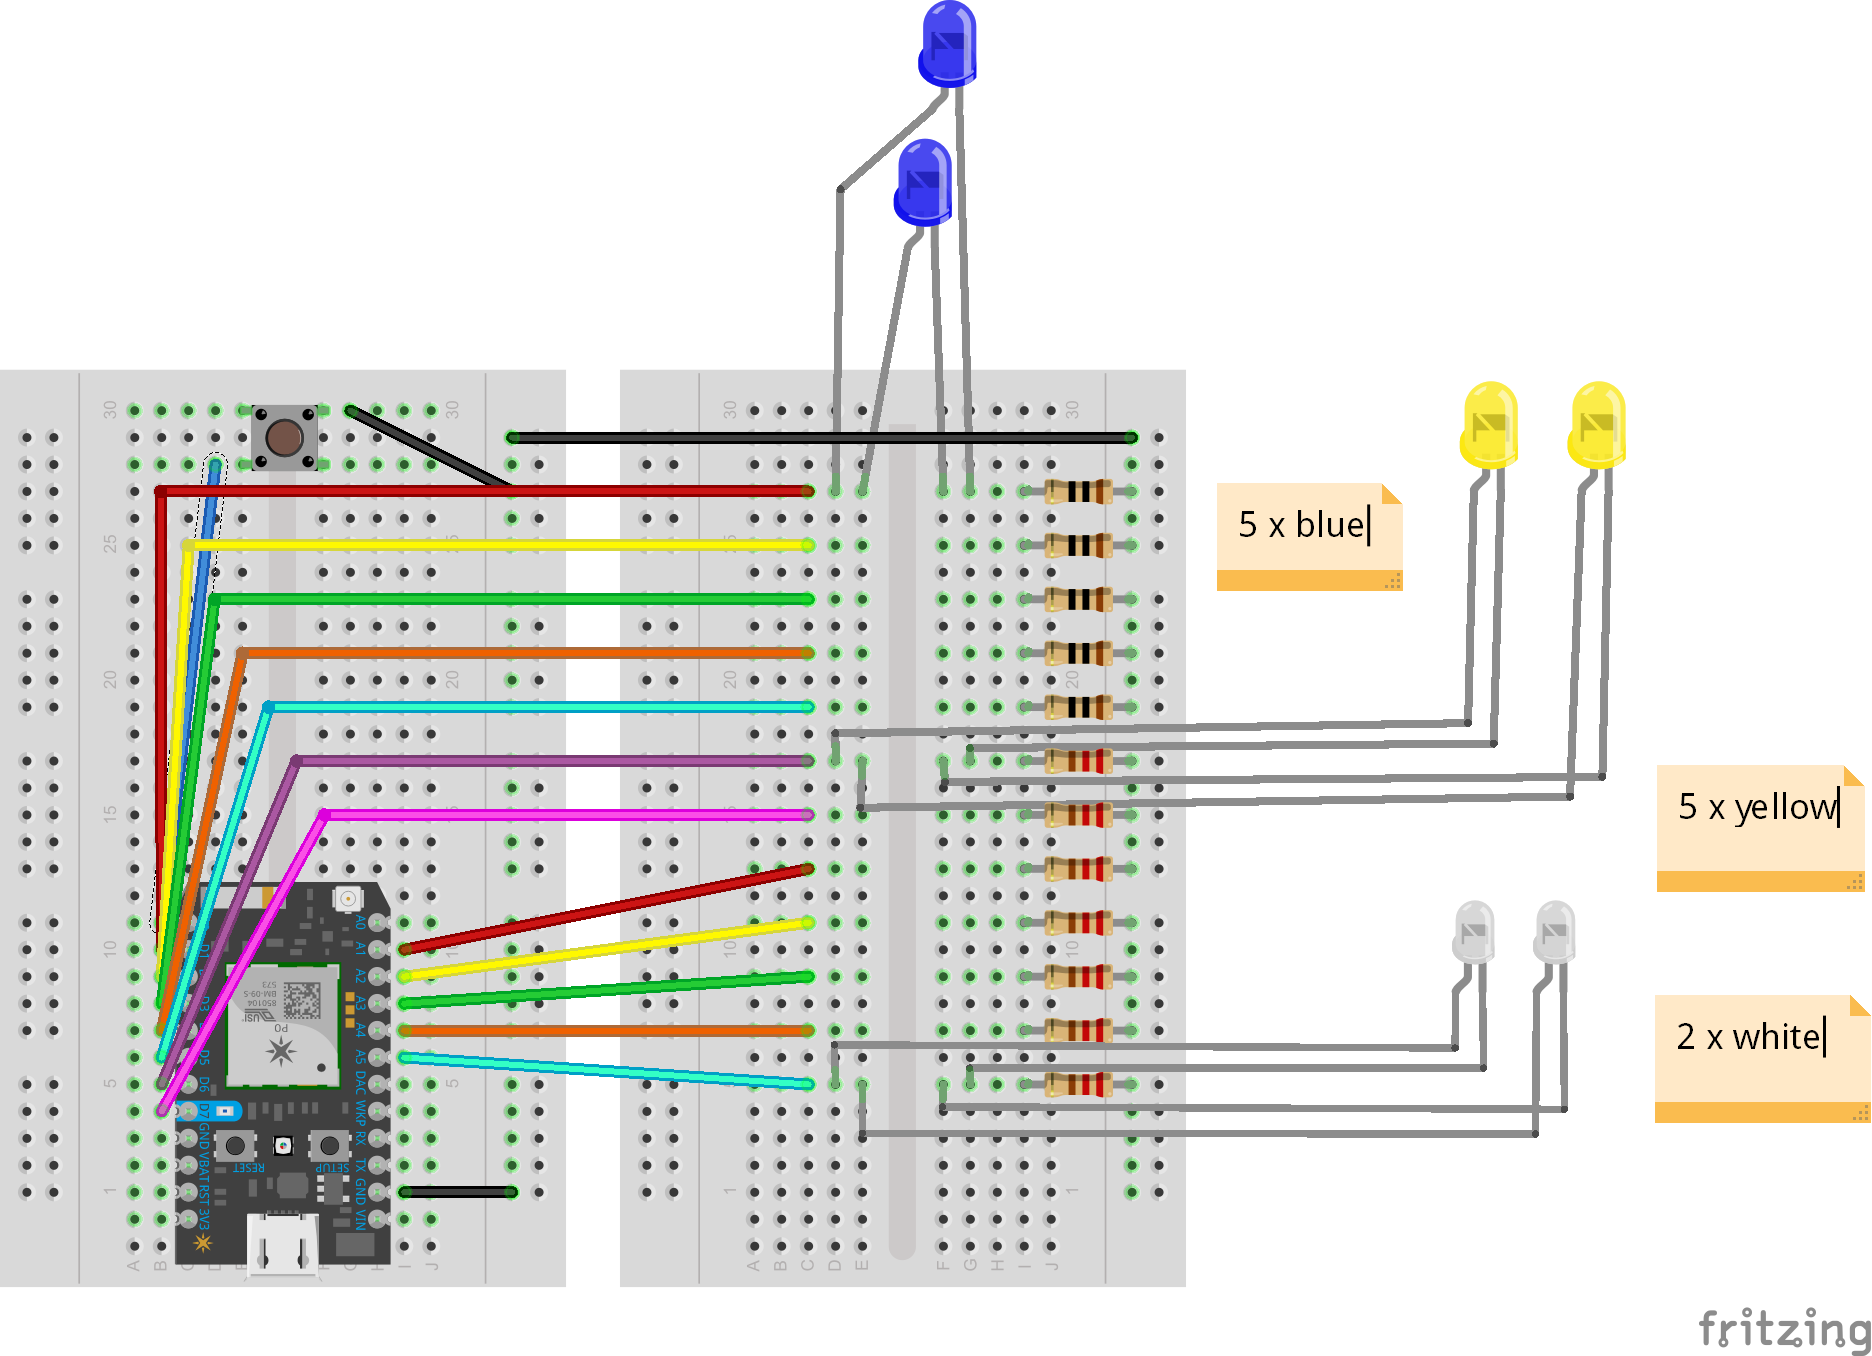
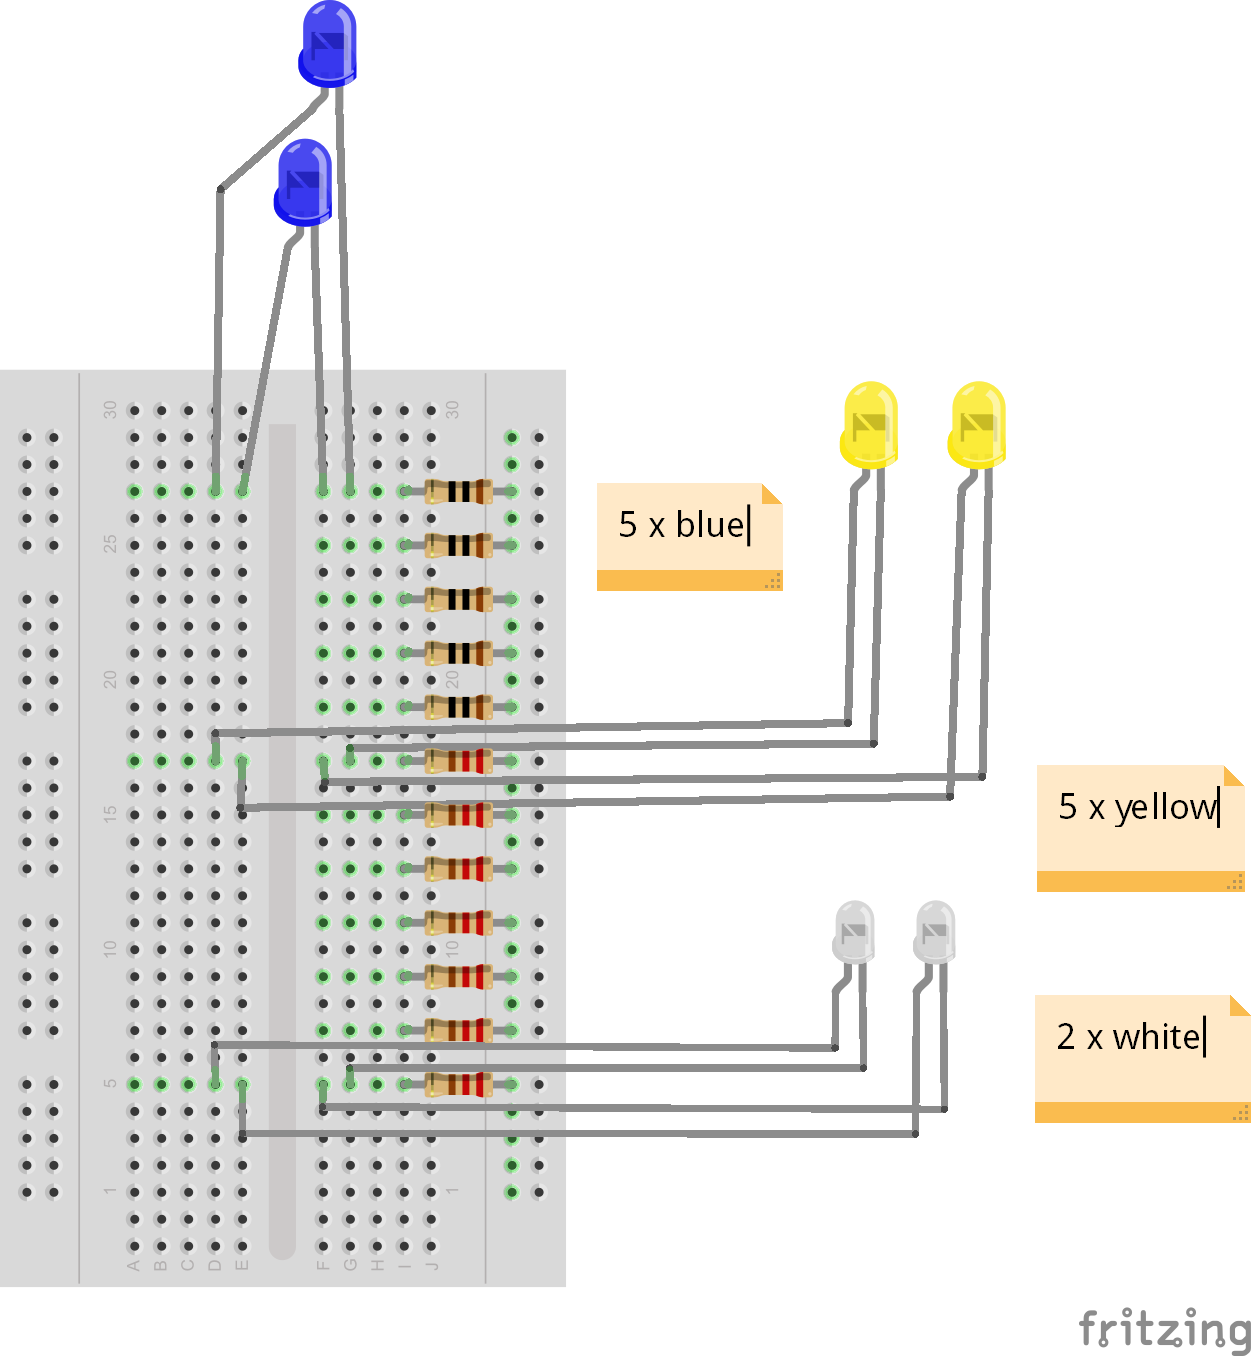
Due to the number of LEDs connected, I chose to use two breadboards.
This is where it gets a bit tricky, a pair of tweezers will come in handy. You're trying to connect matching LEDs to the same row on the breadboard. The resistor for each row is then connected directly to the negative row (which will go to ground), to minimize cables.
Tip: It can be worth connecting a few at a time and trying them to check that they work.
For clarity, the circuit only shows one pair of blue LEDs, one pair of yellow LEDs, and one pair of white LEDs. In reality you will need five pairs of blue LEDs, five pairs of yellow LEDs, and two pairs of white LEDs.
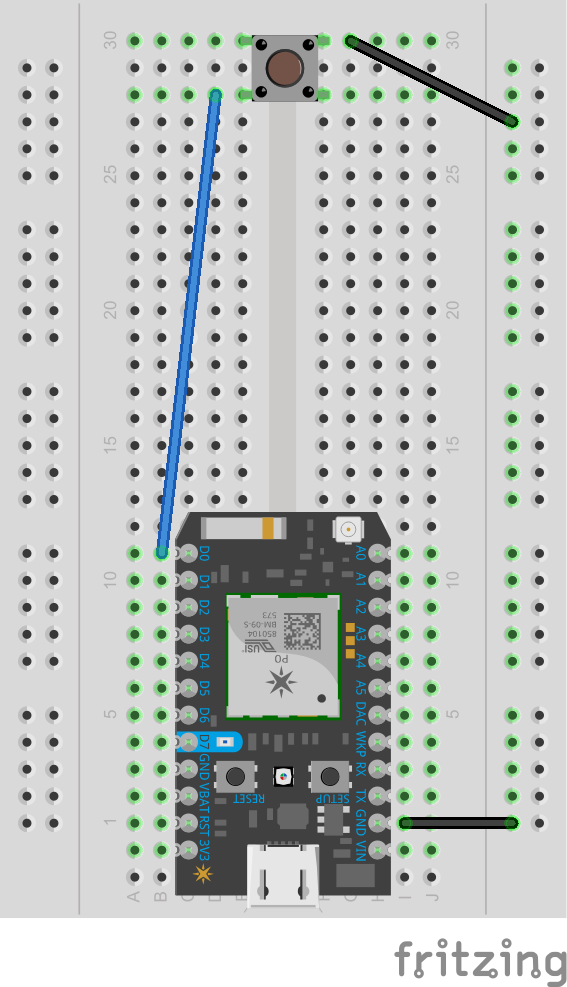
The Particle Photon
Now it's time for the Particle Photon.
I've chosen to do this on a separate breadboard - it's made it easier to install and move around. The push button is optional, but allows for easy testing and demonstration of the display.
We've then got to connect the digital and analogue pins to the LEDs. In the code, we will be treating the analogue pins simply as digital ones, which is perfectly fine.
Connecting a pin to a pair of LEDs means that we will be able to control each pair individually.
When everything is connected: the LEDs, the Photon, and the push button it will look something like this.
You will find the code attached, but there are few things worth talking through.
To make it possible for the light display to be triggered by IFTTT, we need to set up a function. I've chosen to call this function goalLight. The first thing to do is to instantiate it, you'll find this early in the code.
/* Instantiate what will be the light function */
int goalLight(String command);
Once this is done, we need to publish the function as part of the setup() loop.
Particle.function("goalLight", goalLight);
//This will make the function "goalLight" accessible from the cloud
Now when we open up IFTTT, we'll be able to find the goalLight function.
The actual code for the function is as follows:
/* The cloud triggered function */
int goalLight(String command)
{
   if(command == "score"){
       blinkLoop();
       return 1;
   }
   else return -1;
}
This means that we will need to pass the parameter "score" when invoking the function. If everything goes as it should, then 1 will be returned, otherwise -1 will be returned.
The other part of the code which is worth discussing is the code which controls how the LEDs are triggered. I've chosen to put it in a loop which runs 5 times. The code below turns on a pair of LEDs for 150ms, then turns them off and moves to the next pair. Of course, you could modify this to trigger to several pairs (near-) simultaneously or anything else you wish. But I'll leave it for you to explore that.
void blinkLoop(){
           for (int i = 0; i<5; i++){
           digitalWrite(ledWhite1, HIGH);
           delay(150);
           digitalWrite(ledWhite1, LOW);
           digitalWrite(ledBlue1, HIGH);
           delay(150);
           digitalWrite(ledBlue1, LOW);
           digitalWrite(ledYellow1, HIGH);
           delay(150);
           digitalWrite(ledYellow1, LOW);
           digitalWrite(ledBlue2, HIGH);
           delay(150);
           digitalWrite(ledBlue2, LOW);
           digitalWrite(ledYellow2, HIGH);
           delay(150);
           digitalWrite(ledYellow2, LOW);
           digitalWrite(ledBlue3, HIGH);
           delay(150);
           digitalWrite(ledBlue3, LOW);
           digitalWrite(ledYellow3, HIGH);
           delay(150);
           digitalWrite(ledYellow3, LOW);
           digitalWrite(ledWhite2, HIGH);
           delay(150);
           digitalWrite(ledWhite2, LOW);
           digitalWrite(ledBlue4, HIGH);
           delay(150);
           digitalWrite(ledBlue4, LOW);
           digitalWrite(ledYellow4, HIGH);
           delay(150);
           digitalWrite(ledYellow4, LOW);
           digitalWrite(ledBlue5, HIGH);
           delay(150);
           digitalWrite(ledBlue5, LOW);
           digitalWrite(ledYellow5, HIGH);
           delay(150);
           digitalWrite(ledYellow5, LOW);
       }
}
Once you're happy, flash the code to your Photon.
Connecting to IFTTTThe last technical part is setting up the IFTTT trigger. You'll need an IFTTT account with Twitter and Particle enabled.
- Select create a new applet.
- For "this" - select Twitter.
- Chose trigger as "New tweet by a specific user".
- The username to watch is "wc2018_goals" (this is the Twitter bot which we'll use).
- For "that" - select Particle.
- Chose event to be "Call a function".
- For "Then call", select "goalLight on '[your device name]'" and for "with input" change it to "score". It should look like this:
Tip: If the goalLight function doesn't appear, check that:
- the code has been successfully flashed to the Photon;
- that this was done before you started creating the applet on IFTTT;
- that you can see the function on the Particle Console.
8. Click "Create action".
Try itThere are three ways to try it:
- Press the button.
- Change the Twitter account IFTTT is monitoring to yours, and then tweet.
- Wait for a goal to be scored.
So, you've tried it and it works. You're happy with it. No connections that look dodgy or something that needs fixing. Time to make things more permanent.
Firstly, it might be nice to bundle some of the cable with a few cable ties. Once this is done, you can tape the breadboard done on the cardboard. I found electrical tape to be useful for this.
To make the sign a little bit sturdier, I also attached a set of three straws to each side of the Photon. Hopefully you won't need this.
Next, make sure that the USB cable is connected to the Photon.
Then wrap the cardboard around. It should make a nice stand, and you can add some tape at the bottom, back edge to keep it together.
Of course, at the moment the sign is very plain. Add some text to it, some flags, some drawings, or something else that will make it look great.
I'm curious to see what you've made, so tweet me your creation - @oscarschafer28!
Or if you have some other feedback on how the circuit can be made more efficient, please let me know!
Issues and future improvementsOne of the main issues is the delay that is involved. If you're actually watching the game, the 2-4 minute delay caused by the API needing to triggered, the Twitter bot needing to tweeting, then the IFTTT needing to be triggered, and finally the Particle cloud function needing to be triggered - makes for unexciting results.
This could possibly be addressed if the API could be monitored directly.
Two other nice addition would be connecting speakers of some sort, and filtering the tweet to only light up the display when a certain team scores.


_3u05Tpwasz.png?auto=compress%2Cformat&w=40&h=40&fit=fillmax&bg=fff&dpr=2)


Comments
Please log in or sign up to comment.