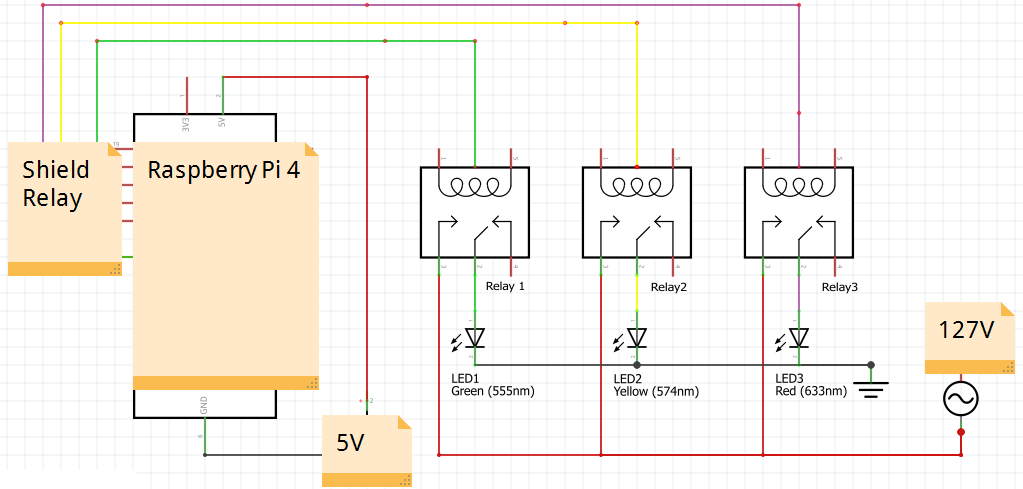
This project aims to foster alternatives for traffic management with IoT. The traffic signal light runs at the power supply of 127V and 10A.
The prototype employs a Raspberry Pi 4 with the operating system Raspbian 2021. Tip: the Raspbian without GUI works, but it is a little more difficult to configure wireless, fan, and others. So, I prefer to install Raspbian with the GUI Desktop interface (Images are here).
1) Write the Raspbian image in a SD Card
To accomplish this step is necessary SD Card of 16GB+, and a SD Card software writer. I used win32diskimager software. My notebook has the port entry to write the card.
2) Hardware Configuration2.1) Heat Sink issues: I experienced that basic heat sinks over CPU, RAM, Ethernet chip, and USB chip are sufficient to run Raspberry Pi 4 for relatively small loads. However, some researchers gives many reasons to buy a good cooler to avoid overheat at long runs with high loads. So, I replaced the basic heat sinks and put a single heatsink with dual cooler (yep, they do not assembly together).
2.2) Relay Shield: I put the relay shield over the heatsink with dual cooler. Unfortunately, the fan cable was not sized long. So, I put a jumper male-female and it works nice. The Figure 1 shows this assembly.
I put some wire connectors to avoid the small shield wiring ports, as shown in Figure 2. Probably there is a better way to insert these wires in this shield.
3.1. In the first run, to access the Raspberry, I put in the terminal:
User:pi
Password:raspberry
3.2. The Internet Access through my SmartPhone
A small webserver was develop to manage the traffic light. So, it is necessary to configure the Internet acess to download some packages. I perform the wireless configuration doing my cellphone as access point for the Raspberry. A complete description is done here. In the terminal:
#rasp-config
> System Options - Wireless - SSID - no password
> Localization - BR - reboot
Then, after reboot, I turned on my cellphone access point router. Here, my SSID is AndroidAP. In the terminal, I confirmed that the wireless is running:
#iwlist wlan0scan | grep AndroidAP
Now I edited the file to maintain the connection after reboots:
#nano /etc/wpa_supplicant/wpa_supplicant.conf
This is the file contents:
ctrl_interface=DIR=/var/run/wpa_supplicantGROUP=netdev
update_config=1
country=BR
network={
ssid="AndroidAP"
psk=""
}
The 'psk' is the access point password. To avoid keep the raw password to every one, I encripted it as follows:
# wpa_passphrase"MY_PASSWORD" | tee -a /etc/wpa_supplicant/wpa_supplicant.conf >/dev/null
I update the field 'psk' in the "/etc/wpa_supplicant/wpa_supplicant.conf" file with the new encripted password.
Finally, I just run in the terminal:
# wpa_cli-i wlan0 reconfigure
(Tip: It is necessary to wait no more than 1 minute to verify it)
# ifconfig wlan0
#iwconfig
Then, the Raspberry is connected through the cellphone, and now I can download webserver files.
3.3 WebServer
Web.py is a small webserver. I installed it as follows:
sudo apt-get update
sudo apt-get install python-webpy
Next, I put the code of the "Software attached files" in my home folder.
A sample of the running is in the video 1.
A sample of the webserver running is in the video 2.


Comments