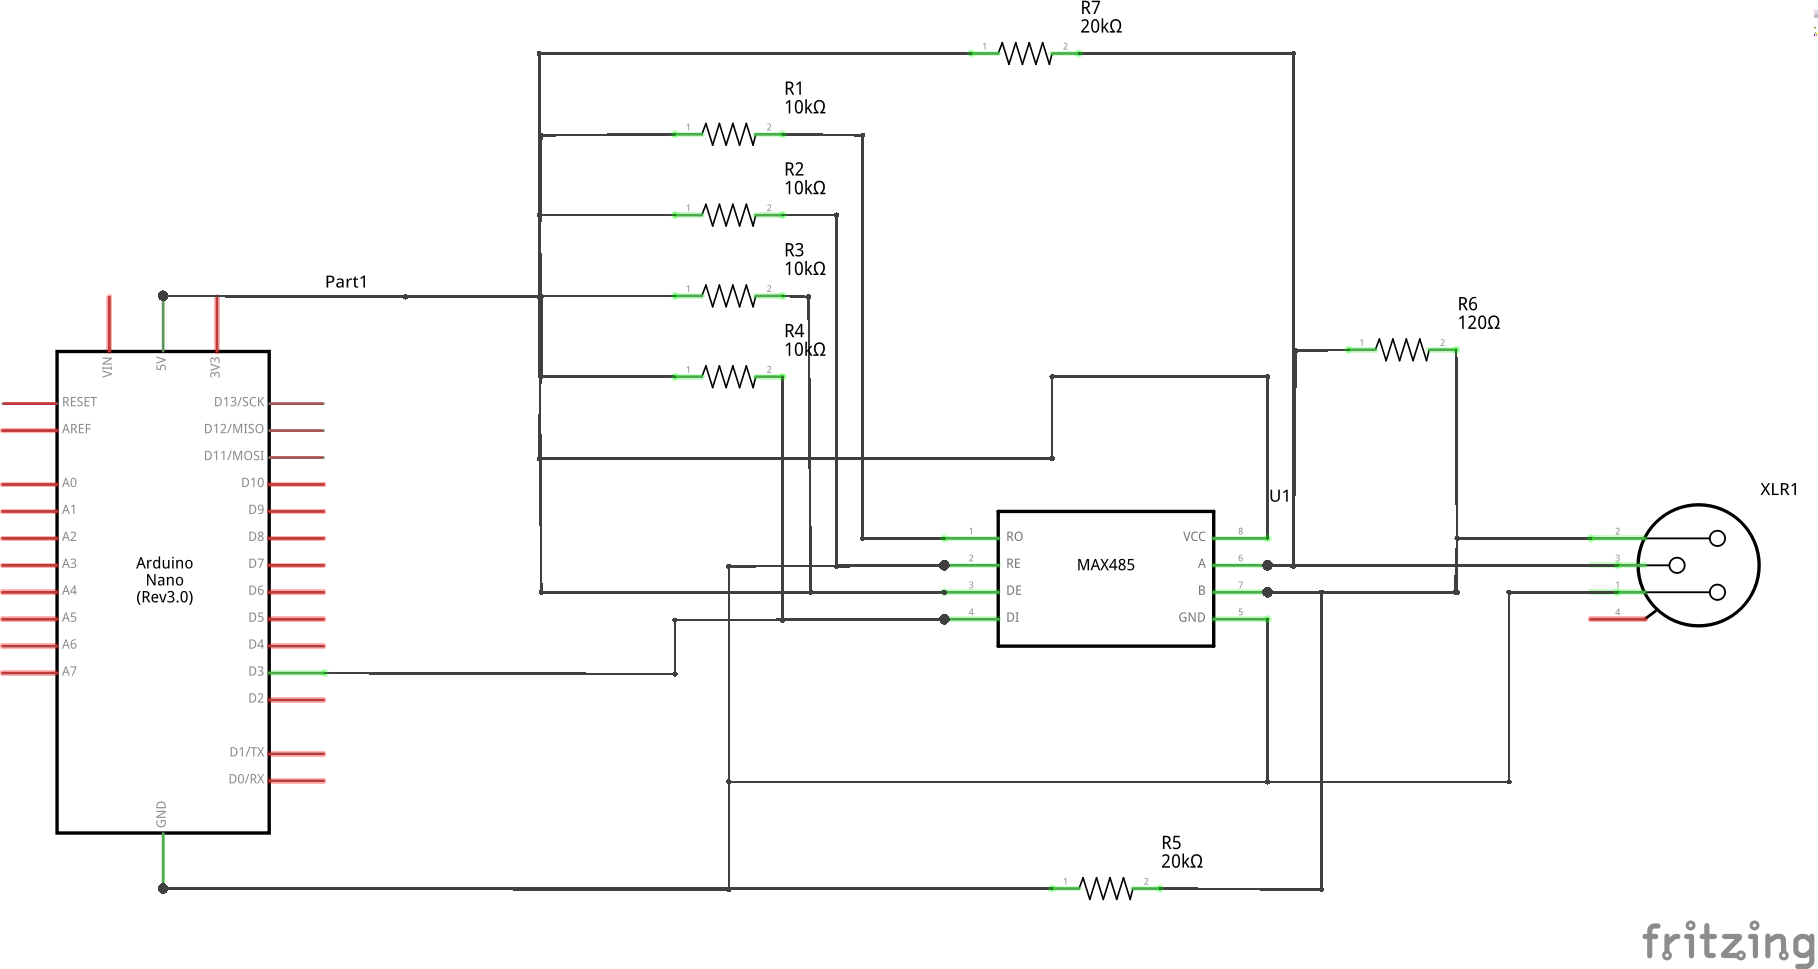
For this, you need the Arduino. We used the Nano, but an UNO and a few others should also work. For the conversion to DMX, we use the MAX485 IC. You can use it standalone or, as we did, a breakout board. In both cases, the wiring is the same:
The green input pin is connected to any digital pin on the Arduino. The default for the library we are going to use is D3.
If you want to recreate the breakout board yourself, you can look at the schematics in the schematics section, but we recommend you buy the breakout board as it's not worth the effort.
The code of the Arduino is available in the gitlab repository (linked in the code section here), but it's super simple. We used the DmxSimple library, which makes working with DMX as easy as writing to an analog pin.
Step 2Preparing an enclosureUse our files on GitLab to make an enclosure. You can either cut the boards out of wood (we used CNC laser cutter), or print it out. The dimensions are for 3mm thick boards. Next thing you will need are the pillars. They are really small and prepared to be printed on a 3D printer. You need 4 of them to hold the RPi in place. Than you can glue the poles into holes in inner board (the thicker end goes into the board).
Step 3Flashing firmwareArduino
You can flash the Arduino from the Arduino IDE, which you can download here. The code can be found here. The easiest way to flash is to:
1. Copy-Paste the code from the above link to the Arduino IDE.
2. In the IDE, click on Tools » Library Manager, search for the `DmxSimple` library and install it.
3. Click on Tools again, but now, select your board type (e. g. Arduino Nano, Arduino/Genuino UNO) and then from the same menu, select your port. If you don't have any other Arduinos or similar devices connected, there should be only one available. If there's multiple, it's usually safe to try the next step with a random port and if it doesn't work. Protip: If you're using the Nano, especially the cheap Chinese ones, and it doesn't work, try changing the Processor under Tools to `ATmega328P (Old bootloader) `. This can save you a lot of torn out hair.
4. Click the round button with a leftwards arrow in the top left. If there's an error, try the tips from the previous step.
5. You're done!
Raspberry Pi
We need to put the latest-ish version of raspbian on an SD card. There's plenty of tutorials on the internet on how to do that. For instance this one, is the first result on google, feel free to do that by yourself.
After the raspberry is up and running, we have to install a few things to make our system work. Get access to a command line (again, there's many tutorials on how to do that) then run these commands:
sudo apt update
sudo apt install docker.io make docker-compose git
cd ~
git clone https://gitlab.com/patek-devs/psc.git
That installs some necessary files. To start up the program, run those commands:
cd ~/psc/backend/src
make run
That second one is going to take a loooong time, but only the first time.
To update to the latest version, run:
cd ~/psc/backend/src
git pull
After this update, starting the program is again going to take a longer time, but hopefully not too much.
The Rasperry now should be ready to rock!
Step 4Putting parts togetherFirstly clip the RPi on the pillars. Connect your ethernet (you can route it through USB hole under the board and through the other hole back up) and USB cable from Arduino to RPi and route it through rectangular hole just in front of the connector under the board. Once you got it, clip on side of the inner board left wall and the right wall (I recommend this order, because you may find it difficult to fit in port holes). After that put the Arduino and chip on the bottom part, put dmx and ethernet connector in place in the front panel and connect them. When you finished this step clip the side walls on the bottom board. Continue with cliping front and back (If your RPi really heats up, you can mount the 60mm fan on the back board) and finish with the top part. You can glue it now, but it is probably good idea to wait for the first mock-up show to check if everything's working fine and glue everything together after that.
Step 5Preparing a showUse Markdown extended with our special format within the web app to write your script and add actions. You can copy-paste from Word, the internet, anywhere where Ctrl-C Ctrl-V works.
Format of actions:
<pcs-action module="<module>" command="<command>">
{
    "foo": "bar",
    "baz": "foobar"
}
</pcs-action>Press the spacebar to advace to the next action. It's that simple.


Comments
Please log in or sign up to comment.