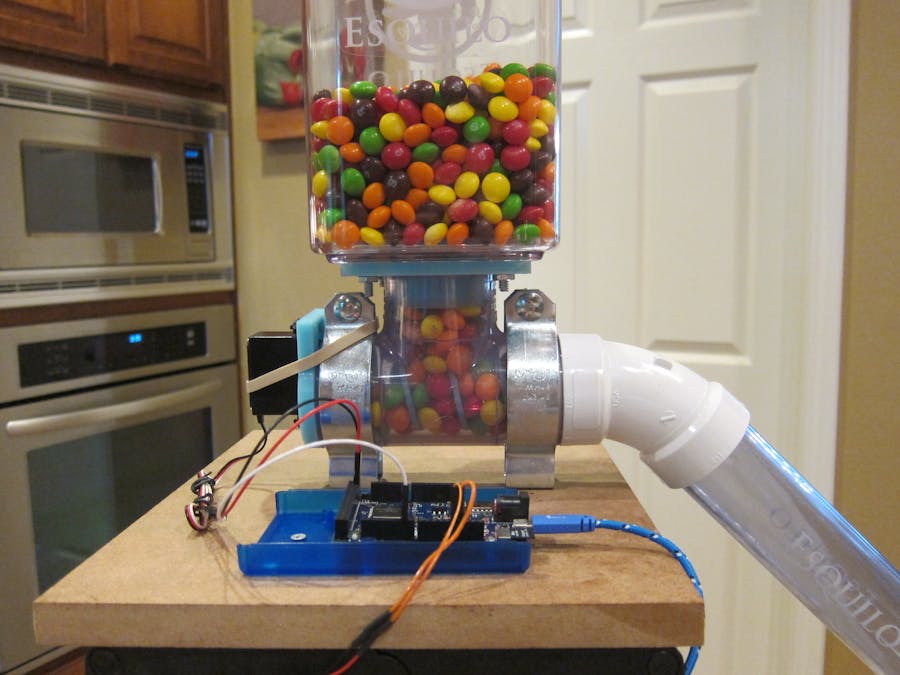
This is an Internet-enabled auger-fed candy dispenser. It is made with a few 3D-printed parts, some off-the-shelf PVC fittings, a servo, and an Esquilo. I made it as a demo project at the Austin Mini Maker Faire. We had a computer sitting near it with a webpage served from the Esquilo asking to join our newsletter in exchange for some Skittles. Needless to say, it was a big hit with the kids!
We also added a push-button on a cable that allowed us to do manual dispenses without entering you email address.
Auger Drive
This project’s auger mechanism is based on an automated cat feeder design I found posted on the Makerbot Thingiverse website at: http://www.thingiverse.com/thing:8175. The CAD files needed to print the parts are posted with that project on Thingiverse.
Having never done 3D printing before, I was initially concerned that getting the parts made would be too difficult or costly. Someone recommended I find a local 3D print shop using http://www.makexyz.com. This site is a marketplace for such shops that ranks the vendors based on customer feedback. We found a highly rated local shop and simply downloaded and emailed the CAD files to them. A few days later we had the parts! The following picture shows what we got. As you can see, we orders some extras in case anything broke in testing.
Parts List
Besides the 3D-printed parts, everything is off-the-shelf. Here's all the parts we used to put it together:
- Esquilo development board
Continuous rotation servo
3D-printed auger, servo mount, and hopper mount
1 ½ “ PVC tee (clear will let you see the auger do its thing! - see the hardware section for a source link)
1 ½ “ PVC 45 degree elbow
1 ½ “ PVC pipe (about ½ foot - clear will let you see the candy coming down - see hardware section for a source link)
Two 2 “ pipe hangers for mounting
Rubber band
MDF or plywood (about 8” x 8”)
Superglue
Plastic food container for the candy hopper
- Miscellaneous mounting nuts and bolts
- Miscellaneous jumper wire
- Bottom part of a Hammond Arduino Uno enclosure
- Push button and some cable for manual dispense
Build Instruction
- Assemble Auger - The auger comes in two halves. Shave the excess plastic off with an Exacto knife and glued them together with superglue.
- Mount Servo - Bolt the servo on the the servo mount with some small bolts and nuts.
- Attach Auger - Attach the auger to the servo arms with some small screws. This was kind of tricky. We left the arm attached to the servo and screwed in the auger through the opening at the back of the servo mount.
- Mount Hopper - Set the hopper mount upside down on the bottom of the container you want to use as the hopper. Drill five holes in the container, one for each bolt and one for the candy to come through. Attached the mount to the hopper with four nuts and bolts.
- Mount Tee - Mount the PVC tee joint onto the board with the pipe hangers.
- Attach Servo / Auger Assembly - Insert the auger and servo mount into the back of the PVC tee and use a rubber band to hold it in place. We’re using a rubber band instead of gluing it in to allow some give if the candy binds in the auger.
- Attached PVC elbow - Insert the 45 degree PVC elbow to the front of the tee, angled down.
- Attach Downspout Pipe - Cut a piece of 1 1/2" PVC pipe to the length you'd like the candy to roll down. This obviously depends on your setting and how high you put the auger part of the dispenser. We used a 1' high step-stool on a table, so cut about a 1' pipe to allow a dixie cup to be placed at the end to catch the candy.
Connections
The few connections needed are from the Esquilo to the servo and to the push button.
Esquilo Pin Servo Pin
6 (PWM1:CH0) White (signal)
5V Red
GND Black
Esquilo Pin Push Button
13 (GPIO 13) Either wire
GND The other wire
Esquilo Code
The servo control code to dispense candy uses the Esquilo servo library to rotate the auger backward for 400ms and then forward for 900ms every time a dispense is requested. Dispense requests can be made over HTTP with a simple POST. The full source listing is included in software section below, but it fits here. This runs the auger to dispense candy.
// Auger servo is on PWM1 channel 0 (Esquilo pin 6)
servo <- Servo(PWM(1), 0);
// Dispense
function dispense() {
// Turn the auger backward for 400ms first to avoid binding
servo.position(90);
delay(400);
// Turn the auger forward for 900ms to dispense!
servo.position(0);
delay(900);
// Turn the auger off
}
The other part of the code simply watches for a button press on the GPIO pin and calls a manual dispense cycle when that happens.
// Button to dispense
cableButton <- GPIO(13);
cableButton.input();
cableButton.pullup(true);
while (true) {
// Dispense if the button is pressed
if (cableButton.islow())
dispense();
delay(200);
}
Webpage Control
The Esquilo served a simple page asking for an email address to dispense some candy. It is written in standard HTML and JavaScript. Basically, when an email address is entered, the Esquilo RPC mechanism is used to run the auger with this JavaScript one-liner:
erpc('dispense');
This can be adapted to control the dispenser from anything with an HTTP client. For example, here's a curl call to request a serving:
curl http://10.0.0.115/erpc?method=dispense


Comments
Please log in or sign up to comment.