The DHT11 humidity and temperature sensor make it really easy to add humidity and temperature data to your DIY electronics projects. It’s perfect for remote weather stations, home environmental control systems, and farm or garden monitoring systems.
In this tutorial, I’ll first go into a little background about humidity, then I’ll explain how the DHT11 measures humidity. After that, I’ll show you how to connect the DHT11 to an Arduino and give you some example code so you can use the DHT11 in your own projects.
DHT11 SensorThe DHT11 is a basic, ultra low-cost digital temperature and humidity sensor. It uses a capacitive humidity sensor and a thermistor to measure the surrounding air and spits out a digital signal on the data pin (no analog input pins needed). Its fairly simple to use, but requires careful timing to grab data. The only real downside of this sensor is you can only get new data from it once every 2 seconds, the sensor readings can be up to 2 seconds old.
Compared to the DHT22, this sensor is less precise, less accurate, and works in a smaller range of temperature/humidity, but it is smaller and less expensive.
Technical Details
- Low cost
- 3 to 5V power and I/O
- 2.5mA max current use during conversion (while requesting data)
- Good for 20-80% humidity readings with 5% accuracy
- Good for 0-50°C temperature readings ±2°C accuracy
- No more than 1 Hz sampling rate (once every second)
- Body size 15.5mm x 12mm x 5.5mm
- 4 pins with 0.1" spacing
The DHT11 measures relative humidity. The relative humidity is the amount of water vapor in air vs. the saturation point of water vapor in the air. At the saturation point, water vapor starts to condense and accumulate on surfaces forming dew.
The saturation point changes with air temperature. Cold air can hold less water vapor before it becomes saturated, and hot air can hold more water vapor before it becomes saturated.
The formula to calculate relative humidity is:
The relative humidity is expressed as a percentage. At 100% RH, condensation occurs, and at 0% RH, the air is completely dry.
How the DHT11 Measures Humidity and TemperatureThe DHT11 detects water vapor by measuring the electrical resistance between two electrodes. The humidity sensing component is a moisture holding substrate with electrodes applied to the surface. When water vapor is absorbed by the substrate, ions are released by the substrate which increases the conductivity between the electrodes. The change in resistance between the two electrodes is proportional to the relative humidity. Higher relative humidity decreases the resistance between the electrodes, while lower relative humidity increases the resistance between the electrodes.
The DHT11 measures temperature with a surface mounted NTC temperature sensor (thermistor) built into the unit. To learn more about how thermistors work and how to use them on the Arduino, check out this Arduino Thermistor Temperature Sensor Tutorial.
With the plastic housing removed, you can see the electrodes applied to the substrate:
An IC mounted on the back of the unit converts the resistance measurement to relative humidity. It also stores the calibration coefficients, and controls the data signal transmission between the DHT11 and the Arduino:
The DHT11 uses just one signal wire to transmit data to the Arduino. Power comes from separate 5V and ground wires. A 10K Ohm pull-up resistor is needed between the signal line and 5V line to make sure the signal level stays high by default (see the datasheet for more info).
There are two different versions of the DHT11 you might come across. One type has four pins, and the other type has three pins and is mounted to a small PCB. The PCB mounted version is nice because it includes a surface mounted 10K Ohm pull up resistor for the signal line. Here are the pinouts for both versions:
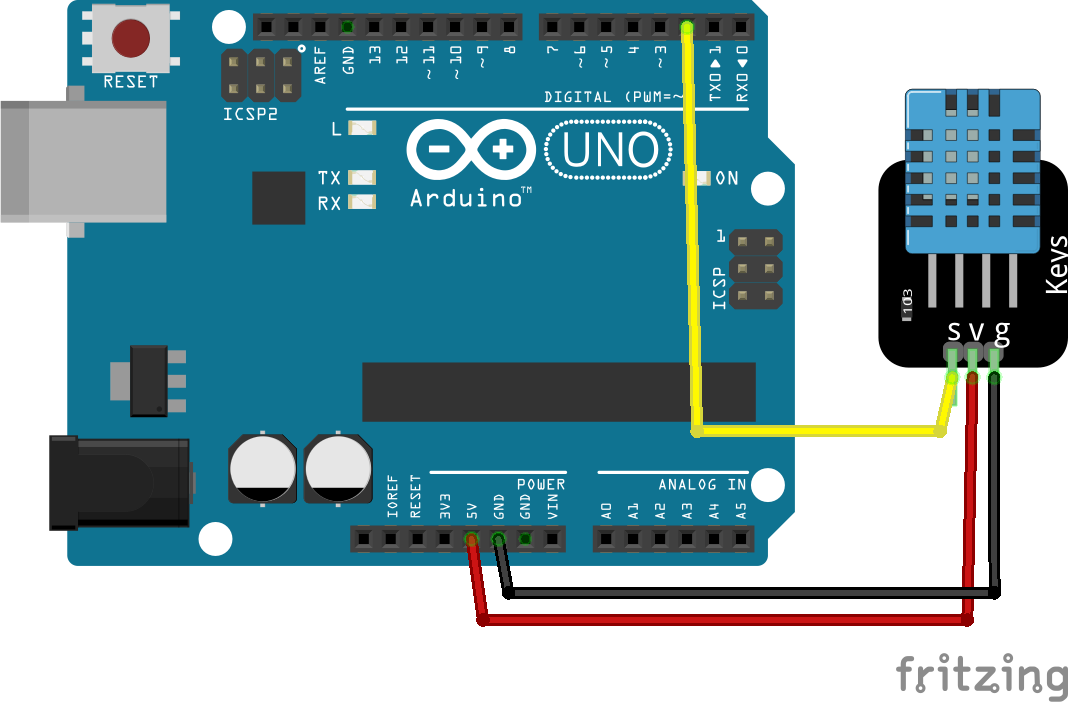
Wiring the DHT11 to the Arduino is really easy, but the connections are different depending on which type you have.
- VCC - red wire Connect to 3.3 - 5V power. Sometime 3.3V power isn't enough in which case try 5V power.
- Data out - white or yellow wire
- Not connected
- Ground - black wire
Simply ignore pin 3, it's not used. You will want to place a 10 K ohm resistor between VCC and the data pin, to act as a medium-strength pull up on the data line. The Arduino has built-in pull-ups you can turn on but they're very weak, about 20-50K
Programming ArduinoYou should have the Arduino IDEsoftware running at this time. Next, it’s necessary to install the DHT Sensor library, which can be done through the Arduino Library Manager:
Sketch→Include Library→Manage Libraries…
Enter “dht” in the search field and look through the list for the “DHT sensor library by Adafruit.” Click the “Install” button, or “Update” from an earlier version.
IMPORTANT: As of version 1.3.0 of the DHT library you will also need to install the Adafruit_Sensor library, which is also available in the Arduino Library Manager.
Now load up the Examples→DHT→DHTtester sketch.
Code ExplanationFirst we have to include the "DHT.h" Library.
#include "DHT.h"Then define the digital pin in which the DHT11 is connected to.
#define DHTPIN 2 // Digital pin connected to the DHT sensorNow define the type of DHT Sensor. Since we're using a DHT11 sensor, we can write like this.
#define DHTTYPE DHT11 // DHT 11If you have a DHT22, write this.
#define DHTTYPE DHT22 // DHT 22 (AM2302), AM2321Then define the DHT parameter to Initialize DHT sensor.
DHT dht(DHTPIN, DHTTYPE);Note that older versions of this library took an optional third parameter to tweak the timings for faster processors. This parameter is no longer needed as the current DHT reading algorithm adjusts itself to work on faster procs.
Inside the void setup function, Initialize the Serial Communication and the DHT Sensor.
void setup() {
  Serial.begin(9600);
  Serial.println(F("DHTxx test!"));

  dht.begin();
}
Now, inside the void loop function, let's measure the readings.
Reading temperature or humidity takes about 250 milliseconds! Sensor readings may also be up to 2 seconds 'old' (its a very slow sensor).
float h = dht.readHumidity(); // read humidityRead temperature as Celsius (the default)
float t = dht.readTemperature(); // read temperatureRead temperature as Fahrenheit (isFahrenheit = true)
float f = dht.readTemperature(true);Check if any reads failed and exit early (to try again).
if (isnan(h) || isnan(t) || isnan(f)) {
    Serial.println(F("Failed to read from DHT sensor!"));
    return;
}
Compute heat index in Fahrenheit (the default)
float hif = dht.computeHeatIndex(f, h);Compute heat index in Celsius (isFahreheit = false)
float hic = dht.computeHeatIndex(t, h, false);Print the measured readings on the Serial Monitor.
Serial.print(F(" Humidity: "));
Serial.print(h);
Serial.print(F("%  Temperature: "));
Serial.print(t);
Serial.print(F("°C "));
Serial.print(f);
Serial.print(F("°F  Heat index: "));
Serial.print(hic);
Serial.print(F("°C "));
Serial.print(hif);
Serial.println(F("°F"));
That's all. You can use this code to measure the temperature and humidity values using the DHT11 or DHT22 sensors in any of your projects.
Upload Program to the ArduinoWatch our youtube video to see how to upload the program to Arduino.
About Pi BOTS MakerHub:
Pi BOTS MakerHub is an Opensource Hardware Community and Training Center. You can join our Community programs By joining our Community Groups. To join, Click HERE
Thank You.


_ztBMuBhMHo.jpg?auto=compress%2Cformat&w=48&h=48&fit=fill&bg=ffffff)


Comments