Intel Galileo
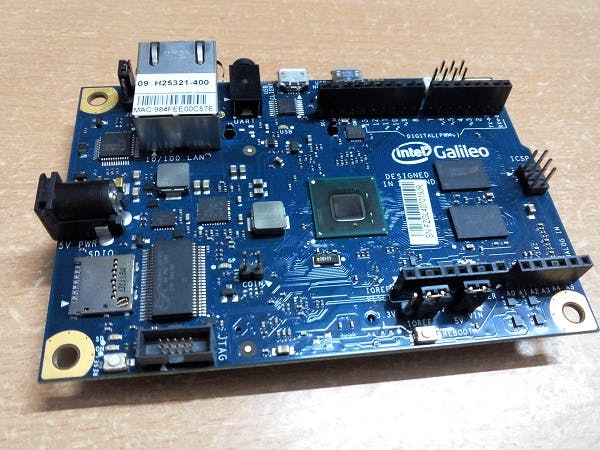
Intel Galileo is a hardware development board that lets us write code and create electronic circuits to build our own projects. The board doesn’t do very much on its own, so we need to connect it to the right hardware and write the code to tell it what we want it to do. Galileo is an Arduino compatible board but the thing that makes it different is its specs, It is a cross-pollination between an Arduino Uno and a low-end computer.
This is how it looks like
Prerequisites
Galileo software https://communities.intel.com/docs/DOC-22226
Setting up
- Extract the contents of the Zip file.
- Power up the Galileo. You will see the power LED light up. Galileo will start booting from the customized version of Linux. Wait a few seconds.
- Now we are ready to make the rest of the connections, we will connect the Galileo to a computer via USB cable. Now we see the USB LED light up.
- When we connect the Galileo for the first time we need to install the drivers. In Device Manager we can see that the device needs a driver since the device will be appearing under Other devices as Gadget Serial v2.4.
- Right-click on that and select Update Driver software from the menu, from there browse to the directory that we have recently downloaded. Also turn on the check box beneath that to include subfolders. Click next, It will automatically detect the driver software. Click Install. After installation we can see our Galileo device is appearing under “Ports” listening on a specific COM port. Remember the COM port. Now our Galileo is connected.
- Run Arduino.exe to open up the Arduino IDE for Galileo.
- Now we need to point the Arduino IDE to our Galileo. From Tools under Board select your Galileo Gen1 or Gen 2. In my case it is Galileo Gen 1.
- We also want to ensure that our Arduino IDE is pointing to the correct serial port. From Tools under Serial Port select the COM port on which Galileo is listening. You can check that from Device Manager.
- Finally we need to update our Galileo Framework. From Help select Firmware Update. It will take some time and the Galileo can be disconnected and connected during this process since the firmware is updating. Finally you will receive a prompt that the Galileo Firmware is updated.
- Now we are ready to write our first program (Sketch) for Galileo.
Running our First Sketch
The programs we write for Galileo are called sketches. Inside the sketch we have a minimum of the following two methods:
- setup()
- loop()
I am using a Red LED that I hooked up to pin 13 by carefully inserting the anode in pin 13 and the cathode to ground. They have polarity which means we need to connect them in the right order. There are many ways to differentiate between cathode and anode of the LED, we can tell that by looking at the LED carefully in many ways.
- The longer leg will be the cathode and the shorter will be the anode
- When we examine the LED from the top we see the two metal posts, the smaller of the two is the anode and the bigger is the cathode
Galileo has digital and analog pins for input and output. Here by default our LED is hooked up to pin 13. To compile and run the sketch just hit the upload button. In the output you will see the transfer is complete and the LED is blinking. There is a little LED on the board that is also hooked up to pin 13 so if you don’t attach an external LED then that will also work for you.
Now we have successfully deployed our first sketch to Galileo. And we are ready to do more creative stuff with our powerful development board “Intel Galileo”.
Important
Windows users should unzip the Galileo file to the top directory of any drive. Connect your Intel Galileo to the 5V power supply before any other connection or you will damage the board.
The Gen1 and Gen 2 boards need a different power supply. The 5V power supply for the original Galileo Gen1 is not compatible with Galileo Gen 2.


_CknEXl3edm.jpg?auto=compress%2Cformat&w=40&h=40&fit=min&dpr=2)

_CknEXl3edm.jpg?auto=compress%2Cformat&w=60&h=60&fit=min&dpr=2)


Comments
Please log in or sign up to comment.