The DHT22 temperature and humidity sensors appear to be very popular and there has been a lot of interest in using them from Windows 10 IoT Core and C#. However, they present a problem when using this OS.
If you have not read my previous posts, here is an overview of the challenge:
The DHT22 is an inexpensive 4-pin (one pin is unused) temperature and humidity sensor with a unique characteristic, it communicates on one wire. The sensor can operate between 3 and 5.5V DC and communicates using its own proprietary OneWire protocol. This protocol requires very precise timing to get the data from the sensor. The LOW and HIGH bits are coded on the wire by the length of time the signal is HIGH. The total time to take a reading is at most 23.4 ms. This includes an 18 ms delay required to start the data transfer and a window of up to 5.4 ms for the data. Individual signals can be as short as 20 μs and as long as 80 μs. Since Windows 10 IoT core is not a real-time operating system it is incapable of reading this sensor. The timing mechanism limitations (timing is not precise enough) and the existence of multi-threading (your thread can be pre-empted at any time during the read operation) prevents the sensor from being read.
Below are images from my oscilliscope displaying the output of a DHT22 sensor.
I have several projects demonstrating how to interact with this sensor including using an ATtiny85 to turn it into an I2C device (see DHT Tiny Breakout for the Raspberry Pi). I also took code from an older Microsoft C++ sample and turned it into a library usable from C# (see DHT11/22 Temperature Sensor). This approach allowed the sensor to be read but not 100% of the time. I built into it a retry mechanism to give the appearance of higher stability but there were still issues getting a reading each time.
When I first attempted to use this sensor on Windows 10 IoT Core and C#, I tried several approaches including using interrupts to catch all the events changes on a pin and then attempted to measure the time between each event (an event being the falling or rising edge). I ran into a problem in that I could not switch the data pin from output to input fast enough to catch the data from the sensor.
ApproachWhen I came across the latest Microsoft example for the DHT22 (still written in C++) I noticed two things:
- They used a second pin to trigger the sensor (honestly this never even occurred to me). This solves the issue of switching a pin from output to input.
- They used a new feature introduced in the Windows 10 Creators Update (introduced v10.0.15063.0) called GpioChangeReader. This object records high-resolution timestamps on pin changes in kernel mode and makes them accessible in user mode.
In this project I have taken the concept introduced in the Microsoft C++ GpioOneWire Sample and built it in C#. I have also created a NuGet package that can be easily added to any project. The package ID is Dht.Sharp.
CodeThe code initializes two GPIO pins. The first is to trigger the sensor to send a reading, and the second pin is used to read the sensor data.
The potential disadvantage with this approach is that the circuit requires one extra component and one extra pin. This may not be an issue to some but when cost, size of the circuit and/or number of pins is critical, this approach may not be suitable.
The trigger pin is set to output, and the second pin is set to input. The sensor requires a pull-up resistor of at least 5.1K but you can initialize the pin with a built-in pull-up.
// ***
// *** Set up the data pin.
// ***
GpioPin dataPin = GpioController.GetDefault().OpenPin(5, GpioSharingMode.Exclusive);
dataPin.SetDriveMode(GpioPinDriveMode.Input);
// ***
// *** Set up the trigger pin.
// ***
GpioPin triggerPin = GpioController.GetDefault().OpenPin(4, GpioSharingMode.Exclusive);
triggerPin.SetDriveMode(GpioPinDriveMode.Output);
The trigger pin should be immediately set to LOW, which puts data pin on the sensor in HIGH state, due to the MOSFET connected to the trigger pin (more on this in the circuit section).
A GpioChangeReader instance is created next using the data pin.
// ***
// *** Initialize the change reader.
// ***
this.ChangeReader = new GpioChangeReader(this.DataPin)
{
	Polarity = GpioChangePolarity.Falling
};
In this case, I am asking the changes to be recorded on each falling edge. The time measurements that are calculated between each reading will be from one falling edge to the next (the falling edge is where the state changes from HIGH to LOW).
To trigger a reading, the trigger pin is set to HIGH for 18ms and then it is set back to LOW. Next, the change reader is called to read the next 43 falling edge events. Note, the change reader will wait indefinitely for these changes so a Cancellation Token is used. A timeout is set to 100ms which is more than enough time to wait for a response from the sensor.
// ***
// *** Clear and start the Change Reader.
// ***
this.ChangeReader.Clear();
this.ChangeReader.Start();
// ***
// *** Bring the line low for 18 ms
// ***
this.TriggerPin.Write(GpioPinValue.High);
await Task.Delay(TimeSpan.FromMilliseconds(18));
this.TriggerPin.Write(GpioPinValue.Low);
// ***
// *** Wait for 43 falling edges, but do not wait for more than the timeout.
// ***
CancellationTokenSource source = new CancellationTokenSource((int)this.Timeout.TotalMilliseconds);
await this.ChangeReader.WaitForItemsAsync(43).AsTask(source.Token);
// ***
// *** Get all of the change records.
// ***
IList<GpioChangeRecord> changeRecords = this.ChangeReader.GetAllItems();
The sensor when triggered sends an acknowledgment followed by 40 bits. The 43 events provide 42 data points (measuring the time between two events). The first event is the trigger, the second is the sensor acknowledgment and the remaining 40 make up the temperature, humidity and checksum.
Take a look at the rest of the code to see how the bits are transformed into the sensor data.
Normally a single pin could be used for this sensor. This requires that the pin be set to OUTPUT and toggled LOW, waiting 18ms and then toggling it back to HIGH. After this, the pin would be changed to INPUT to read the incoming data from the sensor. Unfortunately, while the pin is being changed from output to input the sensor has started sending data and a portion of the data stream is missed.Circuit
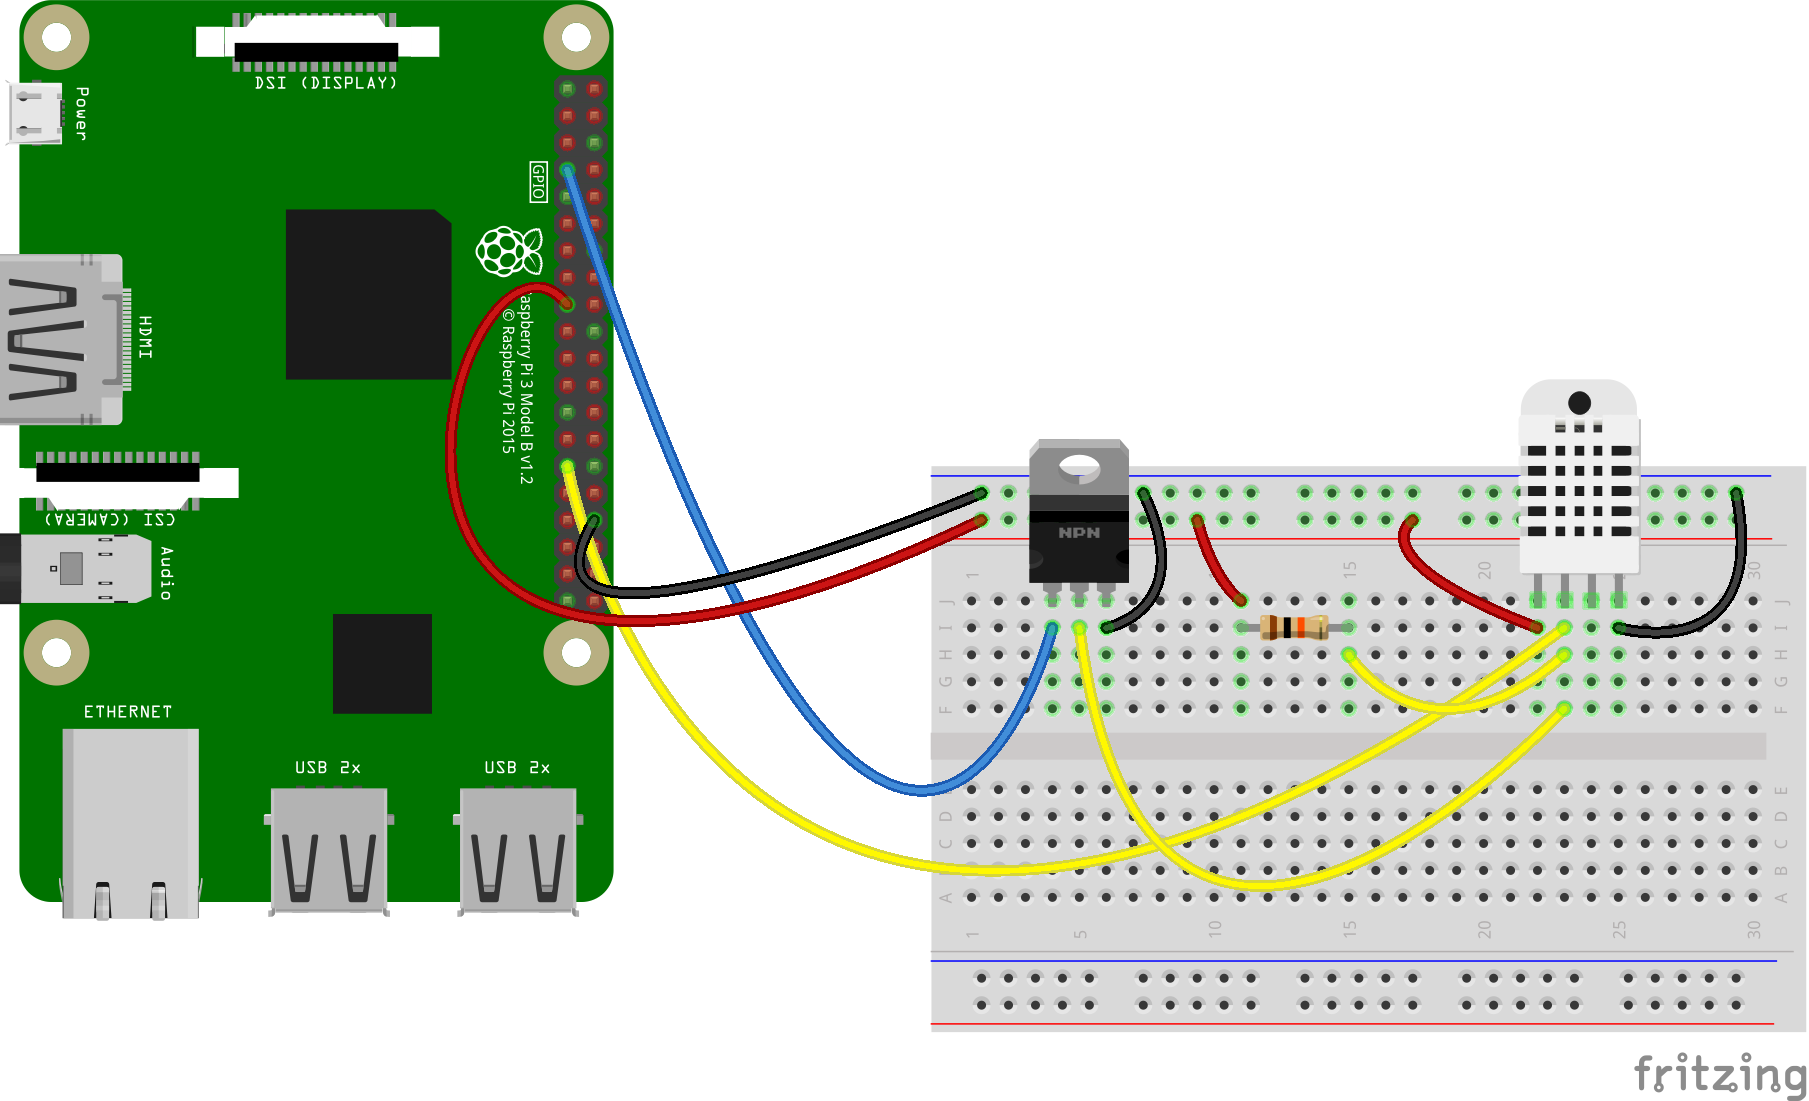
The circuit for this project is simple. It consists of the DHT22 sensor connected to one pin on the Pi and an N-channel MOSFET for triggering the sensor connected to a second pin. There is a 10K resistor between the data pin on the sensor and the 3V3.
In this example, GPIO pin 4 of the Raspberry Pi is connected to the gate of the MOSFET. The source pin of the MOSFET is connected to ground while the drain pin is connected to the data pin of the DHT22 sensor. GPIO pin 5 on the Raspberry Pi is also connected to the data pin on the sensor.
See the circuit diagrams at the end of the project for the full details.
Using the CodeThe source code in this project can be used directly in your projects. if you like to just add the binary, install the library via NuGet package manager.
pm> Install-Package Dht.Sharp
After initializing the pins as shown above, create an instance of the Dht22 object and initialize it.
// ***
// *** Create the sensor.
// ***
IDht _sensor = new Dht22(dataPin, triggerPin);
await _sensor.Initialize();
To take a reading, call GetReadingAsync() and check the result.
// ***
// *** Read the sensor.
// ***
IDhtReading reading = await _sensor.GetReadingAsync();
// ***
// *** Check the result.
// ***
if (reading.Result == DhtReadingResult.Valid)
{
	System.Diagnostics.Debug.WriteLine($"Temperature = {reading.Temperature:0.0} C, Humidity = {reading.Humidity:0.0}%");
}
else
{
	System.Diagnostics.Debug.WriteLine($"Error = {reading.Result}");
}
The result can either be Valid, which indicates a good reading, Timeout, which indicates the sensor did not respond or ChecksumError which indicates the data retrieved from the sensor was invalid.
Pros/ConsOn the upside, this approach provides a slightly higher read rate (about 5 - 7 %) against the C++ code with the built-in retry mechanism. In addition, it is fully based on C# code.
On the downside, it currently requires one extra pin.
It is always good to have multiple options.


Comments
Please log in or sign up to comment.