Arduino LilyPad Protosnap Plus
10k 1/4w Resistor
1k 1/4w Resistor (X2)
9 Allligator Clips (while prototyping)
2 LEDs (one green, one red)
Conductive Thread
Analog Pressure Sensor
Materials for Analog Pressure Sensor:Velostat
Fusible Interfacing
Iron
Foam
Neoprene
Additional Materials:Backpack
Background:I was interested in learning more about coding and testing functions of the Arduino ProtoSnap Plus board. In doing so, I found a practical application of this circuit board by integrating it into an existing backpack as a weight sensor. Middle school and high school backpacks can be exceedingly heavy. With this embedded weight sensor, the wearer's backpack will go from a green zone to a red zone through the LEDs when more weight is added and both lights will flash repeatedly when the backpack's weight exceeds 3kg. The circuit board and lights are strategically placed to ensure the sensor's connection isn't disrupted with use, but remains accessible and in view.
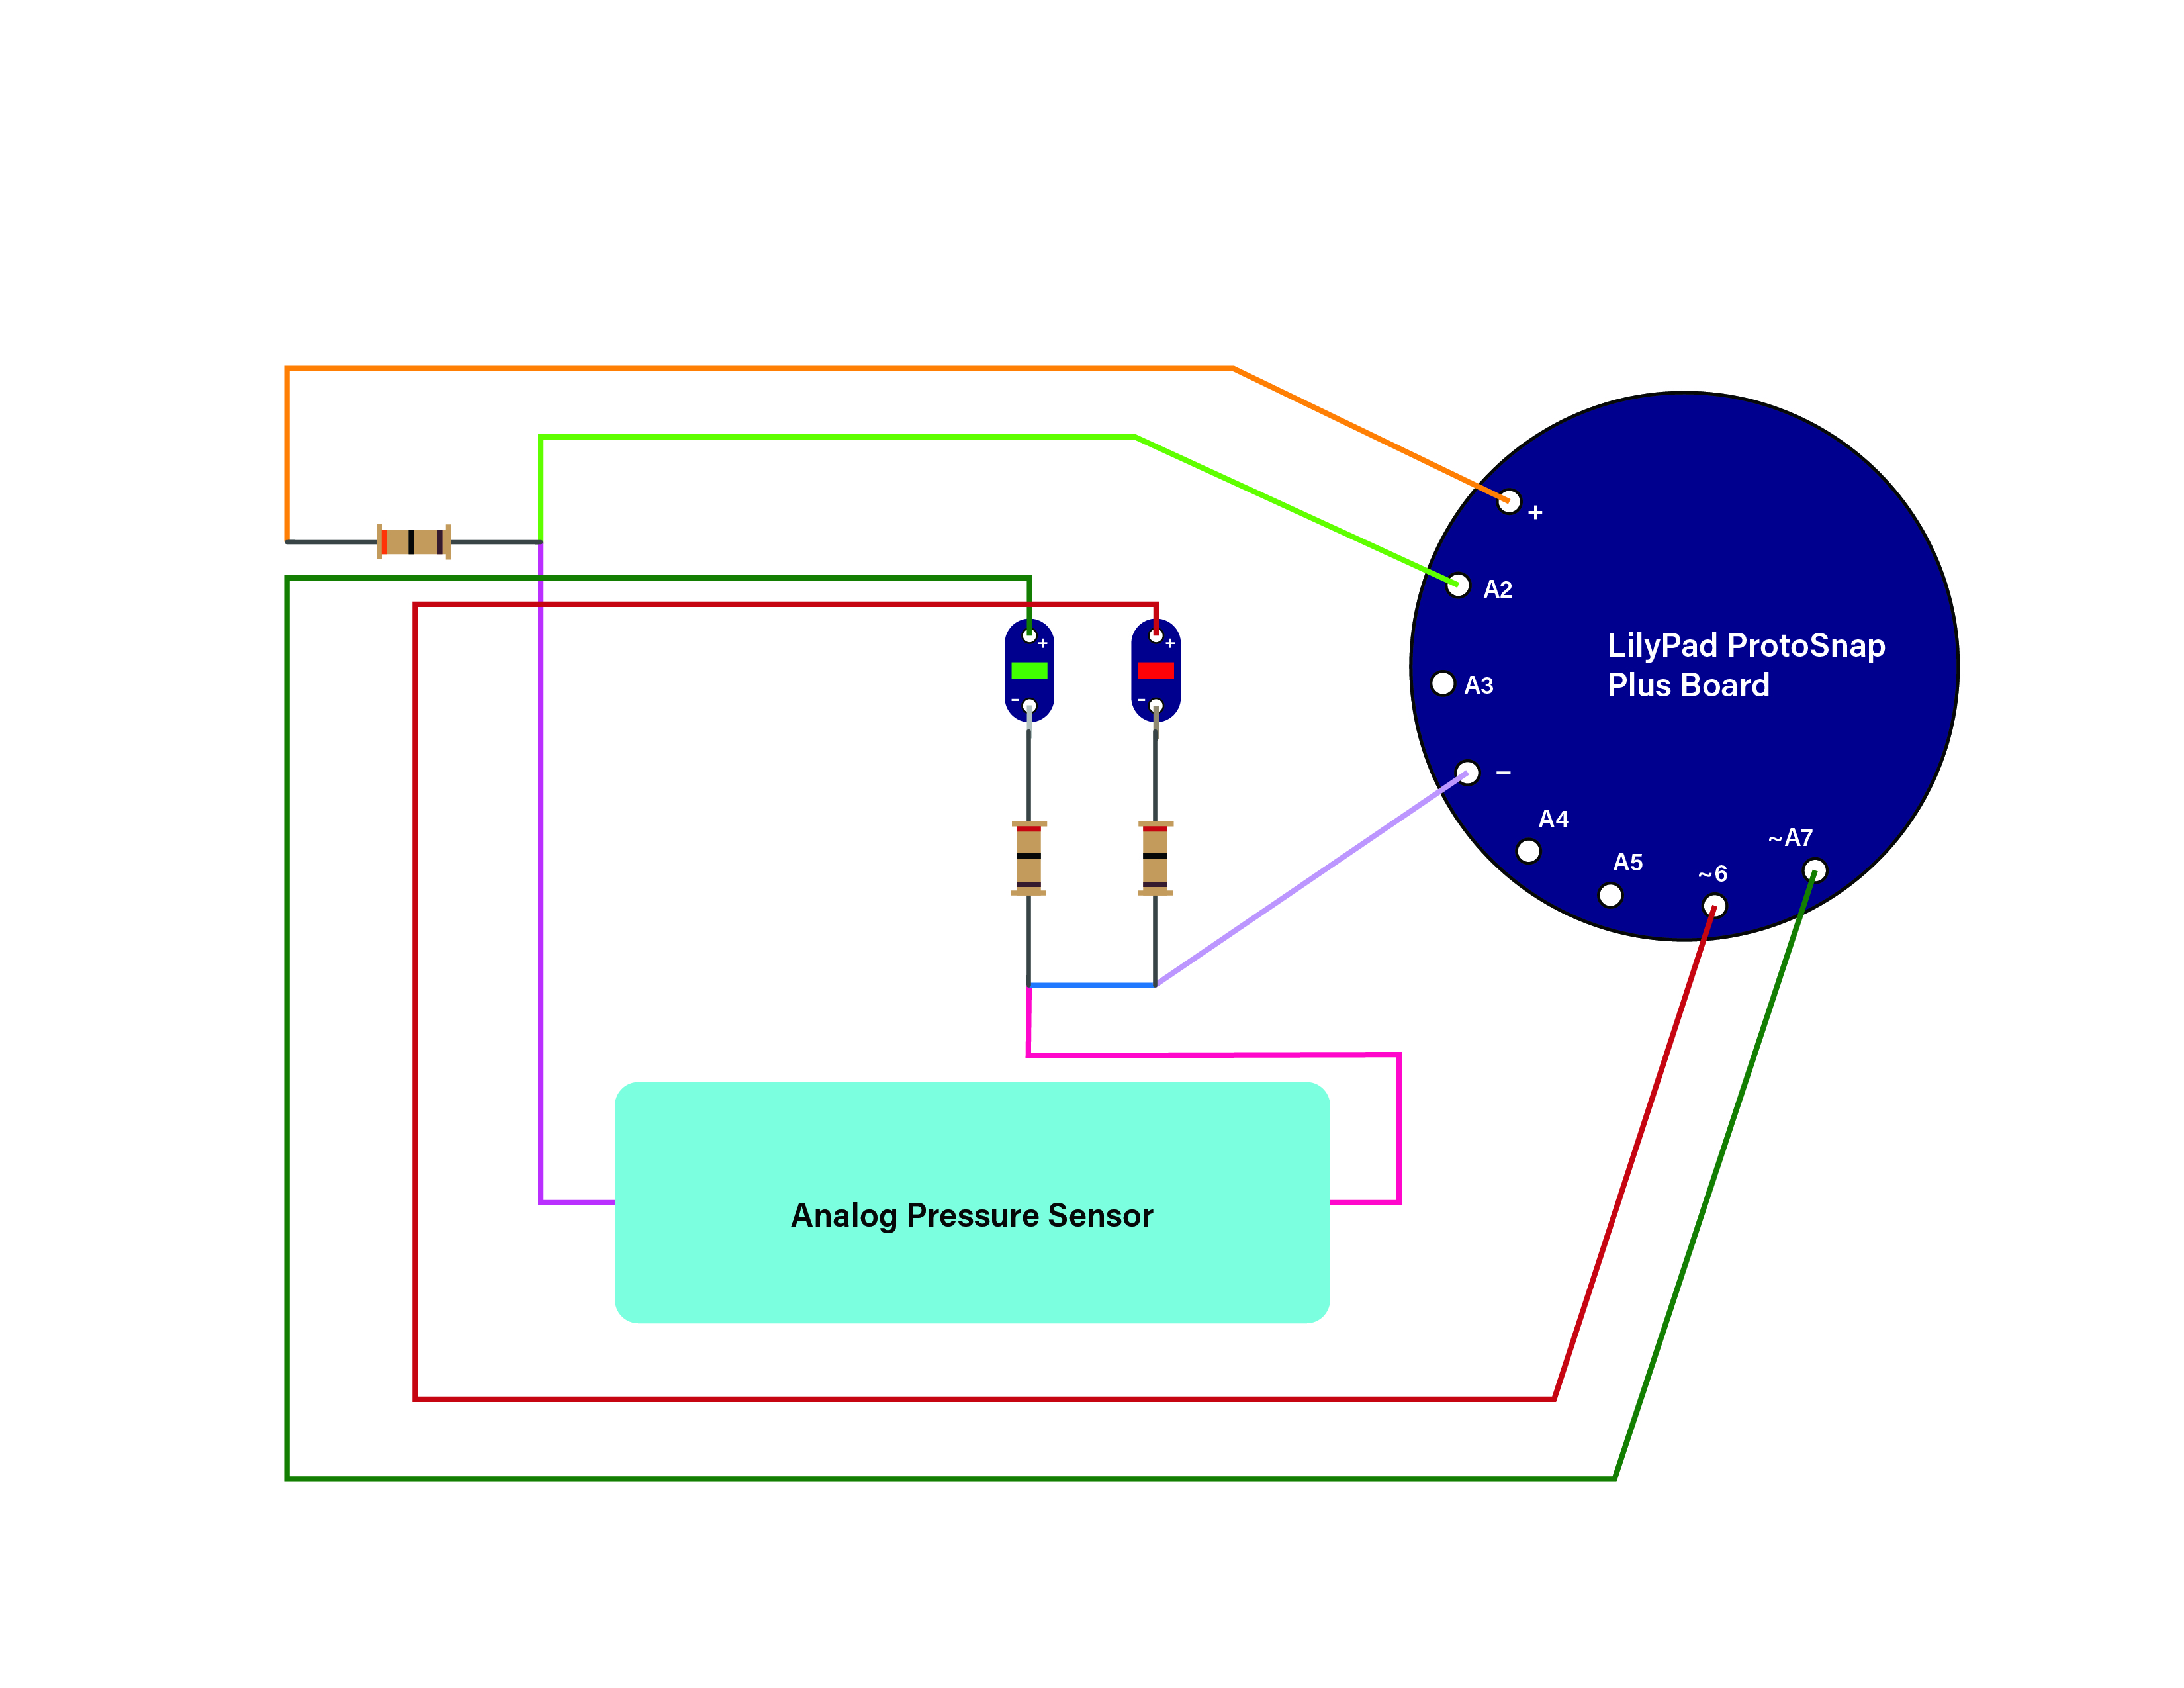
Process:STEP 1: Plan schematic for embedded weight sensor. The light blue box in the schematic represent the Textile Analog Pressure Sensor.
STEP 2: Build Textile Analog Pressure Sensor. I used this tutorial and changed the size to fit the dimensions needed for the shoulder strap of my backpack https://www.instructables.com/Conductive-Thread-Pressure-Sensor/. I also added a layer of foam with a few holes cut out for added resistance.
STEP 3: Code your circuit board. Coding for this project was adapted from Arduino_Scuola https://create.arduino.cc/projecthub/Arduino_Scuola/a-cool-scale-512c2f?offset=2&ref=search&ref_id=lilypad.
Working principle:
There are 2 LEDs (Green and Red):
- the LEDs are both OFF with no load conditions;
- the Green LED lights up with a weight between 100g and 2kg;
- the LEDs are both ON with a weight between 2.1kg and 3kg;
- the LEDs are blinking over 3kg
BOM:
Arduino lilypad
Textile Analog Pressure Sensor
Conductive wire
1x 10k resistor
2x 1k resistor
1x Green LED
1x Red LED
Approximated reference table:
0g    -> analogRead = 860
557g  -> analogRead = 630
945g  -> analogRead = 550
2121g -> analogRead = 410
4000g -> analogRead = 250
created by Arturo Guadalupi <a.guadalupi@arduino.cc>
*/
const int no = 850;
const int ok = 530;
const int mmh = 410;
const int argh = 330;
const int sensor = A0;
const int greenLED = A7;
const int redLED = 6;
int analogVal;
void setup() {
 // put your setup code here, to run once:
 pinMode(sensor, INPUT);
 pinMode(greenLED, OUTPUT); //green LED
 pinMode(redLED, OUTPUT); //red LED
}
void loop() {
 // put your main code here, to run repeatedly:
 analogVal = analogRead(A2);
 if (analogVal >= no) //no load
 {
   digitalWrite(greenLED, LOW);
   digitalWrite(redLED, LOW);
 }
 if (analogVal >= ok && analogVal < no) //100g < weight < 2kg;
 {
   digitalWrite(greenLED, HIGH);
   digitalWrite(redLED, LOW);
 }
 if (analogVal >= mmh && analogVal < ok) //2.1kg < weight < 3kg;
 {
   digitalWrite(greenLED, HIGH);
   digitalWrite(redLED, HIGH);
 }
 if (analogVal <= argh) //weight > 3kg;
 {
   digitalWrite(greenLED, HIGH);
   digitalWrite(redLED, HIGH);
   delay(150);
   digitalWrite(greenLED, LOW);
   digitalWrite(redLED, LOW);
   delay(150);
 }
}
The working principle is very simple:
- the LEDs are both OFF with no load conditions;
- the Green LED lights up with a weight between 100g and 2kg;
- the LEDs are both ON with a weight between 2.1kg and 3kg;
- the LEDs are blinking over 3kg.
STEP 4: Build the simple circuit following the schematic above! To prototype, I kept my ProtoSnap Plus board in one piece and formed connections with alligator clips. If you do not have enough alligator clips to make every connection, you can use wire as you see I've done connecting from the yellow alligator clip to the ProtoSnap Plus board.
STEP 4: Test your circuit before attaching to backpack. Once tested, use conductive thread in place of the alligator clip connections to sew your circuit to your backpack. Make sure to put the pressure sensor where your backpack strap rests on your shoulder to ensure that it will pick up changes in weight from your backpack load.
FINAL BACKPACK:
When load increases, the LEDs go from green, to green and red, to flashing green and red indicating a heavy load.


_3u05Tpwasz.png?auto=compress%2Cformat&w=40&h=40&fit=fillmax&bg=fff&dpr=2)


Comments
Please log in or sign up to comment.