


Hardware components | ||||||
 |
| × | 1 | |||
 |
| × | 2 | |||
Software apps and online services | ||||||
 |
| |||||
| ||||||
| ||||||
As a developer, I work on multiple features for various projects at Bolt IoT. We use Bitbucket for version control of our softwares. Very often I raise pull-request for important features which has to undergo code reviews and approvals before it can be pushed into our production systems. We require a minimum of 2 approvals from the team before pushing the feature into production. I always have to check my Bitbucket dashboard every few hours to check if the pull-request has been approved so that we can proceed with the deployment. Although this is not a huge hassle, checking it regularly becomes quite distracting and breaks my development flow.
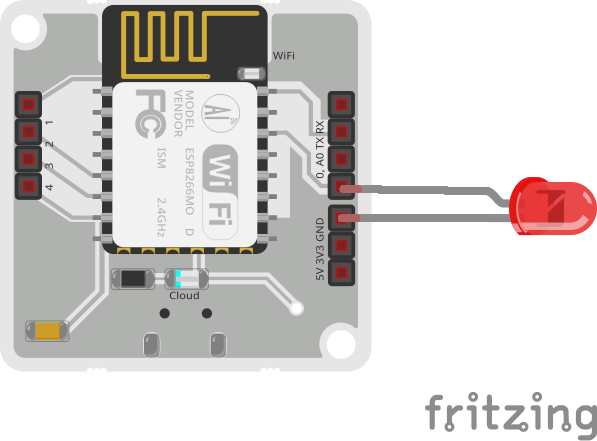
I felt the system would be really cool if instead of me checking the status of the pull-request, my Bolt could tell me when the pull-request was ready to be deployed. All I had to do was connect 1 LED to my Bolt which would glow when I receive an approval on the pull-request. We can even connect other actuators such a buzzer to the system to notify when the approvals are available. For this project, I shall be only using a single LED.
I am using Bolt with Integromat to build my workflow. In the subsequent updates I shall share how we can make this project even more effective and accurate.
Step 1: Hardware ConnectionsConnect the LED to the Bolt as shown in the circuit diagram in the schematics section.
Step 2: Login to your Integromat accountIf you don't have an account on Integromat, please create your account. You can checkout Integromat in the below video:
Step 3: Create a new scenario
Step 5: Setup the scenario
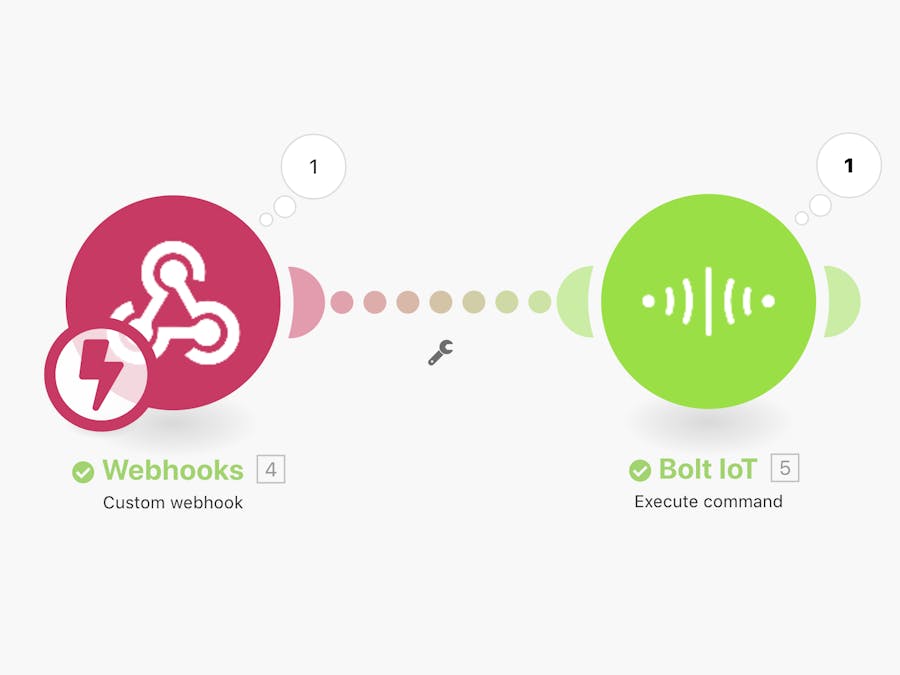
- Click on the question mark at the centre.
- Select Webhooks icon
- Choose 'Custom webhook' under Triggers section.
- Click on 'Add to create a new webhook.' Enter a suitable name for the webhook. You can also add IP restrictions if you want the scenario to be triggered on when a certain IP triggers it. This is optional and you can leave it blank for now.
- Once you click on save, your new webhook will be created and displayed just below the name. You can click the 'Copy address to clipboard button' to copy the webhook.
- Currently the webhook is waiting for incoming data to understand the data format. We shall come back to this later. For now click on stop.
- Press Ok
- Click on Add another Module
- Select Bolt IoT - Execute Command
- Add your Bolt connection using the API Key from your Bolt Cloud account
- In command select 'Write digital output' since LED is an output device
- Enter your Bolt Device name. The device name can be found on the Bolt Cloud dashboard
- Choose the Pin to which you connected the longer end of the LED and state as High
- Press Ok
- Click on the Webhook and the webhook details will be displayed
- Click on 'Copy address to clipboard' button to copy the webhook
- Click on 'Re-determine data structure'. The webhook will then wait for a trigger so that it can determine the structure of the incoming data
- Go to your Bitbucket account and open the settings for the repository for which you wish to track the approvals
- Click on 'webhooks' under the settings section of the repository. And select 'Add webhook'
- Enter the title for the webhook and paste webhook link we copied from Integromat in the URL textbox.
- Select 'Choose from a full list of triggers' and check the 'Approved' option under Pull Request.
- Click on Save.
Click on scheduling in the lower left-hand corner and choose Run 'Immediately' so that scenario is triggered as soon as it receives the pull request approval data.
Your Pull Request approval tracker is now ready! You can now create a pull request and as soon as any reviewer approves your pull request, the LED shall light up!
Future Enhancements
The workflow is very basic at the moment as it only tracks a single reviewer. Also it does not tell which Pull Request was approved and by whom. In case an approval is removed, the LED will continue to glow. We can add the following updates to it:
- Switch off the LED if an approval is removed
- Add LCD screen to display pull request name and no. of approvals
I shall update the project soon. Let me know if you have any suggestions to make it even better! :)


Comments
Please log in or sign up to comment.