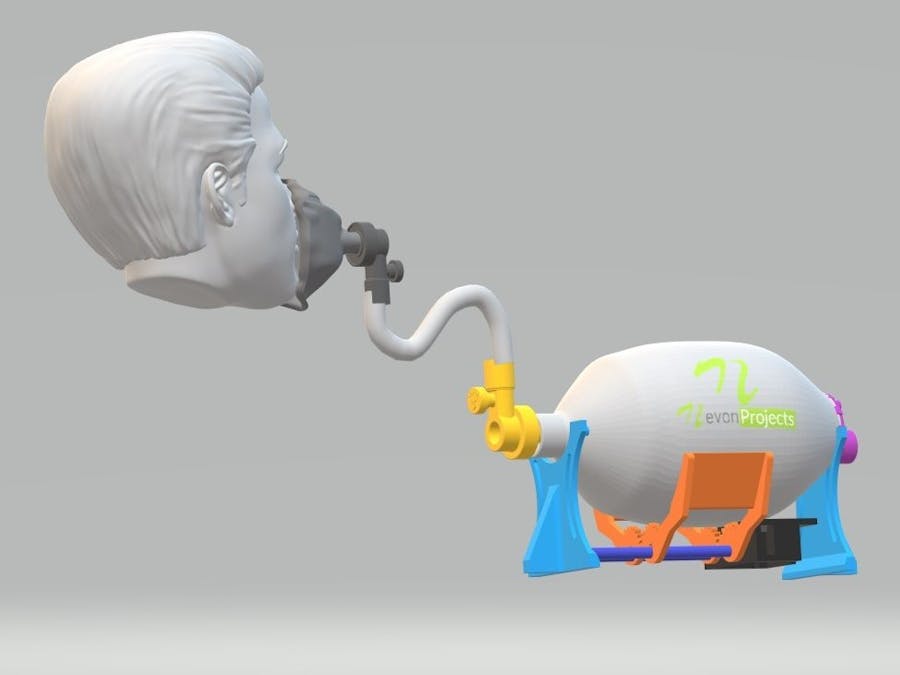
Human lungs use the reverse pressure generated by contraction motion of the diaphragm to suck in air for breathing. A contradictory motion is used by a ventilator to inflate the lungs by pumping type motion.
A ventilator mechanism must be able to deliver in the range of 10 – 30 breaths per minute, with the ability to adjust rising increments in sets of 2. Along with this the ventilator must have the ability to adjust the air volume pushed into lungs in each breath. The last but now the least is the setting to adjust the time duration for inhalation to exhalation ratio.
Apart from this the ventilator must be able to monitor the patients blood oxygen level and exhaled lung pressure to avoid over/under air pressure simultaneously.
The ventilator we here design and develop using Arduino encompasses all these requirements to develop a reliable yet affordable DIY ventilator to help in times of pandemic.
We here use a silicon ventilator bag coupled driven by DC motors with 2 side push mechanism to push the ventilator bag. We use toggle switch for switching and a variable pot to adjust the breath length and the BPM value for the patient.
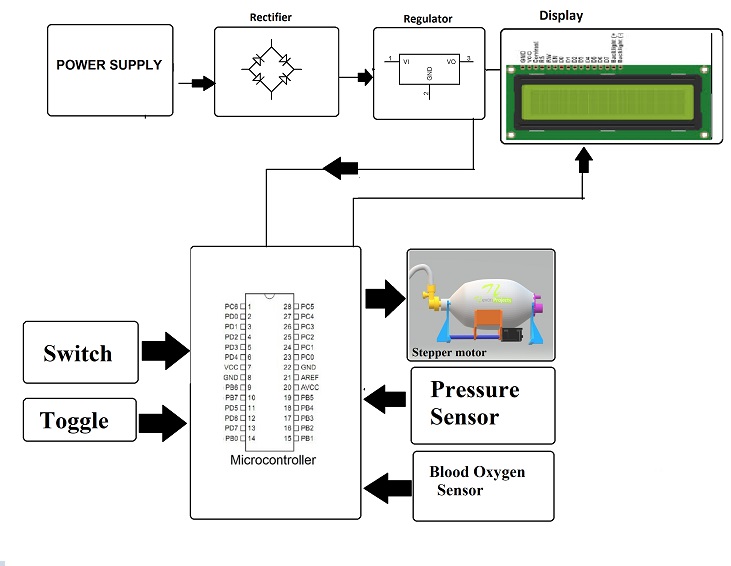
Our system makes use of blood oxygen sensor along with sensitive pressure sensor to monitor the necessary vitals of the patient and display on a mini screen. Also an emergency buzzer alert is fitted in the system to sound an alert as soon as any anomaly is detected.
The entire system is driven by Arduino controller to achieve desired results and to assist patients in COVID pandemic and other emergency situations.
Applications:· Hospitals
· Clinics
· First Aid Centers
· Emergency Situations
Advantages:· Easy to Use
· Automatic Operation
Disadvantages:· Requires External Oxygen Supply
Block Diagrams:Amid the global crisis caused by the corona virus pandemic, hospitals and healthcare facilities are reporting shortages of vital equipment. As makers it's our responsibility to combat the shortage by constructing makeshift-open-source substitute devices. Our country might be in a lock down but our ingenuity isn't !
One important device for which demand has ramped up is ventilators for patients who need assistance with their breathing due to the respiratory effects of COVID-19. Basically a ventilator is a machine that provides breathable air into and out of the lungs, to deliver breaths to a patient who is physically unable to breathe, or breathing insufficiently. A DIY ventilator may not be efficient as that of a medical grade ventilator but it can act as a good substitute if it has control over the following key parameters
- Tidal volume: It's the volume of air delivered to the lungs with each breath by the ventilator - typically 500ml at rest.
- BPM(Breaths per minute): This is the set rate for delivering breaths.
- Inspiratory: Expiratory ratio (IE Ratio): refers to the ratio of inspiratory time: expiratory time.
- Flow rate: is the maximum flow at which a set tidal volume breath is delivered by the ventilator
- Peep (Positive end expiratory pressure): It is the pressure in the lungs above atmospheric pressure that exists at the end of expiration.
refer this link for more information on ventilation parameters https://www.ncbi.nlm.nih.gov/pmc/articles/PMC6212352/
My design is based on the automation of the manual BVM (Ambu-bag), which you can find in any medical supply store. It is a hand-held device commonly used to provide positive pressure ventilation.
When the bag is squeezed, the air enters the lungs of the patient, while the nonreversible breathing valve prevents backfiring of the exhaled air. Then the AMBU bag self-dispenses by sucking air from the valve from its back side. Either ambient air can be used as "fuel", or an oxygen cylinder can be connected. In the latter case, it is possible to connect a tank to collect excess oxygen, which was not used by the patient.
Most of the DIY ventilator out there are based on ambu bags and a direct drive actuator. In my design, I've tried to simplify the actuator mechanism and I also made a better user interface for the unit.
The key element in my design is a linear actuator which is coupled with a lever mechanism that can compresses the ambu bag. A control panel is also provided for precisely controlling the ventilation parameters.
Use plywood or similar sturdy materials for making the housing and the lever mechanism. Make a cut under the lever arm so that the ambu bag can rest there without sliding. I am not suggesting you any particular hardware (nuts, bearings, etc..) because you may have a hard time in finding parts in this adverse situation. But make sure you follow the design. For those who own a CNC, I'll try to upload plans soon.
Actuation MechanismIn order to make a linear actuator, I used a bipolar stepper motor integrated with a lead screw(or a Nema 17+coupling) and coupled it with a traveling nut. As the shaft of the motor rotates the traveling nut translates along the screw so that linear motion is achieved.
In the end, control over ventilation parameters can be achieved by varying;
- No. of rotations (stroke) ----> Tidal volume
- Speed of rotation----->Flow rate
- Steps in clockwise : steps in anti-clockwise direction--->IE Ratio
- Frequency of direction change per minute---->BPM
I'm using an A4988 for controlling the stepper motor. The A4988 is a micro stepping driver for controlling bipolar stepper motors which has built-in translator for easy operation. This means that we can control the stepper motor with just 2 pins from Arduino, i.e. one for controlling the direction of rotation and the other for controlling the steps.
For user interface I've made a control panel out of a 20X4 character display and 3 buttons (for up, down & ok functions). You could simply connect the display directly with Arduino but I'd prefer using an I2c display adapter so that you can plug and play without a mess. 10K resistors are added for each individual buttons for pull down purpose.
Wire the components as shown in the diagram. Make sure that you had installed all the necessary libraries mentioned in code. Now, upload any of the sketches provided to your Arduino. Use a 12v SMPS (3A min.) for powering the setup.
On running the test code, the motor executes cycles of clockwise& anti-clockwise rotations so that you can make sure that the actuator is running smoothly.
For testing the control panel and the device as a whole, upload the final_code.ino to the Arduino. Now you can interface with the ventilator via control panel. By default, all the ventilation parameters are displayed on the screen. Use 'up'/'down' buttons to switch between parameters and press 'ok' button for selecting a parameter. Again use the up/down buttons to increase/decrease the value of the selected parameter. Finally press 'ok' to confirm the value.
Assemble the circuitry and the power supply unit inside the ventilator housing and make sure everything is fixed in place.
I had trouble finding resources for making the housing for mechanical parts. So I had to use what's available. But as you can see I had followed key features in my conceptual design while building this version and it works way better than I expected!
Feel free to ping me for any queries related to this project.
Stay healthy, stay safe.References:
https://www.eetindia.co.in/Covid-19-A-Review-of-Low-Cost-Ventilators/


Comments
Please log in or sign up to comment.