


Hardware components | ||||||
| × | 2 | ||||
| × | 1 | ||||
 |
| × | 1 | |||
| × | 2 | ||||
| × | 4 | ||||
| × | 1 | ||||
| × | 1 | ||||
 |
| × | 1 | |||
 |
| × | 1 | |||
 |
| × | 1 | |||
 |
| × | 1 | |||
 |
| × | 1 | |||
 |
| × | 1 | |||
 |
| × | 2 | |||
Software apps and online services | ||||||
 |
| |||||
 |
| |||||
 |
| |||||
| ||||||
| ||||||
| ||||||
| ||||||
Hand tools and fabrication machines | ||||||
 |
| |||||
 |
| |||||
 |
| |||||
 |
| |||||
Bike-sharing systems have become a cornerstone of urban mobility, but traditional implementations face significant challenges in energy efficiency and operational costs. These issues are exacerbated in densely populated areas, where increased demand strains existing systems that rely heavily on LTE/4G technology. High energy consumption, the need for individual SIM cards, and limited scalability are major trouble to the sustainable growth of these services.
Our project try to address these challenges by integrating the oneM2M IoT standard with DECT NR+ technology to create a next-generation bike-sharing system. The oneM2M standard provides an interoperable platform for managing IoT devices, ensuring seamless communication and data management across a scalable network protocol. DECT NR+ complements this by enabling energy-efficient mesh networking, which reduces power consumption and operational costs while maintaining reliable device-to-cloud communication.
The system leverages the oneM2M framework to enable:
- Scalability: Efficiently adding and managing devices in large deployments.
- Interoperability: Supporting diverse IoT platforms and ensuring smooth integration of new devices.
- Seamless Cloud-to-Device Communication: Providing a standardized common service layer that ensures efficient data exchange between cloud platforms and devices.
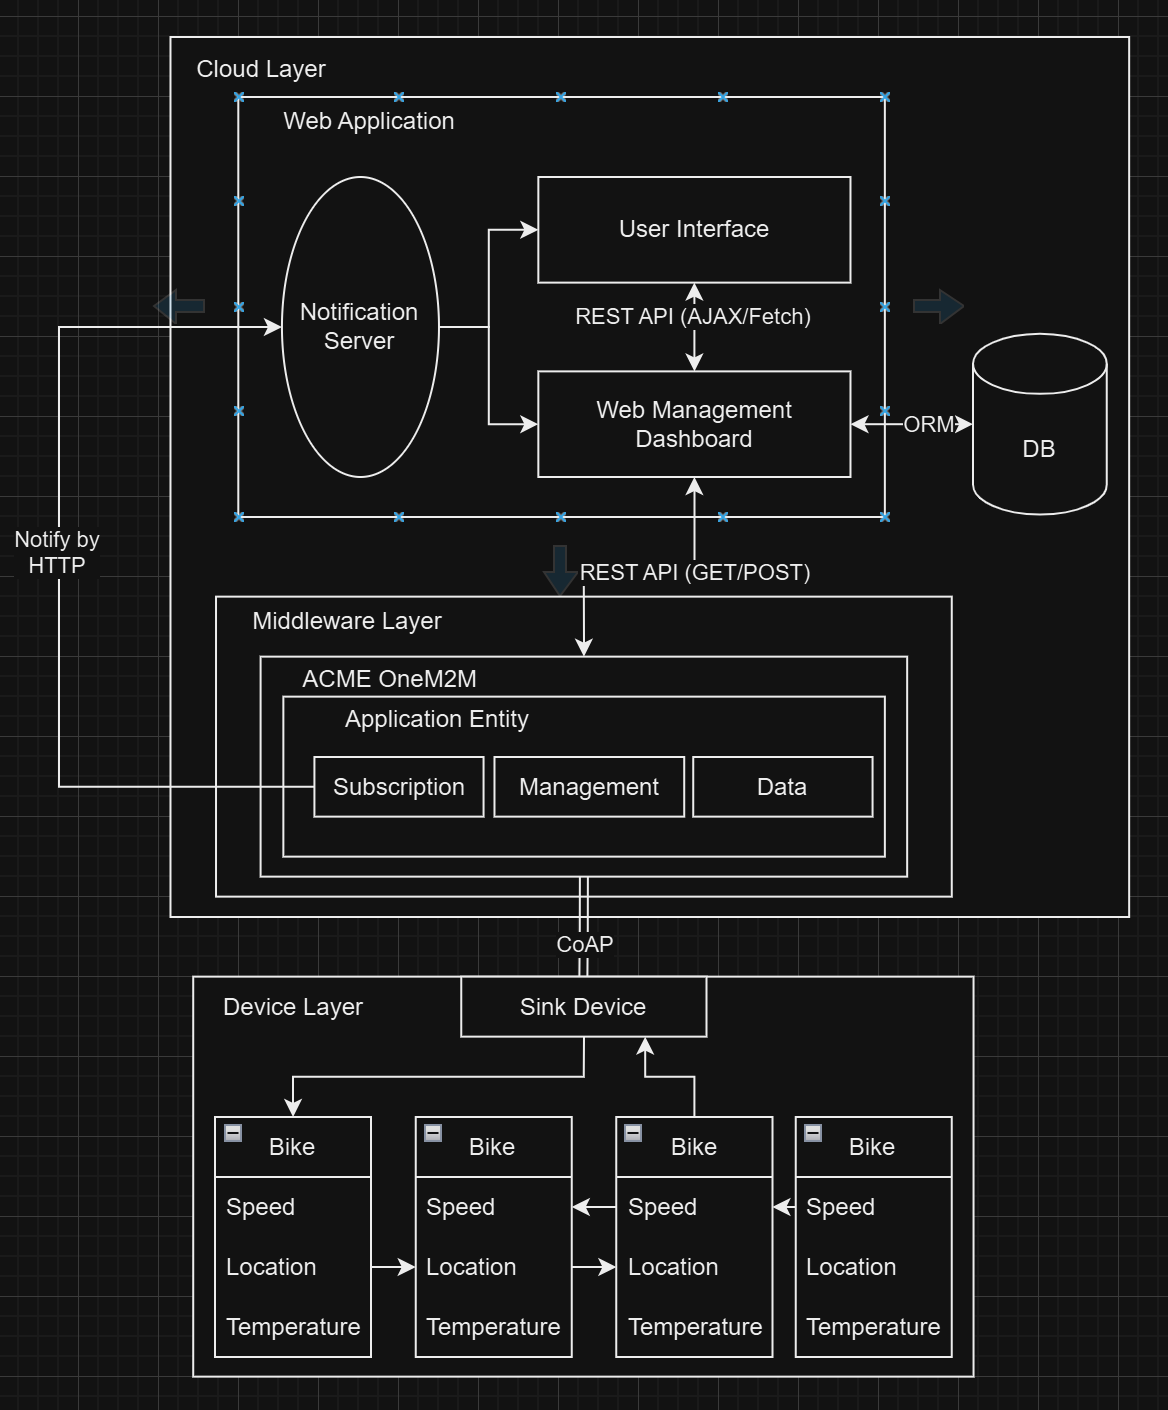
The system is organized into three primary layers: Application Layer, Middleware Layer, and Device Layer.
Application Layer (Web Dashboard):
- Role: The primary management & user interface for system operators and administrators.
- Location: Hosted on an AWS server.
Middleware Layer (ACME - oneM2M Implementation):
- Role: Acts as the bridge between the Application and Device layers, ensuring interoperability and standardized communication.
- Location: Hosted on an AWS server.
Device Layer (nRF9161DK):
- Role: Collects real-time data from sensors and communicate data with ACME
- Location: Distributed across individual bikes
Middleware Layer <==> Application Layer:
- Protocol: HTTP
- Purpose: Enables feature-rich communication for advanced operational control.
Device Layer <==> Middleware Layer:
- Protocol: CoAP
- Purpose: Efficiently transmits real-time data with minimal bandwidth and energy consumption
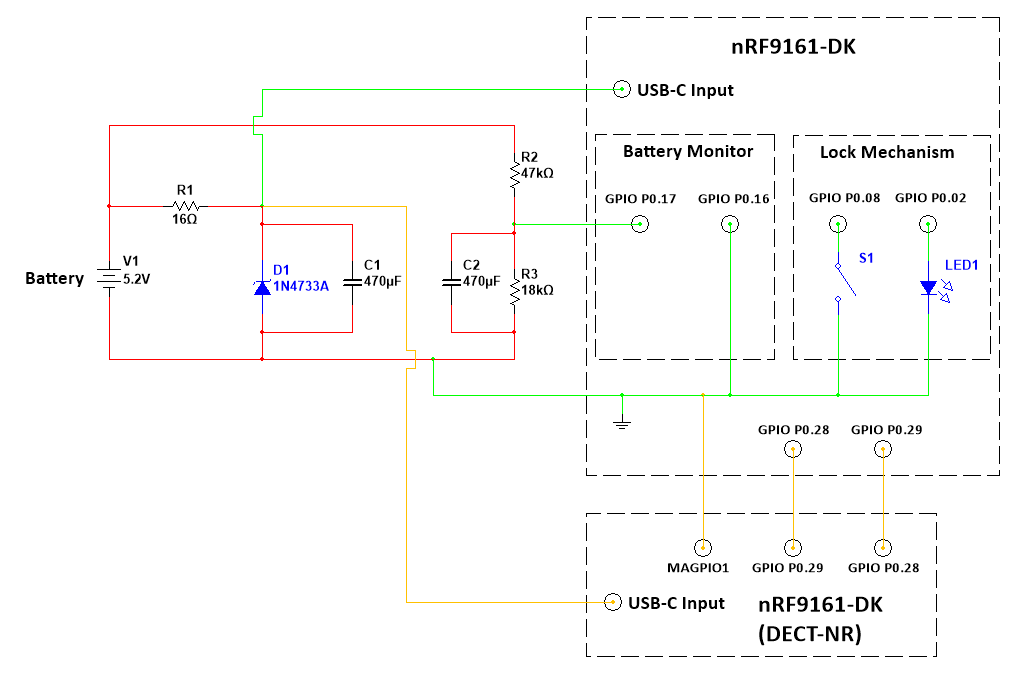
Within the device layer:
- Protocol: DECT-NR+ (Physical layer only)
- Purpose: enable between bikes (device-pairs) to aggregate data before being sent to the server, saving power. We designed our own protocol for communicating on top of the DECT-NR+ physical layer due to time constraints and other difficulties (in part due to it being so new and information on MAC layer implementation on the NRF-9161DK being difficult to find) with implementing the MAC layer in accordance with the DECT-NR+ technical specification
- Protocol: UART
- Purpose: Transmit data between the device with the DECT-NR+ modem firmware and the device with the LTE/GNSS modem firmware in each device-pair
- Protocol: I2C
- Purpose: Read data from the X-NUCLEO IKS4A1 sensor board connected to the device with the LTE/GNSS modem firmware in each device pair
Mesh Network Protocol - in depth
Our mesh network is formed using several layers of protocols built on top of the DECT-NR+ Physical layer. Many challenges including the lack of information on NRF-9161DK implementation due to it being so new prevented us from being able to properly implement the MAC layer according to he DECT-NR+ standard which would be required for proper DECT-NR+ certification, though this 1910-1930MHz frequency band does not require a certification to use.
Originally we had designed a synchronous breadth-first-search based protocol that had used pings propagated across all reachable devices to find and transmit information between all of the devices in the network. While this design presents very few points of failure, propagating messages across an entire network when not necessary becomes more costly power-wise as the network scales, as, with each device not having a full knowledge of where to forward anything other than where it had received the ping from, each request for information has to be propagated across the whole network. This also prohibits transmission power tuning to reduce costs across the network and limits latency to a certain fixed polling frequency. The "root" device in this protocol would be a bicycle that becomes the "root" device after a timeout in which it has not received any communication from other devices in the network.
With this in mind, even though we did have significant time constraints, we decided to redesign this protocol. This involves persistent, asynchronous connections for very low latency and updates to be sent across the network, in a single forwarding path rather than a loop, whenever new data is generated (such as when an event like a crash for a new GPS fix occurs). This new protocol does away with this "top-down" model for forwarding and routing and rather uses a dynamic "star-mesh" topology (by rejecting connections that would form loops) and maintains a forwarding table of all other devices in the network and which devices they are connected through. The doing away with the "top-down" model means that there is no significant distinction between the behavior of the "root" device which will forward information to the other NRF-9161DK with LTE modem firmware and any other devices in the network, other than a single forwarding table entry which advertises a path to a device with a hardware ID of 0000, which is a logical representation of the OneM2M/ACME server.
The new protocol effectively has 2 layers with abstractions between them. The Physical layer, built according to the DECT-NR+ standard, which has threads to asynchronously handle transmission, acknowledgments of packets, and receipt. Packets sent to this layer ae typically one of two types, either expecting an acknowledgment or not expecting an acknowledgement, and are queued to be transmitted. This layer uses a semaphore and a pointer to a C struct to report back to the caller on whether the packet was acknowledged. The physical layer also includes a receive queue so packets received can be processed without interrupting transmission/receipt of current packets, keeping everything asynchronous and low-latency
The second layer of this protocol is the connection layer, part of which being the establishment of new connections and polling to verify the connection is still alive, which is pictured above. This layer also handles rejection of redundant connections (to avoid routing loops) and any potential TX power tuning or approximated GPS locations via triangulation (which will be handled via connectionless, ACK-less, broadcasts). This layer also handles retransmissions in the case that packets that need to be acknowledged are not acknowledged as well as any and all routing and forwarding data coming in and out (via a callback from the physical layer's receive queue). This also handles closing connections in the case of either several failed retransmissions of a packet or a message informing the device that the connection does not exist or was closed. Since this is asynchronous, each connection operates on a different thread with the exception of handling things like forwarding and incoming routing information (including forwarding new routing information to other devices as necessary) from the receive queue which goes through a separate incoming data thread. There is also a thread to handle cleaning up threads from dead connections and to handle sending broadcast messages to discover new ones.
The Application Layer and Device Layer do not interact directly. All communication is routed through the Middleware Layer (ACME), which acts as the central hub. This design ensures scalability with future development, as the ACME server can efficiently manage a large number of devices. By mediating all communication, the ACME server enables the web dashboard to provide advanced functionalities such as real-time data visualization, automated device registration, and resource management—all without adding complexity to the individual devices.
Now, let's build whole system from scratch!
3.0 Software ConfigurationThis section outlines the steps to configure the software components of the bike-sharing system. It includes a cloud-hosted ACME server, and a Web Dashboard application that acts as the interface for both administrators and users. They both need to be host on cloud, this tutorial will use AWS as cloud service.
3.1 Setting Up the Cloud Instance (AWS)This section covers the step-by-step process of setting up an AWS EC2 Instance to host the oneM2M server and the web dashboard. The cloud instance provides a scalable and reliable infrastructure for our bike-sharing system.
3.1.1 Launching an InstanceNavigate to EC2 Dashboard:
- Log in to your AWS Management Console.
- Go to EC2 > Instances > Launch an instance.
Name and Tags:
- Assign a name for your instance (e.g., "My Web Server").
In the Application and OS Images section, select an appropriate AMI:
- Choose Ubuntu Server 24.04 LTS (HVM), SSD Volume Type.
- This AMI ensures compatibility with the dependencies needed for the oneM2M server and the web dashboard.
In the Key pair (login) section:
- Select an existing key pair or create a new one.
- Ensure you download and securely store the
.pemfile if creating a new key pair, as it will be needed for SSH access.
1.VPC and Subnet:
- Select the default VPC (
vpc-0de762d6ef8032e2e). - Choose No preference for the subnet.
2.Auto-Assign Public IP:
- Set Auto-assign public IP to Enable to ensure your instance receives a public IP address.
3.Firewall (Security Group):
- Create a new security group or use an existing one.
- Example security group name:
launch-wizard-7.
Add the following Inbound Rules:
SSH (Port 22):
- Protocol: TCP
- Source: 0.0.0.0/0 (for unrestricted access; limit to specific IPs for better security).
HTTP (Port 80):
- Protocol: TCP
- Source: 0.0.0.0/0 (for web server access).
Elastic IP addresses provide a static public IP for your instance. Unlike the default public IP, which changes if the instance is stopped and started, an Elastic IP remains constant, ensuring consistent access to your instance.
Steps to Assign an Elastic IP:Navigate to Elastic IPs:
- In the EC2 Dashboard, go to Network & Security > Elastic IPs.
Allocate Elastic IP Address:
- Click on Allocate Elastic IP address (top right).
- Click Allocate to confirm.
Associate Elastic IP Address:
- Click on Associate Elastic IP address.
- Choose your instance from the dropdown menu.
- Confirm the association.
Verify Assignment:
- The Elastic IP should now be associated with your instance, providing a consistent public IP for access.
Once your instance is running and configured, you can easily connect to it directly from the AWS Management Console using EC2 Instance Connect. This approach allows you to establish a browser-based SSH session without the need for external SSH clients.
Steps to Connect:
Navigate to Instances:In the AWS Management Console, go to EC2 > Instances and locate your running instance.
Select the Instance:Click on the Instance ID of the instance you want to connect to. This opens the instance details page.
Open the Connect Dialog:On the instance details page, click the Connect button at the top right. This opens the "Connect to instance" panel.
Use EC2 Instance Connect:In the EC2 Instance Connect tab, verify that the Public IPv4 address is displayed. Make sure the Username is correct (for Ubuntu AMIs, it’s typically ubuntu).
Click Connect:Press Connect to initiate a browser-based SSH session directly in the console window.
ACME is an open source implementation of OneM2M framework created by Andreas Kraft. The server acts as the middleware in our system, bridging communication between the Web Dashboard and devices. Let's host it step by step:
1. Access the EC2 instance from section 3.1 via SSH or the AWS console. Create a folder (optional), navigate to it, and set up a Python virtual environment using the following command:
python3 -m venv venv2. Activate the virtual environment:
source venv/bin/activate3. Install ACME by running:
pip install acmecse-dev(If you encounter an error, it indicates the virtual environment was not successfully created or you are not inside the virtual environment.)
4. Starting setting up the ACME, following the figure:
6. By default, ACME does not enable CoAP support.
To enable it: Stop the ACME server by pressing Ctrl+C. Open the acme.ini file for editing by:
nano acme.iniAdd the following configuration:
[coap]
enable=true
port=5683
listenIF=0.0.0.0
timeout=10.0
clientConnectionCacheSize=100
Make sure to save the file using Ctrl+o and Enter, and then exit with Ctrl+X. (TODO you can change this back to the one with Ctrl+X and Y if you want)
7. Restart the ACME server with: acmecse
8. Configuring Security Group (Important): Open UDP port 5683 and TCP port 8080 in your AWS Networking control panel.
Steps to Configure the Security Group:
Navigate to Security Groups:
- In the EC2 Dashboard, locate the left-hand navigation panel.
- Click on "Security Groups" under "Network & Security".
Select Your Security Group:
- Find the security group associated with your instance. (If you used the default created during instance setup, its name might be something like
launch-wizard-7.) - Click on the security group to view its details.
Edit Inbound Rules:
- Go to the "Inbound rules" tab.
- Click on "Edit inbound rules".
Add New Rules:
- Click "Add rule" to create a new entry.
For TCP port 8080:
- Type: Custom TCP (or HTTP if applicable)
- Protocol: TCP
- Port range: 8080
- Source:
0.0.0.0/0(or a more restricted IP range for better security)
For UDP port 5683:
- Type: Custom UDP
- Protocol: UDP
- Port range: 5683
- Source:
0.0.0.0/0(or a more restricted IP range for better security)
Save Changes:
- Click "Save rules" to apply the new inbound rules.
Verification:
- Return to your instance’s details and verify that inbound rules now list ports 8080 (TCP) and 5683 (UDP) as open.
- Test connectivity by sending requests to these ports from your local machine or IoT devices.
9.Verification: Access the ACME web interface by navigating to your EC2 instance's public IP with port 8080 in your browser (e.g., http://<EC2-IP>:8080). You will see the ACME web management interface.
This section details the setup and configuration of the Web Dashboard, which serves as the primary interface for administrators and users in the bike-sharing system. Follow these steps to configure and deploy the Django-based application on your AWS EC2 instance.
1. Clone the Web Dashboard Repository
- Access your EC2 instance via SSH or AWS Console.
- Navigate to your working directory (optional: create a new folder).
- Clone the repository:
git clone https://github.com/WindHurtLZ/Django-Web-Application.git
cd Django-Web-Application
2. Install tmux for Persistent Sessions
- Update system packages:
sudo apt update- Install
tmuxfor managing background sessions:
sudo apt install tmux- Start a new tmux session to ensure the server continues running even after you disconnect:
tmux new -s webapp3. Set Up and Activate a Python Virtual Environment
- Create a virtual environment and activate it:
python3 -m venv venv
source venv/bin/activate
4. Install Dependencies
- Install all necessary Python packages from
requirements.txt
pip install -r requirements.txt5. Configure Environment Variables
- Open the
.envconfiguration file for editing:
nano .env- Modify the following fields:
SERVER_URL: Set this to the Elastic IP of your Web App instance, including the port8000.ONE_M2M_CSE_URL: Set this to the Elastic IP of your ACME instance, including the port8080and CSE path/cse-in.
Example:
# Debug Mode
DEBUG=False
# Server Config
SERVER_URL=http://{Your Elastic IP for Web App Instance}:8000
# OneM2M Config (ACME)
ONE_M2M_CSE_URL=http://{Your Elastic IP for ACME Instance}:8080/cse-in- Save changes by pressing Ctrl+X, then Y, and confirm with Enter.
6. Initialize the Database
- Apply Django migrations to set up the database:
python3 manage.py makemigrations
python3 manage.py migrate
7. Create a Superuser
- Set up an admin account by running:
python3 manage.py createsuperuser- Follow the prompts to create an admin username, email, and password.
- Note: The system separates admin views (for dashboard and device management) from user views (for bike rental). Non-admin accounts will be redirected to a user-friendly interface designed for bike rentals.
8. Run the Web Server
- Start the Django server
python3 manage.py runserver 0.0.0.0:80009. Verify the Setup
- Open your browser and navigate to
http://{Elastic IP for Web App Instance}:8000. - Use your admin credentials to log in and access the Dashboard Management Interface.
- To explore the User Interface, create a new user account via the main page and log in to experience bike rental features.
Your Web Dashboard is now fully configured and ready for operation!
3.4 Web Dashboard FeaturesThe Web Dashboard serves as the central control panel for the entire bike-sharing ecosystem, supporting both administrative management and end-user functionalities. This dual-purpose platform with distinct interfaces for Administrators and Users caters to the unique needs of each role, ensuring that every stakeholder can interact with the system efficiently and effectively.
3.4.1 Administrator FeaturesThe Administrator interface is designed for bike management and operational control. Key functionalities include:
Device Management:
- View and manage all connected devices, through a centralized dashboard.
- Add, configure, or remove devices via full CRUD (Create, Read, Update, Delete) operations.
- Automatically register devices on the ACME server‘s resource tree, eliminating manual setup complexity.
- Provide reboot and update firmware command to control device remotely by utilizing Polling Channel resource.
BikeMonitoring:
- Real-time Data: Bike locations, speed, temperature, and operational status through table.
- Real-Time Map: Displays the location and routes of all bikes, assisting with fleet management and route optimization.
- Speed Chart: Shows live updates of bike speed.
- Mesh Network Visualization: Offers insights into the DECT NR+ network structure and signal strength.
Click the arrow to view screenshots of each feature
The User interface simplifies bike rentals and provides essential tools for a seamless riding experience. Key functionalities include:
Bike Rental:
- Allow users to log in or register through a dedicated user portal.
- Enable users to enter available bikes' identify for rental.
Payment and Ride Tracking:
- Process fake payments through the interface.
- Automatically unlock bikes upon payment confirmation and start ride duration tracking.
- Display current ride details, including time, location, and route on the map.
To set up the hardware, you need to use VS Code. In VS Code, you need to install the plugin nRF Connect for VS Code Extension Pack. This extension is used to program Nordic boards.
After setting up VS Code, you need to clone our repository at https://github.com/BobFIV/PSU_CAPSTONE_F24.git, and
5. Integration and TestingThe integration and testing phase ensures that every component of the bike-sharing system—hardware, software, and communication layers—works as intended both independently and as a cohesive whole. By methodically validating each subsystem and then performing comprehensive end-to-end tests, the project team can confirm that the system meets the technical specifications, operates reliably under various conditions, and delivers a seamless user experience.
Testing:
Software Testing:This stage focuses on verifying the Web Dashboard’s functionality, device registration automation, and the seamless flow of data between the device simulator and the oneM2M server.
- Device Registration & Data Flow: Check that new devices, when created via the dashboard, automatically generate the corresponding oneM2M resource structures, and that updates (e.g., speed, temperature) are reliably reflected in real time.
- Subscription & Update Validation: Evaluate the automatic subscription mechanism to ensure that the ACME oneM2M server pushes data updates promptly to the Web Dashboard, maintaining minimal latency and accurate synchronization.
Hardware Testing: Hardware validation involves examining the DECT NR+ mesh communication and verifying device-to-device interactions, sensor readings, and LTE/GNSS functionalities.
- Sensor & GNSS Verification: Confirm that the GNSS/LTE device and sensor configurations provide accurate positional and environmental data, and that the DECT NR+ nodes communicate reliably over UART.
- Mesh Network Performance: Introduce signal obstructions or adjustments to test the network’s robustness, checking the quality of communication under challenging conditions.
Integrated System Testing: After individual components pass their tests, the entire ecosystem—Web Dashboard, oneM2M server, simulated or physical devices, and mesh network—is tested as a unified platform.
- Rental Initiation & Unlock Flow: Simulate a user renting a bike to confirm that the server, dashboard, and mesh network respond cohesively by unlocking the correct bike and updating device status in real time.
- Real-time Data Tracking: Verify that updates (e.g., speed, location) appear instantaneously on the dashboard, ensuring operational visibility for administrators and a frictionless experience for users.
- End Rental & Lock Procedures: Confirm that ending a rental session re-locks the bike and accurately resets the device state and dashboard data.
- Load & Scalability Testing: Stress-test the system by simulating multiple simultaneous rentals and high-frequency polling. Gather performance metrics—such as data transmission times and server response rates—to evaluate scalability and identify any performance bottlenecks.
During our development process, we made several contributions to improving the robustness of the ACME system:
- Provided feedback during the learning phase to help ACME identify missing documentation, such as guidelines on creating a user-defined FlexContainer.
- Reported an issue where the
atrlkeyword caused an error when performing a partial retrieve on a FlexContainer. - Identified that the
mad-mc.fcpfile is missing aresultDataPoint in the definition ofmad:toggle. - Discovered that the CoAP server rarely becomes unresponsive to CoAP messages after running for an extended period, with a restart being the solution.


_SPmZ63wPgQ.png?auto=compress%2Cformat&w=40&h=40&fit=fillmax&bg=fff&dpr=2)
Comments
Please log in or sign up to comment.