

Hardware components | ||||||
 |
| × | 1 | |||
 |
| × | 1 | |||
 |
| × | 1 | |||
 |
| × | 1 | |||
| × | 1 | ||||
 |
| × | 1 | |||
Software apps and online services | ||||||
 |
| |||||
Hand tools and fabrication machines | ||||||
 |
| |||||
Arduino LilyPad Protosnap Plus
15 V Resistor
Square Force-Sensing Resistor
11 Allligator Clips (while prototyping)
4 LEDs (two blue, two yellow)
Conductive Thread
E-Textiles Battery
Soldering Iron
Materials for Pillow: (or you can use a pillow you already own, but I'd recommend making your own because it's much easier to sew in the circuit before the pillow is constructed)
Polyester Fiber Fill
White All-Purpose Thread
Blue Poly Cotton
Sewing Needles
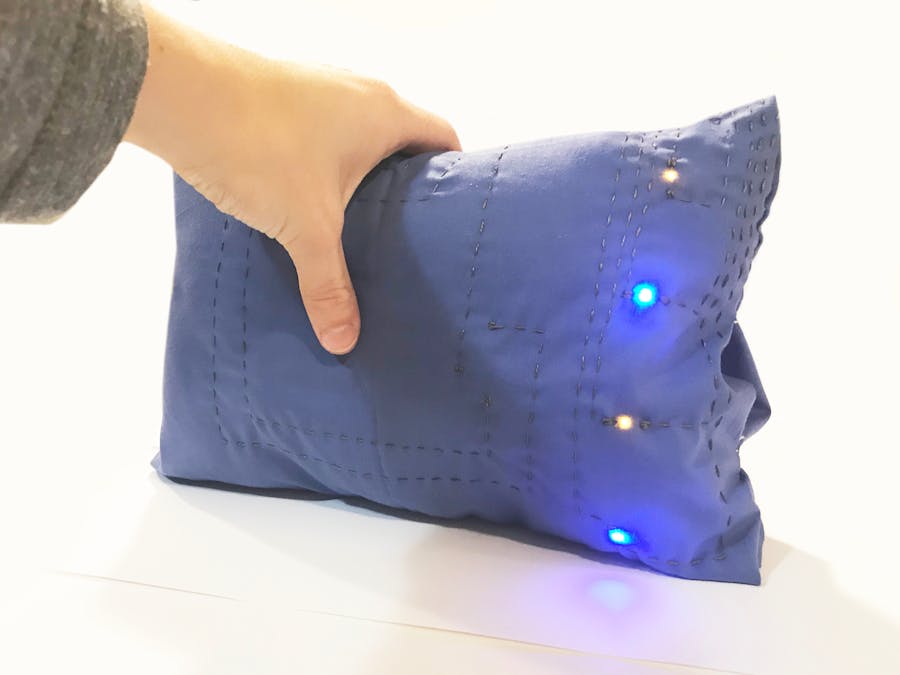
I was interested in learning more about working with force-sensing resistors and wanted to find a beneficial application where a person would have a logical reason to apply pressure to a portable textile. I decided to create a small pillow that would glow if hugged, and the harder a person squeezed the pillow, the more light would shine in the dark. The LEDs build up in designed series based on how hard the force-sensing resistor in the center of the pillow is pressed. I placed the series of LEDs on one side of the border of the pillow so they wouldn’t be covered if users were resting their heads on it.
Process:1. I bought materials to make the small pillow and used alligator clips to test my code using the schematic.
2. The connections between the pressure sensor (force sensing resistor) and the resistor were improved with a soldering iron.
3. I lightly sketched out my embedded design over the pattern for the pillow, avoiding overlapping paths. I didn't want any of the conductive thread to accidentally touch and interfere with my circuit. You can reference the schematic diagram which is much neater, but make sure the location of the LEDs match your code.
4. I attached my LilyPad board, pressure sensor, and four LEDs to the fabric using conductive thread. I attached the pressure sensor first, sewing the paths between the LilyPad and the sensor. I then sewed the four positive ends of the LEDs to the corresponding outputs to match my code (edit the series in the bargraphLED in your code to match the LED output locations that you choose), and then then sewing the negative paths to the LilyPad.
5. I sewed the borders of the pillow once I finished (and tested my progress) and added the stuffing. I left a small gap so the cable could reach the embedded battery to recharge and so I could easily turn the LilyPad on/off.
Final PillowWhen the pillow is pressed, hugged, or used the LEDs light up on the side of the pillow!


_3u05Tpwasz.png?auto=compress%2Cformat&w=40&h=40&fit=fillmax&bg=fff&dpr=2)


Comments