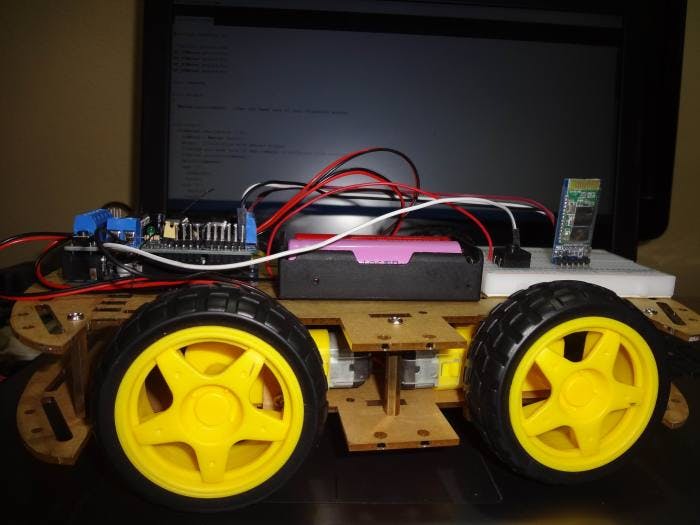
I have been working on this project for a couple of weeks. After learning the basics and doing small projects, I thought that now was the time to take things to the next level. I want to build something meaningful, and practical which is also enjoyable. So I thought why not just start with RC car. I researched the materials, read a lot of articles and watched countless tutorials. My plan was to keep it as simple as possible. So I’ve decided to share this small, unassuming and yet very educative project with you. This project is now in the initial state.
“Rain1” RC car -1
To build a awesome small car, you will need:
- Arduino UNO
- 4WD custom made chassis
- HC05 Bluetooth transceiver module with TTL outputs with Switch4WD custom chassis for robot
- (4x) DC 3V-6V dual axis gear reducer motor
- L293D Adafruit Motor/Stepper/Servo Shield for Arduino
- (2X) 3.7V Li-ion 18650 rechargeable battery (3000 mAh & 2600 mAh)
- 18650×2 battery case holder
- 70mm rubber tire wheel
- Mini switch
- Female to female jumper wire (I used breadboard because I don’t have it)
- Wire
- Male to male jumper wire
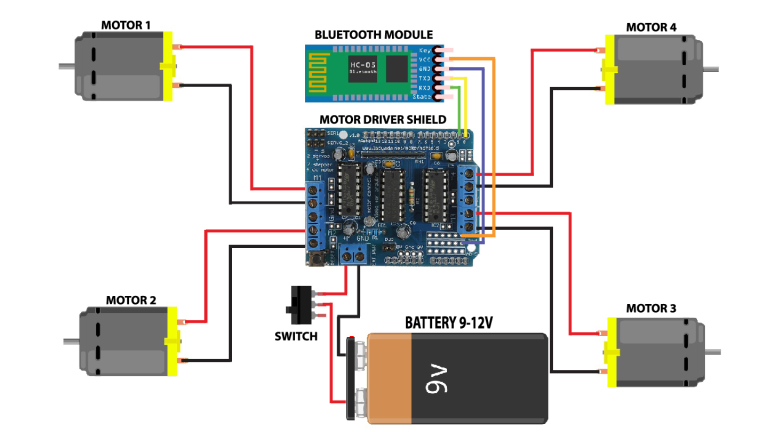
I mounted the motor shield on Arduino board and connected Bluetooth module to the Audino or directly to the shield by soldering on it to connect RX to TX, TX to RX, ground to ground, VCC to VCC as shown in the figure and also connect Motors to M1 (left) and M2 (right)
The choice was the L293D Adafruit Motor Shield Because there are 2 connections for 5V ‘hobby’ servos connected to the Arduino’s high-resolution dedicated timer. 4 H-Bridges: L293D chipset provides 0.6A per bridge (1.2A peak) with thermal shutdown protection, internal kickback protection diodes. Can run motors on 4.5VDC to 25VDC. Up to 4 bi-directional DC motors with individual 8-bit speed selection (so, about 0.5% resolution). Up to 2 stepper motors (uni polar or bipolar) with single coil, double coil or interleaved stepping. Pull down resistors keep motors disabled during power-up. Big terminal block connectors to easily hook up wires (18-26AWG) and power. Arduino reset button brought up top. 2-pin terminal block and jumper to connect external power, for separate logic/motor supplies
This part was super easy. I just found that on my local store. So I thought that would be very easy.
Step 5: Power SupplyConnect the 9 volt battery to the arduino board and you can also connect the 9 volt battery to shield through external power for increasing power supply to your motors. Remove the power jumper shown in the figure.
Step 6: CodeI will upload the code later in git repository. This project is now in the initial state. I have to make it more efficient.
Step 7: Controlling the Car with BluetoothFrom play store I downloaded the ‘Arduino Bluetooth RC Car’ apk and installed it. Switch on the car and connect the module using 1234 as the password. Then I clicked on gear shown in the app now “choose connect to car”. The red button blinking in the app will turn into green. Now I am connected to the car and play with it. Before uploading the code I removed the 5v or RX and TX pins from the Arduino which are connected to the Bluetooth module because there would have been problems in uploading the code if not.
Part 1
Part 2
My Social ChannelsFacebook: https://www.facebook.com/auvee12
Instructables: https://www.instructables.com/member/rafath.auvee/?cb=1561557854
Twitter: https://twitter.com/RafathAuvee
Instagram: https://www.instagram.com/rafath_auvee
Linkedin: https://www.linkedin.com/in/auvee/
My name is Rafath Bin Zafar Auvee. An enthusiastic, self-taught, motivated programmerI am studying Bachelor of Science & Engineering in Computer Science and Engineering at Bangladesh Army University of Science and Technology. For me, computer programming is love, passion, exploration & much more. Basically, I do a lot of self-made Arduino projects and solve problems in online Judge.In this blog, I will write about the work that I have done. View all posts by Rafath.


_ztBMuBhMHo.jpg?auto=compress%2Cformat&w=48&h=48&fit=fill&bg=ffffff)


Comments
Please log in or sign up to comment.