

Hardware components | ||||||
 |
| × | 2 | |||
 |
| × | 2 | |||
 |
| × | 1 | |||
 |
| × | 2 | |||
 |
| × | 1 | |||
 |
| × | 2 | |||
 |
| × | 2 | |||
| × | 2 | ||||
| × | 2 | ||||
 |
| × | 2 | |||
Software apps and online services | ||||||
 |
| |||||
RF-Messenger is a device which allows user to send short messages to the next peer and vice-versa. The way RF-Messenger works, is almost same as a Walkie-Talkie. Walkie-talkie is a half-duplex communication device. Multiple walkie-talkies use a single radio channel, and only one of them on the channel can transmit at a time, although any number can listen. Basically Walkie-Talkie broadcasts a message to all user listening on that channel.
The same way, the RF-Messenger works as well. Instead of recording and deliver the voice message like Walkie-Talkie, RF-Messenger uses quick short text message.
Functionality of RF-Messenger is very simple. It can be described as follows:
1. All the devices stay in receiving mode. Here the display attached to each unit shows the last received message.
2. While someone wants to send a message, they press a button for a second. After pressing the button, user can start typing the message and record it.
3. Then pressing "Enter" will deliver the message.
** Some points -
1. For ease of understanding, we will use two devices and simulate with it.
2. One device is powered with USB-TTL converter (The one connected with laptop).
3. The other device is powered from a transformer (6v-0v-6v) 600 mA. The output voltage is then regulated with 7805 voltage regulator.
Pictures illustrating how RF-Messenger works:
- Interfacing 16x2 LCD display withArduino/ATMega328p/ATMega16: The core part of RF-Messenger is the output display unit. That is basically a 16x2 LCD display. Following is the connection diagram and sample code -
- Adding keyboard input with Arduino and LCD display unit:
I used PS2 keyboard library to integrate with Arduino. The connection is very simple. First of all, the connection layout of PS2 keyboard:
Sample PS2 connection with Arduino:
But PS2 keyboards are difficult to find, that's why we will use USB keyboard. Pin out of USB keyboard is different from PS2 keyboard. That's why we will convert the PS2 connection to USB connection.
Which library to use with Arduino for keyboard support:
I have used this library to integrate keyboard with Arduino. First make sure that you have the PS2 to USB setup working as discussed in the earlier step.
Demo of keyboard integration with Micro-controller unit:
- IntegratingRF transmitter and receiver:
As each device has to receive and transmit messages at the same time, we will integrate both RF transmitter and receiver modules with the micro-controller. I will use 433Mhz RF transmitter and receiver.
Demo of RF transmitter & receiver integration with the unit:
Earlier we prepared a device which has keyboard, micro-controller and a display. We need to clone the same device. This way we will have two of them. Now, we will integrate a RF-Transmitter on one device and the other one will have a RF-Receiver. And we can communicate
It was one sided communication. Now, we need something which will enable us to create duplex communication. So that, users of both device can communicate with each other. We will use a button with pull-up resistor, which will config the device to go "Input message" mode from "Receiving" mode. After sending the message it will automatically return to "Receiving" mode.
- Both devices will have the same schematic diagram:
I have used ATmega16 micro-controller for final touch, more like a bare-bone version of Arduino Mega. It is only possible if you can burn the boot-loader and map the pins of arduino to the chip. Otherwise, the project works great with Arduino Mega.
And I haven't said much about supplied voltage. It is 5volts. You can place any power adapter, but the desired rating has to be 5volts. And ground has to be properly connected.
Happy Making!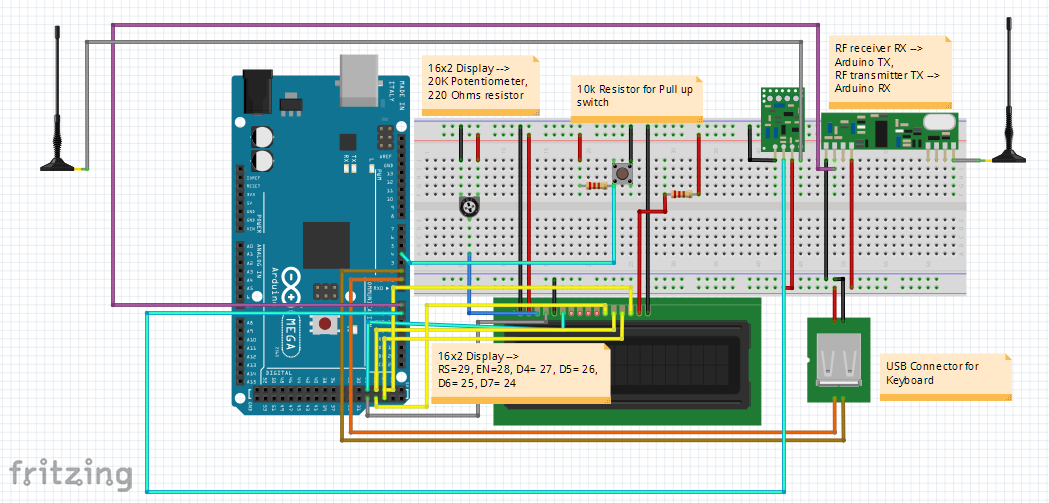


Comments