The Raspberry Pi Pico W, a microcontroller with built-in Wi-Fi, opens a plethora of possibilities for IoT projects, including the ability to control devices from anywhere in the world. In this tutorial, we will learn how to control an LED over the internet using a Raspberry Pi Pico W and dweet.io.
You can check out this video for more clarity on how we are going to do.
Let's complete how to control LED from Internet step by step:
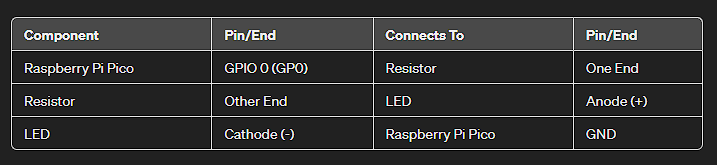
Step 1: Setting Up the Hardware- Connect the LED to the Raspberry Pi Pico W: Insert the LED into the breadboard. Connect the long leg (anode) of the LED to GPIO 0 of the Pico W through a 220-ohm resistor. Then, connect the short leg (cathode) directly to one of the ground (GND) pins on the Pico W.
- Power Up: Connect your Raspberry Pi Pico W to your computer using a Micro USB cable. The device should power up immediately.
Step 2: Installing MicroPythonTo control the Pico W from the internet, we'll use MicroPython, a lean and efficient version of Python designed for microcontrollers.
- Download the latest MicroPython firmware for the Raspberry Pi Pico W from the official website.
- Install the firmware using the Thonny IDE. Go to
Tools > Options > Interpreter, select MicroPython (Raspberry Pi Pico), and follow the prompts to install the firmware. Checkout this Getting Started Guide: How To Get Started with Raspberry Pi Pico
Step 3: Create Thing on DWEET.IO- Go to dweet.io website and click on Play
- Click on create a dweet for a thing
- Provide the thing name as "led_control"
- In the content provide
{ "value" : 1 } - To turn the LED ON
Step 4: Grab the thing URL from DWEET.IO- Click on GET request
- Provide the created thing name in the parameter "led_control"
- Click on Try it out!
- Grab the request URL https://dweet.io:443/get/latest/dweet/for/led_control
- Above URL you need replace in code if it's changed
Step 5: Grab the Code and Run- Download the sketch/code remote_controlled_led.py
- Open Thonny IDE and open the downloaded code
- Provide your SSID and PASSWORD in code
- Check if request URL for the thing is the same which you copied
- Run the application
- LED should be turned on as Value = 1 we have set
- Change the value on dweet.io e.g. "value" : 0 to turn off
If I have provided a real value for you, consider buying me a coffee☕
ConclusionYou've now set up a basic but powerful IoT application with the Raspberry Pi Pico W. This project can be the starting point for more complex applications, such as home automation systems, remote monitoring, and more.


Comments
Please log in or sign up to comment.