


Introduction:
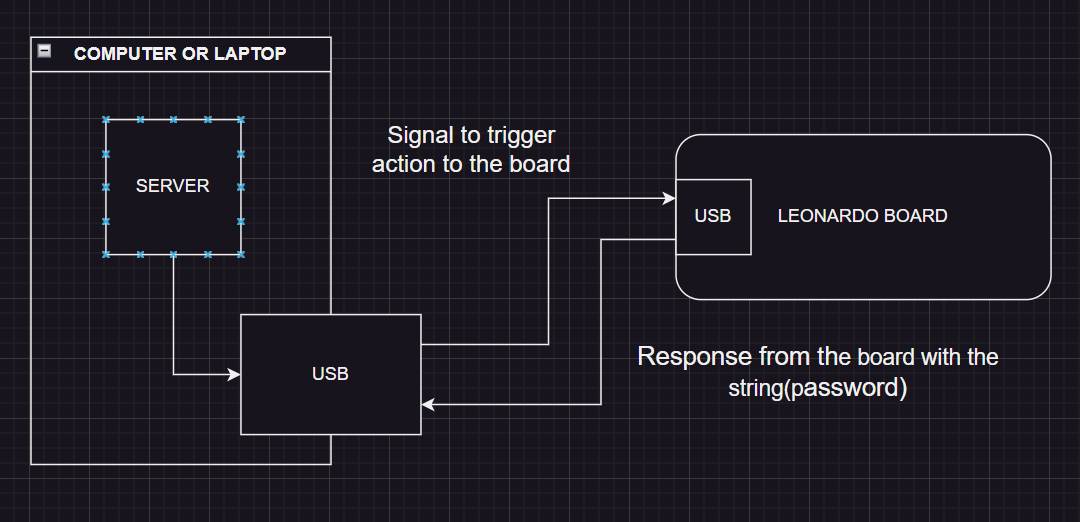
Welcome again to this new autoMate tutorial. In this video, I will continue the noMoreLoginSeries. In order to summarize what we have done in the previous video, I will say that we have programmed an Arduino Leonardo board to serve us as an automated login device, to log in aur computer by sending the password and clicking enter. As we stated back then, the device only makes sense in a secured environment, so we wanted to make it more bullet proof so to speak. And we are going to do that by coding a server that will run on our computer, that will control the Arduino Leonardo and instruct it to send the password instead of having a button. By doing this we will make the system more secure and will bring us the possibility to expand our remote control possibilities. Since our server can be controlled in its turn by many other remote devices. And how we are going to do this? well by using NODEJS language; simply because I think for scripting tasks this language comes very handy. Nodejs have many features and libraries that make it super fast and easy to play with. This server that I will show you, will be receiving signals through UDP protocol from external devices. And why UDP, well simply because is super easy to implement, and has a very good advantage which is that you don't need to provide an IP destination. As you may know with UDP you can broadcast signals and the servers listening will catch that signals and will react to them. Of course, using UDP have disadvantages as well but we will deal with them in future videos. Also, we will need a way to communicate with the Leanoardo board through the USB.
Let's get into it:
Supplies:
For this step of the noMoreLogins series, you will only need to install the NODEJS runtime environment. Bear in mind that you can install the NODEJS package manager as well. Once the environment is installed you will need to install the required libraries with the NPM tool. Here you have a tutorial for that. (SUPER FAST TUTORIAL)
Of course, you can achieve exactly the same with other programming languages, with more or less level of difficulty. For me NODEJS comes very handy for that exact reason: its simplicity.
NODEJS installer
Step 1: Libraries And SettingsSo to communicate with the Leonardo board we will use this library SerialPort. Take time to explore this incredible library as you will see, it has many features to do many things with devices through the USB. Bear in mind that you will have to install this version: serailport@10.5.0.
We will need two modules from this library the autoDetect:
const { autoDetect } = require('@serialport/bindings-cpp'), to find our device by the serial number.
and the serialPort:
const { SerialPort } = require("serialport"), to write messages.
In our case, instruct it to send the password back as a keyboard input as we saw in the previous part of this series.
As you can see in the code, we also import the libraries needed to communicate with UDP. We will configure a server and a client in order to receive and send messages. We will be using the IP library as well to get the local IP network.
By replacing the ending part of your local IP you will be able to broadcast to the entire local network.
Step 2: The CodeAs you can see we have two main parts in the code, we have the UDP configuration that sets the ports that we will be using and the actions that will be executing in the message reception. On the other hand, we have the serial port initialization and functions that will be finding the serial port (getSerialPathAndInit) and writing to that port (sendMessageToArdu). So basically, at the moment the program starts the function initSerial() is executed, and the binding module list the ports and executes the getSerialPathAndInit function. This function loops through the ports and finds our Leonardo board by serial number. You will have to modify this string in order to put the serial number of your board. You can know this serial number, by printing all the serial numbers of the located devices. (1)
Once the board is found, we initialize the serialPort object and assign it to the shared variable so it can be used by other functions. We set the behavior of the program in case of an error by doing this (2).
When an incoming message is detected by the server containing a certain string, an attempt to send a message to Leonardo is executed, the message will contain our password.
In this way, the password will not be stored on the Leonardo board but on your laptop or computer.
As you can see, also here, we handle possible errors. We do that basically just to do our code more resilient to certain situations. For example, if the USB got disconnected after being initialized. Or the serial port was never initialized, due to starting the program without the USB connected.
This situation will be handled by the program by re-initializing and resending the message.
Step 3: Arduino CodeNow that we know how to handle the server part we will be doing modifications to our Arduino Loeanardo sketch accordingly, in order to handle the incoming message from the computer. As you might remember we were sending the password at the button press. In this case, we will be listening to the serial in the Arduino loop by serial read string function and finally doing exactly the same as the button press was doing.
Step 4: The TestingYou will be probably asking your selves how can I test this. Well, basically we can do this with another piece of code that I have prepared for you. This NODEJS script that I called updServerClient is a very simple code that is able to send and receive UDP messages as well. And it will send whatever you type in the console where you executed the script. We will be using this script tool in future works since is very handy. For now, you will have to send what our server is expecting to execute its task. If you remember, we also configured a client on our server. This client will respond to a successful action. And finally, we will receive in our updServerClient that message that will let us know that everything went well. Of course, it will be more fun if you do it from another computer to let you know and feel the potential of this work we are doing.
Step 5: The FinaleThat is basically it, please let me know in the comments if you have any doubts. In the next video of this series, I will show you how you can send this UDP message from an Android device in a very practical way so you can log into your computer from your phone.
Thanks, and see you in the next one.


Comments
Please log in or sign up to comment.